Parf Guide System Review

[member=26002]squarecut[/member]

Nice idea - my only worry about all additional bits of kit or accessories is whether the accuracy be maintained. I will do some math on it.

[member=61231]HarveyWildes[/member]

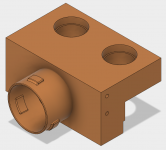
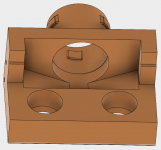
Yes, the 3 mm Guide should fit snugly in a 20 mm hole or a 25 mm hole depending on the way around. It has many uses, some of which we have not discovered yet !

Peter
 
What a great thread. [thumbs up] Loads of ideas being bounced around which is great for me as I just picked up the jig and some dogs from my (almost) local Axminster store.  [big grin]
First job is to replace my warped MFT top, it got damp while on a job and no one knows how (odd that one) so a moisture resistant top is on the agenda with some sort of sealer coat.

Rob.
 
Rob-GB said:
What a great thread. [thumbs up] Loads of ideas being bounced around which is great for me as I just picked up the jig and some dogs from my (almost) local Axminster store.  [big grin]
First job is to replace my warped MFT top, it got damp while on a job and no one knows how (odd that one) so a moisture resistant top is on the agenda with some sort of sealer coat.

Rob.

Hi Rob

A quick tip - put the sealer on before you start drilling the holes as the addition of sealer can make the material expand slightly in the holes. You can use almost anything to seal the MDF - water based varnish is good, polyurethane or even Osmo.

Good luck.

Peter
 
Peter Parfitt said:
A quick tip - put the sealer on before you start drilling the holes as the addition of sealer can make the material expand slightly in the holes. You can use almost anything to seal the MDF - water based varnish is good, polyurethane or even Osmo.

Good luck.

Peter

Thanks Peter, I have a ready source for Osmo worktop oil (having just fitted a kitchen for a friend who has a whole tin spare  [big grin] and the advice on coating pre-drilling is well worth mentioning...I was thinking along the same lines but wondered how much it might affect MRMDF (the Medite brand is my preferred choice, most of the others I have experienced are made to a price not a standard).

Rob.
 
1)Peter has a YoutTube video which I interpret to mean, one can drill a 20mm approximately 1” deep hole with the stock bit that comes with the Parf Guide System. The resulting 1” deep hole may then be used, as a guide, to “carefully” drill deeper holes in thicker workbenches. I have plans to make a 3” thick workbench top from German Beech. I am wondering if the described system is a reasonable approach to drilling 20mm dog holes in that thick a hardwood bench?

2)Lee Valley sells a 20mm bit that is 6” long, "with 3 5/8” of fluting”. The bit is designed to be used with a 20mm Dog Hole Bushing LV sells. This is about the only 20mm bit I am finding on line that I believe will drill a 3” deep, 20mm dog hole. According to the LV description the bit will only drill through 2” thick tops in conjunction with the bushing, which is typically installed in 1.5x ? lumber. I guess if I use it in the 1” deep 20mm hole made by the Parf bit, without the Bushing Guide, it might work? I know it want work in the Parf bushing. My favorite large bits turn out to be metric although they are marked in inches, made by Wood Owl (Ultra Smooth Tri Cuts). However, Wood Owl apparently makes 19 and 21mm bits, 7.5” long but not a 20mm. I am wondering if the LV bit, or some other bit I have yet to discover, will drill through the additional space below the 1” 20mm hole the Parf system makes?

3)Peter uses Medite Smartply, a moisture resistant MDF, to make his table tops. I have a height adjustable table/workbench I am working on that I may use a similar material on. My search for Medite Smartply seems to suggest that this product is only offered in European countries. I was impressed with the fact that drilling this material in Peter’s videos was producing actual shavings vs dust that got airborne. I am wondering if there is a similar product people use here in the US use to achieve similar results?

4)I already  own Veritas: Surface Clamp, Hold Down, Bench Anchors, Planing Stops, Bench Dogs, Wonder Dog. I also own a Festool table, Festool saws, Festool clamps...Will the LV items work in the slightly larger 20mm holes or do I need to drill holes for both size dogs?
 
Peter Parfitt said:
Hi Everyone

it is really important to use a dust extractor when drilling the 20 mm holes as cutting MDF (especially poorer grades) produces a lot of waste that clogs the cutter leading to an inaccurate cut, overheating and potential damage to the cutter.

I appreciate that some users have produced their own Extractor Port accessories to make it easier to use. I have been playing with several designs over the last few weeks and have now settled on what I think is the easiest to make yet most practical to use. Here is a picture of the finished prototype:

View attachment 1

The gadget can be attached in either 20 mm drilling position and it has a hose opening on both sides so it will suit both right and left handed users. It fits snugly on the 20 mm Guide Block and helps the user keep the Guide Block pushed flat on the bench top.

I am in the process of a making the video which I expect to be able to release within the next 5 days. The plans will be available once the video is live. It would take the average woodworker about an hour to make with an additional allowance for gluing time. It consists of 5 pieces of wood all of which require some form of 30 degree cut. Tools required are a 22 mm Forstner (but larger would do), a 35 mm Forstner (for a Festool 27 mm hose fit) and a screwdriver.

Peter

Whoa, hold the phone, you expect me to use a hand tool like a screwdriver
when I could use a nice Festool drill to drive those screws?  [big grin]

Seriously, I love your chip collector and think it's great. Hope to see the video soon.
 
Thanks for the information squarecut. Trying to locate one near me from the link you provided.
 
Made Peters' dust collection port for my PGS yesterday.

Turned out OK. I went to use the 35mm bit to drill out the bit of wood from the top piece that partially blocks the side ports and got to thinking there is not much there for the bit to work on. I decided using the jig saw might be easier so that's what I did. It was no trouble with the dust port clamped in the Workmate placing the face to be cut from flush with the top of the Workmate so I had plenty of support for the jigsaw.


Attachments

  • 20170806_121036[1].jpg
    20170806_121036[1].jpg
    1.4 MB · Views: 648
  • 20170806_121247[1].jpg
    20170806_121247[1].jpg
    1.4 MB · Views: 575
  • 20170806_121316[1].jpg
    20170806_121316[1].jpg
    1.3 MB · Views: 589
Hi Bob

Looks good. Getting the dust and chippings vacuumed away whilst drilling the 20 mm holes is essential as it speeds up the rate of cutting and helps to keep the cutter working efficiently.

Peter
 
When i finally got around to replacing my tabletop on my 80/20 work station, I had the same issues as squarecut.  However when I laid out the pieces, I found a solution for me at least, a lot closer as you can see below.

[attachimg=1]
[attachimg=2]

Insert the drill guide very carefully as you will find it the very tight fit necessary to assure the guide stays vertical while drilling.

[attachimg=3]

This might not work for everyone but as far as I am concerned it was fantastic.  To say that I am pleased with the result would be a gross understatement.

[attachimg=4]

Dick Perry
 

Attachments

  • DSC01402.JPG
    DSC01402.JPG
    98.4 KB · Views: 2,779
  • DSC01403.JPG
    DSC01403.JPG
    108.5 KB · Views: 2,785
  • DSC01405.JPG
    DSC01405.JPG
    113.9 KB · Views: 2,567
  • DSC01408.JPG
    DSC01408.JPG
    133.3 KB · Views: 2,697
greymann said:
When i finally got around to replacing my tabletop on my 80/20 work station, I had the same issues as squarecut.  However when I laid out the pieces, I found a solution for me at least, a lot closer as you can see below.

Insert the drill guide very carefully as you will find it the very tight fit necessary to assure the guide stays vertical while drilling.

This might not work for everyone but as far as I am concerned it was fantastic.  To say that I am pleased with the result would be a gross understatement.
Dick Perry

Hi Dick,

The 3 mm drill guide was designed to have more than one purpose in life.

Nice solution.

Peter
 
Hi All,

Quick PGS review and then a question/suggestion.

I've had my PGS for about a year now and thoroughly enjoyed working with it to create a custom MFT-like top to fit over my portable table saw. With a little bit of geometry (thank you Mr. Pythagoras), it makes the initial layout of a squared system so much easier than rulers and tick marks. It's not perfect, of course, and I echo some of the comments about keeping "in the moment" during repetitive processes and fussing with the 20-mm cutter. Overall, it's an excellent product and I'm sure that Peter is constantly "noodling" over improvements and tweaks (e.g., the dust hub). However, for those without access to the LR32 system the PGS can't be beaten. Keep up the great work, Peter!

Recently, I was able to purchase the LR32 system and have used it to make shelf/slide mounting holes in cabinetry.  I was so impressed with the line boring capabilities of the system that it made me wondered if there was a way to marry the PGS and LR32 approaches. Something like ... layout the 3-mm holes for parallel and square outside "columns" using the PGS rules to ensure basic geometry and then come back through with a 20-mm router bit in the LR32 to create the final product. I'm sure that someone else has thought of this before I. I was going to use the LR32 to fill in some 20-mm in my MFT that I left as 3-mm pilots, but I can't think of a simple approach to lock the LR32 system to the grid of 3-mm holes.

The first stage of the PGS results a grid of 3-mm holes which are easily verifiable to be square and accurate. The LR32 systems needs to lock-in in two directions (along the rail and perpendicular to the rail). Since the holey rail has a series of 5-mm holes that index the router plate along the rail, my first thought was to use 3-mm to 5-mm round shelf pins to align the rail to the grid. But the hole in the rail are offset to the centerline of the router so that the 20-mm grid would be shifted in relation to the rail edge. The LR32 rail offset bars have 5-mm pins that can be set to be aligned with the router centerline (e.g., as done during calibration), but 5-mm pins do not fit in 3-mm holes and there needs to be a way to lock-in the other direction (along the rail).

I think that with a little machining (e.g., 3-mm pins for the rail offset bars and 3-mm to 5-mm conversion pins for the rail itself), there could be a huge advantage to blending the layout strength of the PGS with the boring power of the LR32. Is there something (like a product idea) here? Or am I way off base? Happy to give away "idea" credits to someone with better machining capabilities in exchange for the final product. 
 
Peter Parfitt said:
Hi Bob

Looks good. Getting the dust and chippings vacuumed away whilst drilling the 20 mm holes is essential as it speeds up the rate of cutting and helps to keep the cutter working efficiently.

Peter

Hi Peter,

Your Parf Guide System is very handy. Hope to see a version for plunge routers.

Meanwhile testing some ideas to hold the vacuum hose in place as well as storage for the three registration pins and the drilling block -- which does double-duty here to reduce suction loss from the bushing on the side not being used to bore. Closing off the rectangular channel would also help.

Thank you.

John
 

Attachments

  • Capture1.PNG
    Capture1.PNG
    172 KB · Views: 409
  • Capture2.PNG
    Capture2.PNG
    168.4 KB · Views: 453
[member=63806]AndremG7[/member] wrote:  "...my first thought was to use 3-mm to 5-mm round shelf pins to align the rail to the grid..."

I thought the 5mm rail holes were slightly oblong to allow the pin in the router base plate to
enter/exit easily when boring shelf pin holes. This slight increase along the one axis could
affect your alignment unless I am not understanding how you intend to implement your plan.
I am just guessing but I thought someone had mentioned in another thread a couple months
ago that the holes were actually 5x7 mm slot and not a true 5 mm circular hole.
 
AndremG7 said:
Hi All,

Quick PGS review and then a question/suggestion.

I've had my PGS for about a year now and thoroughly enjoyed working with it to create a custom MFT-like top to fit over my portable table saw. With a little bit of geometry (thank you Mr. Pythagoras), it makes the initial layout of a squared system so much easier than rulers and tick marks. It's not perfect, of course, and I echo some of the comments about keeping "in the moment" during repetitive processes and fussing with the 20-mm cutter. Overall, it's an excellent product and I'm sure that Peter is constantly "noodling" over improvements and tweaks (e.g., the dust hub). However, for those without access to the LR32 system the PGS can't be beaten. Keep up the great work, Peter!

Recently, I was able to purchase the LR32 system and have used it to make shelf/slide mounting holes in cabinetry.  I was so impressed with the line boring capabilities of the system that it made me wondered if there was a way to marry the PGS and LR32 approaches. Something like ... layout the 3-mm holes for parallel and square outside "columns" using the PGS rules to ensure basic geometry and then come back through with a 20-mm router bit in the LR32 to create the final product. I'm sure that someone else has thought of this before I. I was going to use the LR32 to fill in some 20-mm in my MFT that I left as 3-mm pilots, but I can't think of a simple approach to lock the LR32 system to the grid of 3-mm holes.

The first stage of the PGS results a grid of 3-mm holes which are easily verifiable to be square and accurate. The LR32 systems needs to lock-in in two directions (along the rail and perpendicular to the rail). Since the holey rail has a series of 5-mm holes that index the router plate along the rail, my first thought was to use 3-mm to 5-mm round shelf pins to align the rail to the grid. But the hole in the rail are offset to the centerline of the router so that the 20-mm grid would be shifted in relation to the rail edge. The LR32 rail offset bars have 5-mm pins that can be set to be aligned with the router centerline (e.g., as done during calibration), but 5-mm pins do not fit in 3-mm holes and there needs to be a way to lock-in the other direction (along the rail).

I think that with a little machining (e.g., 3-mm pins for the rail offset bars and 3-mm to 5-mm conversion pins for the rail itself), there could be a huge advantage to blending the layout strength of the PGS with the boring power of the LR32. Is there something (like a product idea) here? Or am I way off base? Happy to give away "idea" credits to someone with better machining capabilities in exchange for the final product.
You might want to check out this guy's approach (very meticulous!) with the LR32.

Sent from my iPad using Tapatalk
 
I just tried out the Parf guide that I ordered from Lee Valley.  It worked just like your videos Peter.  Very well made and thought out. 

I had one problem.  I had a hard time finding the correct size screwdriver for the drill stop set screw. My U.S. screwdrivers did not fit well but I got the set screw to hold for about 20 holes.  Then it came loose and I tried a smaller screwdriver.  When I cranked it down much to my surprise it twisted in the screw slot and mutilated the screw.  Much to my surprise I found out the set screw was made from plastic.  But a quick trip to Home Depot and I was able to get a steel set screw replacement and am good to go now.
 
well, I've discovered why a plastic set screw was provided.  a metal screw mars the 20mm shaft.  Now where can I get a plastic setscrew?
 
Put a small piece of plastic or brass into the bottom of the screw hole and it will clamp the shaft and not mark it.
 
Back
Top