You are using an out of date browser. It may not display this or other websites correctly.
You should upgrade or use an alternative browser.
You should upgrade or use an alternative browser.
Please Help Identify - Festool Accessory
- Thread starter deepcreek
- Start date
Michael Kellough
Member
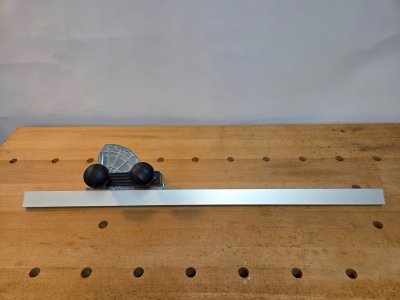
There should also be a black plastic part that goes on the far end to clamp the end of the fence to the rail that surrounds the MFT.
That setup works well for me. I tried the newer generation rig and didn’t like the looseness.
That setup works well for me. I tried the newer generation rig and didn’t like the looseness.
tjbnwi
Member
- Joined
- May 12, 2008
- Messages
- 7,400
The MFT 3 utilizes the same style clamp at the end of the fence.There should also be a black plastic part that goes on the far end to clamp the end of the fence to the rail that surrounds the MFT.
That setup works well for me. I tried the newer generation rig and didn’t like the looseness.
Tom
Michael Kellough
Member
Thanks for that, I don’t have one and was too lazy to look up a photo. If it ain’t broke don’t fix it works for me.The MFT 3 utilizes the same style clamp at the end of the fence.
Tom
The thing I tried was something Uncle Bob Marino sent that fit in the frame and slid forward onto the table (of the MFT 1080) so that the protractor was on an arm and a short fence was attached to the protractor. There was too much flex to be reliable. Maybe it was something they were they were trying out while developing the MFT 3.
tjbnwi
Member
- Joined
- May 12, 2008
- Messages
- 7,400
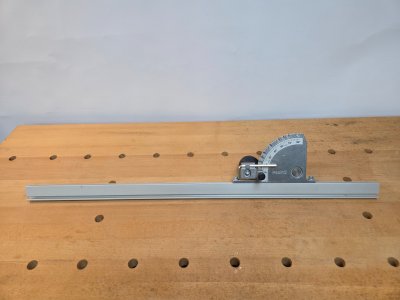
At the shop now, here’s a picture of the “clamp” in use.Thanks for that, I don’t have one and was too lazy to look up a photo. If it ain’t broke don’t fix it works for me.
The thing I tried was something Uncle Bob Marino sent that fit in the frame and slid forward onto the table (of the MFT 1080) so that the protractor was on an arm and a short fence was attached to the protractor. There was too much flex to be reliable. Maybe it was something they were they were trying out while developing the MFT 3.

Tom
Michael Kellough
Member
That looks like what I remember of the piece Bob sent. It just just connected to the top of the rail differently, since the rails changed.
But don’t you find that fence too short?
Really impressed by how crisp and clean the cuts in that mdf is!
But don’t you find that fence too short?
Really impressed by how crisp and clean the cuts in that mdf is!
tjbnwi
Member
- Joined
- May 12, 2008
- Messages
- 7,400
The fence is very solid with the clamp on it. The real advantage to the side rails is, the V profile allows for connecting other items to the MFT accurately.That looks like what I remember of the piece Bob sent. It just just connected to the top of the rail differently, since the rails changed.
But don’t you find that fence too short?
Really impressed by how crisp and clean the cuts in that mdf is!
I do not feel the fence is to short, if I need it to be longer I install a Kapex UG wing on the MFT. Think about how short the contact area on a miter saw fence is yet we expect accurate cuts.
Tom
Michael Kellough
Member
I meant too short in the other direction. The big gap between the right end of the fence and the rail.
Seeing this photo I now remember that my interest in this (18 years ago?) was that the protractor can be moved back closer to the rail (than the MFT 1080 protractor).
Seeing this photo I now remember that my interest in this (18 years ago?) was that the protractor can be moved back closer to the rail (than the MFT 1080 protractor).
tjbnwi
Member
- Joined
- May 12, 2008
- Messages
- 7,400
I believe I set it that way to get the stop where I needed it. Was to lazy to put the UG ewing on it for the few cuts that were necessary.I meant too short in the other direction. The big gap between the right end of the fence and the rail.
Seeing this photo I now remember that my interest in this (18 years ago?) was that the protractor can be moved back closer to the rail (than the MFT 1080 protractor).
Tom
Michael Kellough
Member
The solution is always a compromise between what “should” be done and what we feel like doing, or have time for.I believe I set it that way to get the stop where I needed it. Was to lazy to put the UG ewing on it for the few cuts that were necessary.
Tom
Similar threads
- Replies
- 13
- Views
- 1K
- Replies
- 18
- Views
- 954
- Replies
- 5
- Views
- 2K
- Replies
- 23
- Views
- 3K
- Replies
- 10
- Views
- 1K