You are using an out of date browser. It may not display this or other websites correctly.
You should upgrade or use an alternative browser.
You should upgrade or use an alternative browser.
Plexiglass router template
- Thread starter ear3
- Start date
- Joined
- Feb 22, 2016
- Messages
- 2,858
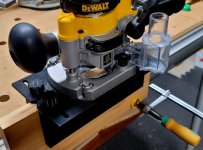
It's no where near as nice as the plexiglass one ear3 made but it will work.
Honestly it takes way too long to print. I used some fast print settings and
it was still over 7 hours for the three pieces plus 2.5 hours for the knobs.
Probably could have made a dozen or more with the SO in less time and had
a much better product in the end.
I beveled the end centering notches to make it easier to align with the layout line.
Dust collection worked very well, only a smidge of dust left in one corner of
the mortise.
This version will handle stock from 1/2" to 3-3/4" wide.
I'm working on a version that will automatically center on the workpiece.
Attachments
- Joined
- Oct 16, 2015
- Messages
- 5,830
festal said:[member=58857]Crazyraceguy[/member] which ones did you get? from mcmaster links?
what size of 1/2" plexiglass sheet is needed?
I just got them from Amazon. 1/4-20 barrel nuts, but this project just got "back burnered". I just got a second order of picture frames. This is essentially a repeat of the first order, from a couple of weeks ago. It's a "friend of a friend" type thing, local artist. She commissioned a bunch of them for an outdoor show/festival and it went so well that she wants more.
Along with 50 hour work weeks, means zero free time, for a while.
luvmytoolz
Member
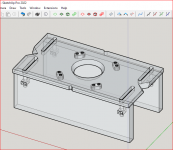
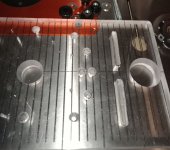
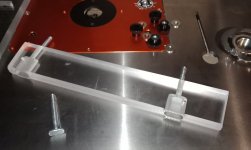
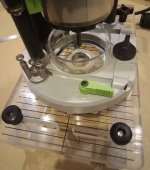
Inspired by others I finally got cracking last week and today finished my own version of the trenching aid. As I do love to over engineer things though I made it all from 20mm thick perspex, and made the base 350 x 200 instead the standard 300 x 140, as I really want the stability as high as possible.
I used the DF700 to cut some holes to insert the t-bolts, which are each held in place by a grub screw. I cut the holes deep for the bolts as this will help greatly with stopping movement and keeping the guides rock solid in use.
I made the centre hole an exact fit for the template ring to make centering the OF14400/OF2200 a breeze. I also used a 22deg cutter to flare the underside of the centre and dust extraction holes. This will allow me to cut a dust extractor tube down and flare it underneath to lock it in place.
For the guides I made the bolt holes at one end a tight fit, but the other end 1mm larger to allow for easier adjustment in use.
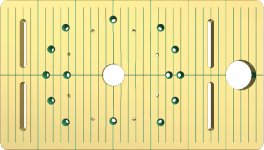
The two circular sets of large holes are for different positions for the OF2200. Fitting the OF1400 is a bit trickier, as the large holes in the routers base aren't symetrical like the OF2200, so I had to opt for two possible positions only for the OF1400, but I think they will work fine.
I'm thinking of making another base to suit the biggest template guide that the OF2200/OF1400 support in case I want to use really wide profile cutters for some reason, but dunno, maybe. maybe not. Never had the need till now, not sure if I ever will, but always nice to have choice.
I used the DF700 to cut some holes to insert the t-bolts, which are each held in place by a grub screw. I cut the holes deep for the bolts as this will help greatly with stopping movement and keeping the guides rock solid in use.
I made the centre hole an exact fit for the template ring to make centering the OF14400/OF2200 a breeze. I also used a 22deg cutter to flare the underside of the centre and dust extraction holes. This will allow me to cut a dust extractor tube down and flare it underneath to lock it in place.
For the guides I made the bolt holes at one end a tight fit, but the other end 1mm larger to allow for easier adjustment in use.
The two circular sets of large holes are for different positions for the OF2200. Fitting the OF1400 is a bit trickier, as the large holes in the routers base aren't symetrical like the OF2200, so I had to opt for two possible positions only for the OF1400, but I think they will work fine.
I'm thinking of making another base to suit the biggest template guide that the OF2200/OF1400 support in case I want to use really wide profile cutters for some reason, but dunno, maybe. maybe not. Never had the need till now, not sure if I ever will, but always nice to have choice.
Attachments
ear3
Member
[member=75933]luvmytoolz[/member] Nice work. Good call as well on adding the dust extraction port, which I skipped when building mine. It's not an issue when routing a through dado/groove that starts at the edge of the board (such that the chips shoot out the back), but I have found if I am doing a stopped groove that I have to start mid board with a plunge, the initial, trapped sawdust can get really hot, to the point where I have checked the bag afterwards just to make sure there were no smoking embers.
luvmytoolz said:Inspired by others I finally got cracking last week and today finished my own version of the trenching aid. As I do love to over engineer things though I made it all from 20mm thick perspex, and made the base 350 x 200 instead the standard 300 x 140, as I really want the stability as high as possible.
I used the DF700 to cut some holes to insert the t-bolts, which are each held in place by a grub screw. I cut the holes deep for the bolts as this will help greatly with stopping movement and keeping the guides rock solid in use.
I made the centre hole an exact fit for the template ring to make centering the OF14400/OF2200 a breeze. I also used a 22deg cutter to flare the underside of the centre and dust extraction holes. This will allow me to cut a dust extractor tube down and flare it underneath to lock it in place.
For the guides I made the bolt holes at one end a tight fit, but the other end 1mm larger to allow for easier adjustment in use.
The two circular sets of large holes are for different positions for the OF2200. Fitting the OF1400 is a bit trickier, as the large holes in the routers base aren't symetrical like the OF2200, so I had to opt for two possible positions only for the OF1400, but I think they will work fine.
I'm thinking of making another base to suit the biggest template guide that the OF2200/OF1400 support in case I want to use really wide profile cutters for some reason, but dunno, maybe. maybe not. Never had the need till now, not sure if I ever will, but always nice to have choice.
luvmytoolz
Member
ear3 said:[member=75933]luvmytoolz[/member] Nice work. Good call as well on adding the dust extraction port, which I skipped when building mine. It's not an issue when routing a through dado/groove that starts at the edge of the board (such that the chips shoot out the back), but I have found if I am doing a stopped groove that I have to start mid board with a plunge, the initial, trapped sawdust can get really hot, to the point where I have checked the bag afterwards just to make sure there were no smoking embers.
Thanks, yeah I was thinking about the dust buildup, and i think I might run a 1/2" groove on the router table between the center hole and the dust port, so dust has somewhere to go. I still have the centerline either side of the holes, so it won't affect centering the jig in use.
Cheese
Member
A very nice job...a couple of questions.
1. Have you used it yet and if so how scratched up do the perspex side panels get?
2. How did you heat swage the dust exhaust port in?
3. What did you do to highlight all of the parallel lines on the top?
1. Have you used it yet and if so how scratched up do the perspex side panels get?
2. How did you heat swage the dust exhaust port in?
3. What did you do to highlight all of the parallel lines on the top?
luvmytoolz
Member
Hi Cheese, I haven't used it yet as I'm waiting on the 6mm C/S screws to arrive, but I have a table I'm working on so as soon as they hit I'll be testing it, I do expect being perspex it's get pretty scratched up, but that doesn't really matter.Cheese said:A very nice job...a couple of questions.
1. Have you used it yet and if so how scratched up do the perspex side panels get?
2. How did you heat swage the dust exhaust port in?
3. What did you do to highlight all of the parallel lines on the top?
I haven't fitted the dust port yet, I was all set to cut up a Festool tube, but I might check at Bunnings first as I suspect a PVC elbow might work out perfect. With a heat gun they're pretty easy to get soft and malleable, so I'll turn up a small wooden cone to give it the shape it needs once done so it should be able to swivel as well.
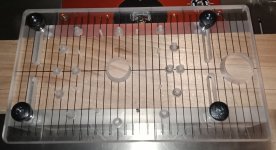
For the lines, I just brushed in a cheap water based acrylic paint, and when it was dried I used a plastic scraper to clean up the lines outside the base. I find acrylic paints really stick well to grooves in perspex.
Cheese
Member
Thanks for the info [member=75933]luvmytoolz[/member] I'm very interested in seeing the finished swiveling dust port.
Packard
Member
Why clear? Phenolic sheet is much tougher and accepts fasteners well.
From my experience, vendors who sell acrylic sheet also sell phenolic sheet.
In the tool room where I used to work, they often produced gages and fixtures from phenolic; never from acrylic.
I don’t see how the see through capability is particularly useful for this application. Maybe I am missing something.
- Joined
- Feb 22, 2016
- Messages
- 2,858
Packard said:Why clear? Phenolic sheet is much tougher and accepts fasteners well.
From my experience, vendors who sell acrylic sheet also sell phenolic sheet.
In the tool room where I used to work, they often produced gages and fixtures from phenolic; never from acrylic.
I don’t see how the see through capability is particularly useful for this application. Maybe I am missing something.
So you would be OK with the 3D Printed version I showed in my previous post.
Packard
Member
I think the difference is going to boil down to durability vs elegance.
Phenolic is much stronger than cast acrylic and cast acrylic is much stronger than 3d printed parts.
It also depends on what kind of fabricating equipment you have. Maybe a semi-disposable 3d printed version will be cost-effective compared to a machined acrylic or phenolic version.
The machining seems like mostly drilling. I was only comparing the materials: acrylic vs phenolic. If the clarity offered some advantage, then the acrylic would be my choice. But I don’t see the advantage the clarity offers. In that case, I would use the phenolic.
Thirty years ago, I used acrylic sheet for router table inserts and then later phenolic sheet. And then later I bought a machined aluminum plate. The ability to see through the insert was immaterial to the function.
Note: My best option was to thin out the area where the router mounted and then use no insert. I guess it depends on how you adjust the depth of cut on the router.
In any case, it seems that you also concluded that clarity is not a design factor.
(Also, plexi scratches easily and looks like crap after a few cuts. Another reason not to use plexi. I suspect that many people don’t use phenolic just because it does not come to mind as easily as acrylic.)
luvmytoolz
Member
Packard said:The machining seems like mostly drilling. I was only comparing the materials: acrylic vs phenolic. If the clarity offered some advantage, then the acrylic would be my choice. But I don’t see the advantage the clarity offers. In that case, I would use the phenolic.
Thirty years ago, I used acrylic sheet for router table inserts and then later phenolic sheet. And then later I bought a machined aluminum plate. The ability to see through the insert was immaterial to the function.
Note: My best option was to thin out the area where the router mounted and then use no insert. I guess it depends on how you adjust the depth of cut on the router.
In any case, it seems that you also concluded that clarity is not a design factor.
(Also, plexi scratches easily and looks like junk after a few cuts. Another reason not to use plexi. I suspect that many people don’t use phenolic just because it does not come to mind as easily as acrylic.)
I don't see how a router table insert compares to a routing jig? A router table insert is a stationary device with all work done above the insert so it could made from moon rock for all that matters, whereas with a jig all the work is done underneath the device, so for me personally, I absolutely want to be able to see what I'm machining. And being clear the alignment lines make positioning fool proof.
I've been using perspex and polycarb jigs and fixtures for decades, and while they do get marks and scratches, I've never had any become even close to unusable because of them.
- Joined
- Oct 16, 2015
- Messages
- 5,830
Plus, you can polish it back to where it was anyway.
luvmytoolz
Member
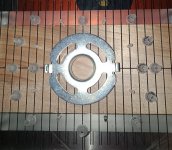
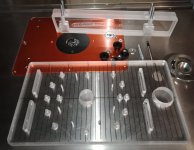
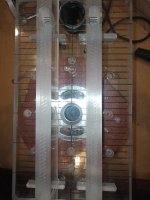
Ok so the bolts finally arrived by slow boat from another state, but as I kept forgetting to pick up a PVC elbow Bunnings as the size looks perfect, I ended up sacrificing a dust hose converter I had lying around. I've been to Bunnings twice to get it but as usual got sidetracked by all the pretty things and came out with other stuff!
I simply heated it with a heatgun until the surface started to get that crazed look, then shoved it in the hole and used a large wooden dowel with the end sanded to shape it to the flared opening of the hole. Worked a treat. I'll probably replace it with an elbow if I ever remember to get one.
Screws fit absolutely perfectly, might even be so tight I don't need to use the 30mm centering guide, I'll have to test that for accuracy though. One change I think I would make would be to add an extra set of holes for the OF2200 to get the router pretty much aligned straight with the guide instead of slightly angled as it is now.
For anyone building one, I think it definitely benefits from being a bit wider, just gives so much support.
Attachments

- Joined
- Feb 22, 2016
- Messages
- 2,858
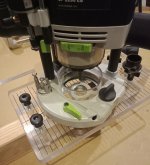
I like how you attached the hose connection but I don't see how this is collecting chips from the cut area since the dust hose connection is offset from the bit and I don't see a path for chips between the two. Maybe it's not visible in the photos but I don't see it.
Without a path between the hose and the cutter nothing will be extracted until the hose passes over the cut area. So that first few CM will be packing chips in the cut as they have no place to go.
If I am missing something please explain.
Without a path between the hose and the cutter nothing will be extracted until the hose passes over the cut area. So that first few CM will be packing chips in the cut as they have no place to go.
If I am missing something please explain.
luvmytoolz
Member
Nope your dead right Bob! In my earlier post a while back I mentioned I was going to machine a groove down the centre, just haven't got around to it yet. I'm thinking of making a new one however as I have been using it and think it can be improved upon.
While grooving wide boards the stability is great, but when doing very narrow boards (
While grooving wide boards the stability is great, but when doing very narrow boards (
luvmytoolz
Member
Bob D. said:"In my earlier post a while back I mentioned I was going to machine a groove down the centre, just haven't got around to it yet."
Sorry, I must have missed that.
Sorry mate, I wasn't having a go at you, hope it didn't come across that way!
Similar threads
- Replies
- 6
- Views
- 596
- Replies
- 2
- Views
- 392
- Replies
- 10
- Views
- 732
- Replies
- 9
- Views
- 723