Plywood for Long Structural Legs/Frame

Bodenham

Member
Joined
Jan 8, 2017
Messages
2
Hi all

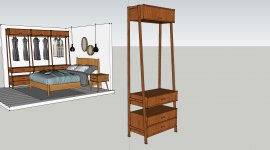
I'm new to the forums and I'm after a big of advice for a set of open plan wardrobes I'm designing. They're in a mid-century style and have some design features similar to West Elm's mid-century range of furniture.

I would like to use a 22mm plywood to create this design, including the frame.

[attachimg=1]

The large verticals of the frame would be cut to approx. 2350 length and 50mm wide finished with a radius edge of 4-5mm. As you can see from the images, there will be three horizontal supports along the length, but for design purposes, a distance of 1500mm will be unsupported where the clothes hang.

Will plywood be strong enough to make the frame, and will it resist bending/swaying? The angle of the front frame leg is 4 degrees.

I'm happy to build a French-cleat into the design to secure the top of the wardrobe to the wall behind and limit the amount of load onto the frame. At worst, a four section of horizontals could be built into the design for stiffness.

If plywood would do the job, would there be any particular grade you might recommend?

Thanks in advance

Ciaran


Attachments

  • wardrobe-full.jpg
    wardrobe-full.jpg
    997.6 KB · Views: 746
You are right in thinking plywood is not strong enough to support and secure the upper cabinet.

Your idea of securing the upper cabinet is good. A french cleat would work if you could accurately engage it but that will be almost impossible. A much more practical solution is to use screws to secure the cabinet to the wall. If not inside then add a discrete cleat or bracket to the top that screws could pass through into the wall.
 
Plywood is laminated to be strong in 2 directions.
However the long boards only need strength in 1 direction, so you are giving up strength.

Therefore I would suggest real wood for the long boards, and reserve the plywood for the box parts.
 
Nice design.

Bodenham said:
Will plywood be strong enough to make the frame, and will it resist bending/swaying? The angle of the front frame leg is 4 degrees.

A strip 50mm x 22mm will be too flexible to actually resist swaying left/right if it is the only support for the top cabinet  A piece of hardwood that dimension would fair a bit better. Without a french cleat I would use blackened square steel tube or square steel tube veneered with wood etc.

Bodenham said:
I'm happy to build a French-cleat into the design to secure the top of the wardrobe to the wall behind and limit the amount of load onto the frame. At worst, a four section of horizontals could be built into the design for stiffness.

This would work and basically render the supports as decorative legs basically supporting the base cabinets. The only critical area is between the top of the bottom cabinet and the bottom of the top cabinet I am not sure it's going to be an issue if the top cabinet is supported with a french cleat.

Bodenham said:
If plywood would do the job, would there be any particular grade you might recommend?

Birch plywood or a high quality cabinet grade plywood with no voids.
Tim
 
Hi Ciaran,
Very nice design. If you want to use plywood, go with Baltic Birch grade B for the cabinet pieces and real natural birch for the vertical pieces. As you have 3 sperate units, I would screw them to the wall in the upper cabinets. Once you throw some clothes in it, you'll never see the screws. You could also countersink the screws, make some birch plugs from the scraps you will have and fill in the screw holes. Use a japanese flush cutting saw to flush cut the plugs.
The important thing with screwing the uppers to the wall is that you will prevent buckling, over time, of the vertical pieces when they are loaded with stuff. Plus it would be a safety features as well.
My 2 cents,
JC
 
Thank you all for the kind comments on the design and especially your advice. I'll likely go down the route of using solid birch for the legs and now will design a system of either screwing to the wall or using a French cleat.

[member=297]Michael Kellough[/member], I'm interested in why it would be difficult to get the cleat to engage. Do you have an example or further explanation for me, please?

Thanks again.

Ciaran
 
A French cleat is fine for a single wall cabinet. More difficult for three cabinet that should hang flush together. Nearly impossible when the lower extremities should also reach the floor.

The cleats on both the wall and cabinet backs have to be perfectly oriented (matched) in three axis. The floor needs to be dead level and square to the wall.

If I were installing cabinets of that (cool looking) design I'd leave the legs a little long to allow for scribing to the floor and install them from the corner out. If the corner is the highest point I'd cut the legs short enough to allow the other cabinets to also be level and even with the first.

Before Installing the cabinets I'd map out the studs and add brackets to the back of the upper cabs so screws could be used to carry the load sparing the spindly plywood web joining the upper to lower cabs. (I highly recommend making that web out of solid wood.) Shims will be needed to fill the inevitable space between the bracket and the wall.

While I appreciate the design I would (personally) leave out the web and make and install the cabinets (upper and lower) as separate banks. I'd go further and make both upper and lower as continuous units. (Better chance of getting French cleats right that way too.) Once installed the outer web elements could be added via screws from inside the boxes after scribing as needed..
 
Michael Kellough said:
A French cleat is fine for a single wall cabinet. More difficult for three cabinet that should hang flush together. Nearly impossible when the lower extremities should also reach the floor.

With a hanging system such as Libra-h7 you can adjust the cabinets to line up. Then you can add the legs so they meet the floor etc.
Tim
 
Michael Kellough said:
A French cleat is fine for a single wall cabinet. More difficult for three cabinet that should hang flush together. Nearly impossible when the lower extremities should also reach the floor.

The cleats on both the wall and cabinet backs have to be perfectly oriented (matched) in three axis. The floor needs to be dead level and square to the wall.

If I were installing cabinets of that (cool looking) design I'd leave the legs a little long to allow for scribing to the floor and install them from the corner out. If the corner is the highest point I'd cut the legs short enough to allow the other cabinets to also be level and even with the first.

Before Installing the cabinets I'd map out the studs and add brackets to the back of the upper cabs so screws could be used to carry the load sparing the spindly plywood web joining the upper to lower cabs. (I highly recommend making that web out of solid wood.) Shims will be needed to fill the inevitable space between the bracket and the wall.

While I appreciate the design I would (personally) leave out the web and make and install the cabinets (upper and lower) as separate banks. I'd go further and make both upper and lower as continuous units. (Better chance of getting French cleats right that way too.) Once installed the outer web elements could be added via screws from inside the boxes after scribing as needed..

This type of stuff is exactly what makes installations of cabinets from a job to a craft to an art form.

I would listen to Michael on this, his comments reflect things a person can only learn by doing hundreds of installations. I agree there are a few ready made hardware hangers, even so it's not as simple as it seems. His comments about layout, scribing, etc are still going to have to happen.

I don't want to talk about the time I didn't take enough care to find the high spot in the floor properly and took for granted the corners were square. I guess I will talk about it a bit. Guess what happens when you get to the last run of cabinets and find you didn't choose the the proper high spot(by more than 2"!) and the last corner isn't square. Yep, you pull half the 100 grand in bathroom cabinets out and start from scratch. That little fiasco cost me the profit on that portion of the job and the realization that I liked making cabinets, installing them not so much. I don't think I have hung a cabinet other than my won since that job.
 
I have not done "hundreds of installations" but I learned all I need to know on my first experience with French cleats.

It was an art installation in a renovated factory building in Soho in 1978. The walls were not ideal but the objects were perfect so all I had to do was figure out how to make the wall cleats perfectly meet the hidden cleats in the back of the "box". It wasn't easy but it was instructive.

These are a small subset of the things I was installing. This is another much later installation and if you look closely you'll see that this installation is flawed. Either the boxes are not on the same level or they are all individually out of level.

DJDZLSHOW2013-11-L.jpg


The reason French cleats were used in this piece is that the complementary bevels pull the box tight to be wall. To repeat, the cleats need to be well matched to work right and when there is more than one piece to be installed it can get difficult.
 
Back
Top