Pocket Hole Joinery

None of this is "proper joinery," though, is it?

After all, it's got metal in it - and new-fangled glue that's never seen the innards of an animal in its life. Cheating, I calls it..

Proper joinery is done with melted rabbits feet and fish heads applied with a wild-boar hair brush to a joint that's clamped together with bows and double-strings twisted together with a stick.. without plans. Story sticks handed down from your Prentice Master are allowed so long as they don't need reading or writing to use 'em.

The worst culprit is electricity. Proper woodwork should be done in a cold shed by candlelight, or maybe oil lamps. Without power tools you can keep warm with a bottle o' gin without any worries of losing the odd appendage. If you gash yourself with a chisel, just pour a drop  o' the gin on it. Multi-purpose. Helps light the oil lamps too if you're desperate.

Kiln-dried wood? what's all that about, then? Rush, rush, rush... what's wrong with waiting a season or five?
If God had meant us to use boards to make things he'd have designed trees to be wide and flat like they are in Sweden.

All this argument about millimetres versus inches... they're ALL rubbish. Do it by eye, or use cubits if you're telling someone else how to make stuff. Precision is intrinsic in the harmonious relationship between a carpenter and his materials. If you need a straight line, a piece of stretched string is perfectly adequate. If it's not tight enough, pour some gin on it.

You call all this gadgetry and motorised flim-flammery progress?

Umm..it has certain advantages.
 
I agree with all of you in some form or fashion.  I have the older K-something (10+ yrs old) and a newer K something I bought last week from Lowes when I left my old one at home.  I also have the older,  all metal electric Foreman and love them all.  However, Kreg clamps do sorta suck.  They aren't too bad when they are new but after they are used a bit they REALLY won't hold.  And that 90 degree clamp thing I bought (theres a pic above in an earlier post) is completely worthless.  I use a domino with the pocket screw placed right beside it for all my joinery other than face frames.  Zero movement.
For faceframes I use a MFT type table I built and use the Festool ratcheting type clamps (whatever they are called) and they work much better than the Kreg.  The other thing I've done is stopped using an impact driver and started using a regular drill/driver where I can actually feel when I'm over-tightening which causes the material to walk.
 
Love the K3 and K5 (Front clamp and dust collection).

Material walking while driving the screws is always a problem.  The Kreg, 90 degree, the Kreg right angle and the UJM (Rockler here in the US), all wonder abit if the material is not sufficiently braced, especially for case goods.    Lots of setup time is needed to make sure things get set into clamping fixtures, and then get clamped that way, for the final assembly, usually minimizes the problem.  This is all part of the fun in making basically a butt joint. 

I've done a lot of tool carts, special purpose industrial workstations, plus cabinets, and drawers with the Kreg over the years,  It's great for what it does.    But it is just another tool in the tool box.  There are still times I use dowels, splines, and biscuits, with a touch of a 23gague pin nail, just to make sure in putting things together.  For all of it's value, sizes, and speed, the Domino is still a lose tenon joint maker, but it fits well into the Festool way of doing things for an onsite, custom built integrated tool system. 

So the point here is what is the level of craftsmanship that you want to use on the project at hand, and what will allow you to get that done, with the tools at hand.  The Kreg sits above the MFT/3, right next to the Domino, within arms reach +3 inches.  The dowel, biscuit, and beadlock materials are all within two arms lengths of the MFT/3.  And usually before I start a project,  I walk through the build steps, so I know what tools need to be stacked into place, at what time, so that they are easily reached. when needed.  Sorry I have a small show now, So having thing modular and mobile are very important.
 
I took the hit and purchased the Kreg Foreman, it was worth every penny. You can blast out pocket holes at the speed of light with it.

As far as alignment is concerned I use dado's and rabbit's then Kreg pocket/screw the panel that sits in them into them. I just finished my new router table cabinet using that method and the alignment is perfect. I did incorporate the use of a few parallel clamps to keep things tight while screwing and gluing.

I would go to the Domino but I need to recover from the CT36, TS55, 800mm, 1400mm, 3000mm, RO150, ETS150-3 along with a bunch of accessories first......
 
Thanks for all the comments guys!

I don't have a specialist clamp for the pocket holes, but when doing edge screwing, I put a straight edge and a clamp on the side that the screws are being drilled towards, this creates a nice guide for when fixing the two pieces together!

Used it for repairing a table top and for rigging out my van with racking, both had perfect alignment and alot stronger than what I expected!

Would definitely recommend the K5 to anyone thinking of getting one!

~WW
 
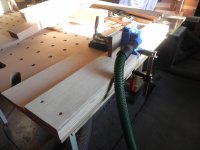
I  just got the Kreg K5 with a very large assortment of screws for the price of the K5 set alone. I really was glad to see the link to Amazon for the  Bosch hose adaptor. It will arrive soon. It pays to look at all of the FOG sub-sites. No question seeing the picture of a Festool green hose connected to the
Kreg with the hose adaptor did it. Thanks again.
 
My now outdated Kreg-4 jig is still serviceable. I am about to use it to make some Shaker style benches and decided to mount it on a permanent base. The general idea came from Fine woodworking Issue. #245 (January/February 2015

Here is the link to bench plans that rely on pocket hole joinery. Utterly simple plans but these make good gifts for those with a mud room

http://www.start-with-free-woodworking-plans.com/support-files/arch1pdfjuly2011.pdf

Building the jig

The basic material is ¾ inch ply with the wings two layers of ½ inch ply. This stack nearly meets the height of the Kreg-4 base.  ( 1-2 mm) However, those seeking absolute precision may want to add a thin shim sandwich between the ½ inch wing layers.

Festool Connection- A reminder that the Bosch vacuum hose adapter Model VAC003 will connect the Kreg Dust Collector hub to the Festool hose.

Belt and Suspenders- As is typical the Fine woodworking, the magazine drawing is not applicable to all Kreg-4 jigs. I give the magazine the benefit of the doubt since the drawing dimensions may simply be inaccurate as is mostly the case. Best proceed by working off your own jig for measurements. I did not glue the plywood layers. I am usually more cautious. If using a height shim, glue-up may be essential.

Woodworking 101. To easily dimension the wings on each side, place the jig at one end of the base, measure the remaining distance and divide by two.

Clutter-Unfortunately, the base is single purpose and takes up room. To reduce clutter, a solution may to create two narrow wings. When in use, clamp the Kreg-4  to the MFT, then lay down the narrow wings on each side to support the work piece. A simpler solution is to go to the Kreg-5 with the built-in wings and reversed clamp system that is more convenient than that of the Kreg-4.

[attachimg=1]

Jig easily clamps to any work surface.


Attachments

  • Kreg Jig.JPG
    Kreg Jig.JPG
    243.9 KB · Views: 609
I was working with my Kreg Jig K4 the other day and noticed it wasn't square. No idea if it never had been and how important it is, but I had thought I had noticed slightly skewed pocket holes next to each other. Have to say I do find this a little dissapointing.

If it wasn't square out of the box that would be bad and if it got out of square/bend after only having using it about 10-20 times I wouldn't find that very reassuring.

Not really sure if I should get a new jig now and if so if I should get another Kreg or not.
 
Often the best way to deal with the joint moving slightly when the screw is pulled tight is to offset it slightly before starting to tighten it.  Experience will tell you how much.  I use kreg clamps, both the kind with two flat disks and the kind with a round peg that goes into the hole.  With them tight you can a least minimize the movement but possibly not eliminate it.  So offset it a little.

I like pocket screws for things where a tiny misfit is not an issue - sand it way.  I hide them or use something else in things fancier than shop stuff. 
 
Back
Top