bertv
Member
Yeah, at the moment I have three flipstops and I wish my dealer would stock them. I would pick one up on every visit!
") I am working on two systports. I have all of my pieces cut and LR32 holes drilled. I hope to start assembling the boxes tomorrow.
I am working on two systports. I have all of my pieces cut and LR32 holes drilled. I hope to start assembling the boxes tomorrow.Holmz said:The logical "next extension" is to remove the fence altogether and push the wood against the dogs. There is then less dust drama with only small contact points, as well as fence flexing drama.
Patrick Cox said:First let me say that I have gotten back to my project so I am not just cutting strips of wood!
But in the meantime I have still been experimenting with my cut process on my MFT3. And one thing I have noticed is that the splinter guard of my 1080 guide rail that is mounted to my MFT3 is looking pretty rough. And while I have not explicitly tested this, I feel like the cuts I am getting from this rail are not as straight as cuts I get from my 1400 rail, which has a much cleaner looking splinter guard.
So my question is - can a rough splinter guard cause my cuts to not be as straight as a fresh splinter guard?
Holmz said:The logical "next extension" is to remove the fence altogether and push the wood against the dogs. There is then less dust drama with only small contact points, as well as fence flexing drama.
[member=40772]Holmz[/member] , this is a good point. I actually tried some cuts with just dogs and the results were better than I was getting with the whole MFT3 kit. Now I was also using the rail with a cleaner splinter guard so that may be playing a part, but I also noticed that some of my cuts had some material hanging at the end of the cut and it made me think that the fewer contact points that the dogs have with the wood may be the reason for the improvement as there is less change to get the wood out of square alignment.
Thanks,
Pat
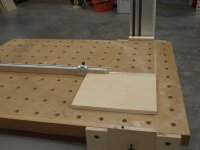
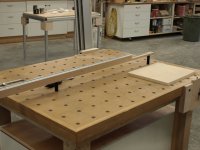
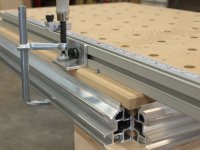
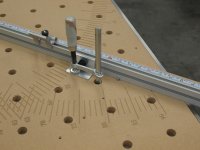
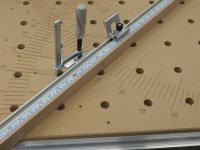
[member=7143]Oldwood[/member] ,Oldwood said:My solution is to use the Qwas rail dogs with the new Lee Valley extrusion and flip stop. If you use two rail dogs you get perfect 90 degree cuts. Then we took it a little further and designed and built a table to cut miters. This system works very well and is rock solid. I have attached some pictures so you can see how it works. The tape scale is calibrated by moving it to match the cut size.
Patrick Cox said:[member=7143]Oldwood[/member] ,Oldwood said:My solution is to use the Qwas rail dogs with the new Lee Valley extrusion and flip stop. If you use two rail dogs you get perfect 90 degree cuts. Then we took it a little further and designed and built a table to cut miters. This system works very well and is rock solid. I have attached some pictures so you can see how it works. The tape scale is calibrated by moving it to match the cut size.
That's pretty cool. Let me ask you a couple of questions.
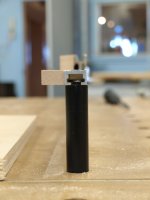
1. What do you have in the top of your rail dogs? The bolt in my rail dogs won't fit in the Festool Fence.
2. Do you have a link to the Lee Valley Extrusion you are referring to?
Thanks!