You are using an out of date browser. It may not display this or other websites correctly.
You should upgrade or use an alternative browser.
You should upgrade or use an alternative browser.
Pool Table
- Thread starter carrera4s
- Start date
charley1968
Member
- Joined
- Sep 20, 2013
- Messages
- 479
Brilliant! Have a jol..!
nclemmons
Member
Being south of the equator, the upside down lathe totally makes sense!
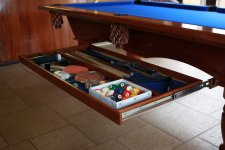
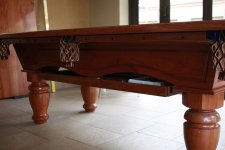
Really nice build! Looks like the screws under the top ledge are how you attached the bumpers, and the entire upper section is one unit.
In terms of assembly, did you place the slate on the leg assembly and then drop down the side and top and then attache the bumpers? I only ask because I remember when they installed my pool table the four side rails were individually packed and assembled on site. Plus the bumpers and table top will need to be recovered in time.
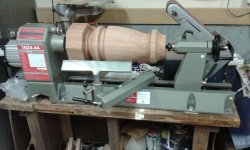
neilc said:Being south of the equator, the upside down lathe totally makes sense!
Fixed! For some reason pictures from my phone always come out upside down. [big grin]
neilc said:Really nice build! Looks like the screws under the top ledge are how you attached the bumpers, and the entire upper section is one unit.
In terms of assembly, did you place the slate on the leg assembly and then drop down the side and top and then attache the bumpers? I only ask because I remember when they installed my pool table the four side rails were individually packed and assembled on site. Plus the bumpers and table top will need to be recovered in time.
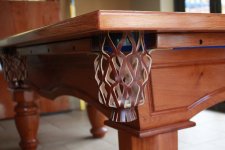
Correct. The slate (with the support glued underneath), is placed on top of the legs & frame assembly.
The top of the table is a single piece called the "Cap" - it is similar to the rails but just a single piece. The bumpers are 6 individual pieces (obviously [big grin]) that bolts into the cap. Each bumper has three 6 mm diameter bolts that passes through 3 matching holes in the cap. The cap the has 3 "pot-holes" per bumper drilled from the bottom from where you then attach the nuts and washers. (I used a kitchen cupboard pot-hole bit for the holes). So the bumpers can simply be un-bolted to recover them.
The screws you see from the side is drilled into the support that was glued underneath the slate. The cap is then resting on top of these supports and fastened with screws from the bottom.
So to re-felt the slate you simply unscrew and remove the cap and unscrew the 6 supports.
Sazerac819
Member
- Joined
- Apr 14, 2017
- Messages
- 8
Impressive! I can see why it took 2 years. I say it was time slowly well spent. 
I upgraded my pool table a bit this weekend:
1. I added a drawer underneath to store all the cues, balls & table tennis accesories; and
2. Replaced the "string" pockets with leather pockets.
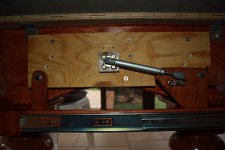
The drawer extends out fully and when closed, it swings up and away on two gas lifts. It works similar to Legacy's "Perfect Drawer", but the 600 mm drawer runners allows the drawer to come out much further to enable better access to the contents.
[attachimg=1]
[attachimg=2]
[attachimg=3]
[attachimg=4]
[attachimg=5]
Here is Legacy's "Perfect Drawer":
1. I added a drawer underneath to store all the cues, balls & table tennis accesories; and
2. Replaced the "string" pockets with leather pockets.
The drawer extends out fully and when closed, it swings up and away on two gas lifts. It works similar to Legacy's "Perfect Drawer", but the 600 mm drawer runners allows the drawer to come out much further to enable better access to the contents.
[attachimg=1]
[attachimg=2]
[attachimg=3]
[attachimg=4]
[attachimg=5]
Here is Legacy's "Perfect Drawer":
Attachments

Hi There,
I recently entered my pool table in a Facebook competition that one of our woodworking tools suppliers are running here in South Africa.
I would really appreciate if you would "Like" the entry and "vote" for my entry!") ;D
;D
Follow the link below and click "Like".
Tools4Wood Pool Table Entry
Thanks!
I recently entered my pool table in a Facebook competition that one of our woodworking tools suppliers are running here in South Africa.
I would really appreciate if you would "Like" the entry and "vote" for my entry!
;DFollow the link below and click "Like".
Tools4Wood Pool Table Entry
Thanks!
Similar threads
- Replies
- 14
- Views
- 1K