Pouring a new concrete entry way and raised patio

ryanjg117

Member
Joined
May 18, 2015
Messages
329
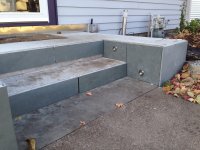
One of the 50 home improvement projects I have for our 1970s tri-level home is replacing the front raised entry. It's become a hazard and I don't have much confidence in the railings or steps. I had a contractor swing by and quote me $7K for this project, so I'm exploring some other ways to get it done (e.g. me). I know I need to replace the raised entry soon, but I was thinking about also demo'ing the concrete walkway and re-pouring it all as one entirely concrete feature.

This is in the Pacific Northwest where temperatures are fairly mild.

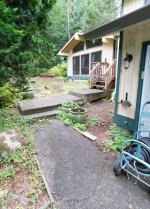
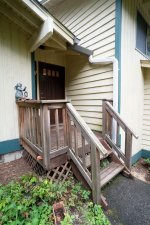
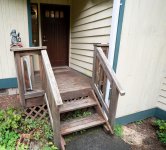
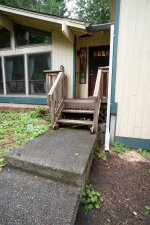
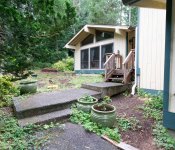
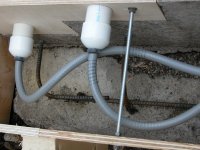
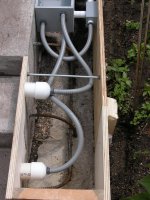
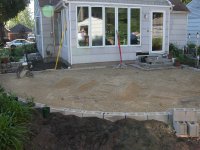
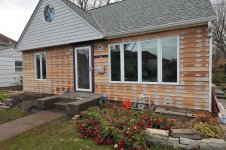
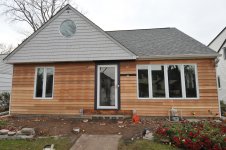
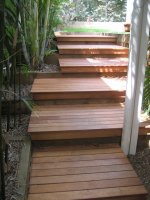
Here's what it looks like today. Pardon the weeds, landscaping is a 2021 project.

[attachimg=1]

[attachimg=2]

[attachimg=3]

[attachimg=4]

[attachimg=5]

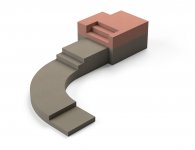
And here is my very rough design for a replacement. Main differences would be the addition of a step to make it easier for the grandparents, the curved 90 degree transition, and of course the paved raised area.

[attachimg=6]

As I haven't done many concrete projects, I've got a few easy questions:

1. The raised entry, currently made of wood, rests against the home siding. The contractor I spoke with mentioned it would be OK to pour right up against the siding as long as tar paper or a similar barrier is placed first. Is this true? Or is there a better way to do this?

2. When I demo the current walkway, can I use those concrete chunks to essentially eat up space inside my pours? Might as well re-use what I have, and it would prevent me from having to pay to haul it to the dump.

3. How deep beneath the existing soil line will I need to dig to start the new subsurface? Note the erosion under the concrete pad just before it reaches the raised portion. The contractor noted that water may be seeping underneath the pad and causing this erosion, but I also have a toddler who likes digging holes. And yep, I caught him digging under the pad just the other day! Which brings me to the next question...

4. Do I need to add drainage? Currently water slopes away from the house, but the current pad is on a bit of a slope so some water may drain under the pad. Won't a proper subsurface account for this?

5. Would it be possible to pour this in phases, or should I really strive to pour it all at once? This is a fairly large project and since I haven't done much masonry work, I'd like to pour it in phases unless there is a really good reason not to.

6. Is reinforcement going to be necessary? I know its common to place rebar or wire mesh at the bottom of these pads.

7. I like the look of brick but not the upkeep, which is why I was thinking about going with stamped concrete. Any thoughts on this, pros/cons?
 

Attachments

  • concrete-entry1.jpg
    concrete-entry1.jpg
    1.6 MB · Views: 3,796
  • Paved-Walkway-Concept.jpg
    Paved-Walkway-Concept.jpg
    50.6 KB · Views: 2,315
  • concrete-entry5.jpg
    concrete-entry5.jpg
    1.5 MB · Views: 3,252
  • concrete-entry4.jpg
    concrete-entry4.jpg
    626.8 KB · Views: 2,791
  • concrete-entry3.jpg
    concrete-entry3.jpg
    1.1 MB · Views: 2,973
  • concrete-entry2.jpg
    concrete-entry2.jpg
    1.3 MB · Views: 2,799
ryanjg117 said:
1. The raised entry, currently made of wood, rests against the home siding. The contractor I spoke with mentioned it would be OK to pour right up against the siding as long as tar paper or a similar barrier is placed first. Is this true? Or is there a better way to do this?

I wouldn't do that, especially in such a wet climate, also you may need to get in there some day. Plus you want the house materials to breath/dry.  I would propose either pour concrete piers and frame a new deck that does not attach to the structure (leave a little gap).  Pour the steps up to the finished deck height, and then build a "bridge" between it and the house.  Pour the steps and 2 piers near the house, poor a deck (either build under forms, or buy steel to put onto), leave a gap to the house again.

2. When I demo the current walkway, can I use those concrete chunks to essentially eat up space inside my pours? Might as well re-use what I have, and it would prevent me from having to pay to haul it to the dump.

yes, you can, especially if you have a large volume to fill, it's solid material, just don't get to close to edges.

3. How deep beneath the existing soil line will I need to dig to start the new subsurface? Note the erosion under the concrete pad just before it reaches the raised portion. The contractor noted that water may be seeping underneath the pad and causing this erosion, but I also have a toddler who likes digging holes. And yep, I caught him digging under the pad just the other day! Which brings me to the next question...

for any piers or deck structure you need to look up your frost depth and get below that. I would guess you basically don't have to worry about that in your climate.  Far as walks, they largely are on top the ground, just remove top loamy soil,  you can use your old busted concrete as base material.

4. Do I need to add drainage? Currently water slopes away from the house, but the current pad is on a bit of a slope so some water may drain under the pad. Won't a proper subsurface account for this?

Drainage is always good, it's hard to tell your grading.  But making a ditch up hill with a drain pipe in it to shift it elsewhere is not a bad idea. Maybe consider digging a dry well to have it run into, so your not pouring water some place that will cause erosion. If you dig one, you can fill it with smashed up old concrete mixed with gravel.

5. Would it be possible to pour this in phases, or should I really strive to pour it all at once? This is a fairly large project and since I haven't done much masonry work, I'd like to pour it in phases unless there is a really good reason not to.

Yes and probably will be much easier for you.  One pour can be a real pain, especialy forming stuff, plus you need an army of people do do a pour of any real size, complexity.

6. Is reinforcement going to be necessary? I know its common to place rebar or wire mesh at the bottom of these pads.

I put wire and rebar in everything,  it doesn't take much to make the job last forever.  It's cheap and easy to add.  Contractors tend to skip it since it makes for work for the next generation to re-do. Much like loggers planting trees behind them.  Since you don't probably have much freeze-thaw it's not going to be a big deal not to have it.  But you do get earthquakes.

7. I like the look of brick but not the upkeep, which is why I was thinking about going with stamped concrete. Any thoughts on this, pros/cons?

Stamped concrete has places IMO, but it generally looks fake and also if you color it, it fades in time, and sealers are work and make it look bad in time.  I like the look of your old concrete, I don't know if that is from age or if the person who put it in did the exposed aggregate look.  But it blends in nicely with the environment and is probably good at managing slipperiness.  I think any concrete you do will age and get moss covered and such quickly (which I consider a good thing).
 
As far as drainage, I see one downspout that dumps right near the foundation. I would change that. Do you have a basement. If yes I would try to carry that water at least the depth of the basement away from the house.
 
Wow...where to start.

I'm going to do this from memory so I have no idea if i've covered your questions and what questions of yours I haven't answered.

Please feel free to ask questions as this post could take hours to answer.

If you're not a concrete guy, yes do this in stages. If you decide upon the stamping method, it's mandatory that you do it in stages . The typical home owner will not buck up for multiple concrete stamping dies and they are expensive. There is a limited window at which concrete is firm enough to stand on yet ductile enough to stamp a pattern. Stamp in small areas. The pros use multiple stamps and multiple stampers. That becomes expensive for a DIY'er because $200-$300 for each die is a major expense.

I'd suggest a step-down area from the front door, if you can lower that area by 4"-8" through the use of poured concrete steps, it means that much less concrete is needed for the area. Less concrete means smaller diameter support columns. Usually 6" diameter tubes will suffice, however for the amount of concrete you want to pour, I'd suggest 10"-12" sonotubes to support that structure. They will probably need to be 48" deep.

I like the arc of the side walk...nice touch.

Now's the time that you need to decide if you want LED lighting in the pathway. Easy to install and cheap to maintain. LED lights set into the concrete are a godsend for older people. One slight elderly trip on a step can become a nightmare. A simple broken bone can become toast for elderly people, that's the way it was with my grandmother.

If you do lighting, I'd house the supply transformer in the garage. Simple to change out and simple to tweak if necessary.

Yes you can use the old concrete for filler, just maintain a 2" distance between the old and the new. I've also used class 5 for filler.

I'll typically use 4"-6" of class 5 for a base material. For large areas I'll use a mechanical tamper, think 100 sq ft. For smaller areas i'll use a hand tamper. 

More to come...

I have tons of photos if they are of interest.
 
Yeah, conduits.  Even if you have zero plans.  Run conduits under your walks so if you decided to run something later, you have a hole there.  Lights, sprinklers, etc.
 
Thanks all. I think you've successfully dissuaded me from trying to stamp my own concrete. And I agree if it's not done WELL, it looks probably worse than a plain poured pad. Also in the videos I was watching, there seemed to be a lot of cleanup/touchup/repair postwork needed.

[member=44099]Cheese[/member], can you show me what you mean by support columns, sonotubes, etc? I'm not quite sure how to pour the elevated area and the support structure. I did bookmark the below video where cinder blocks were used to build the exterior and deck pans were used to form the top, which was then topped by poured concrete. I like this idea but I don't really need access to the "inside." But I could form the walls using blocks or similar, and then fill that void with the broken up concrete from the demo of the walkway, right?

Raised walkway

[member=44099]Cheese[/member], I like your idea of LED lighting integrated into the pad, that's a great idea. Curious if you have any recommendations on low profile light fixtures (I'm thinking of movie theater aisles at night) and how best to run the wires inside the pad before the pour. Also, what's the best way to bring power from the garage to the actual soil?

If I'm pouring in phases (which I'll probably be doing), would it be best to leave some exposed rebar or wire mesh to serve as a connection to the next pour? How can I be sure the two pads won't separate over time?

What's the best material for forms? I was thinking 1/4" plywood, layered, to build that 90 degree curve. Thoughts?
 
BMH said:
I live in Portland so very familiar with the weather. I would recommend using pavers likehttps://westerninterlock.com/?utm_source=google&utm_medium=local&utm_campaign=gmb_listing. I did a number of project using them and they are a great product. You can do it yourself and drainage is usually not a problem. I recommend visiting their factory/show room by Salem.

[member=4668]BMH[/member], I was considering going with pavers as well but visited a local supplier here, Abbotsford Concrete Products, and their salesperson actually unsold me on the idea... He mentioned pavers sometimes don't give "the finished look" that would match concrete. I'm sure it's debatable and all comes down to how well it's put together.
 
I guess it’s difficult for me to offer any help, simply because houses and building methods are quite different in the UK to how they build on your side.

Just a few thoughts though, definitely do not concrete up to the siding, even with a damp barrier, you would almost certainly regret it in the future.

We have done a lot of paths and walk ways similar to what you’re planning. One option is to put in concrete footings, and build the shape of the path with faced brickwork to both edges, including the step downs curves etc. Then use some of the broken up old path (hardcore) to fill the path. Then get some aggregate, we use something called (Type 1) this needs to be applied all over, and compressed with a tool we call a whacker or compactor, not sure what you chaps term it as? Anyway this will compress the type 1 and make it an incredibly strong base.

Then use block pavers to finish, you can mix and match them with the brickwork, then put down kiln dried sand over the pavers, and sweep it in.
A nice stainless steel hand rail would compliment it too.

If budget is tight, could you not do it with decking timber?
 
Whatever you decide on run it by the building inspector before you start so you don't end up tearing half your work out because your piers are not below the frost line. Most have adopted the ICC codes but also there can be amendments which override certain areas of the code to accommodate local conditions.

Washington State -https://apps.des.wa.gov/sbcc/page.aspx?nid=4

The International model codes may be viewed here:https://codes.iccsafe.org/public/collections/I-Codes
The Uniform Plumbing Code can be viewed here:http://epubs.iapmo.org/UPC/

If you're running conduit for lighting in concrete find out if the electrical inspector needs to see it before you pour. Remember too that codes vary slightly from state to state so be sure if you take advice from anyone here that it's in compliance with your local code. In smaller towns like mine often there is only one person qualified to multiple trades/divisions and they can cover both the concrete and electrical.
 
Just dropping in to tell you what a beautiful home and place you got there, looks fabulous and well worth every investment/project!

Have fun with your projects!

Kind regards,
Oliver
 
[member=51886]ryanjg117[/member] I think the bigger question on this project is not how you can get it done, but rather should you do it at all. Personally I think that a giant chuck of concrete in that space would not be attractive and would not complement the character of your home. It is quite lovely.

Consider replacing the current structure with another deck type project out of Ipe perhaps. Mimicking what you have or changing out and taking a series of super wide and deep steps to get it down to the garage level. Ding that would probably eliminate the need for railings. But if you didn't do that, then a much narrower profile and perhaps stainless railing.

Ron
 
rvieceli said:
[member=51886]ryanjg117[/member] I think the bigger question on this project is not how you can get it done, but rather should you do it at all. Personally I think that a giant chuck of concrete in that space would not be attractive and would not complement the character of your home. It is quite lovely.

Consider replacing the current structure with another deck type project out of Ipe perhaps. Mimicking what you have or changing out and taking a series of super wide and deep steps to get it down to the garage level. Ding that would probably eliminate the need for railings. But if you didn't do that, then a much narrower profile and perhaps stainless railing.

Ron

I agree completely with Ron, that's what I was getting at when I suggested the step down area in front of the door. It will reduce the concrete usage and it will eliminate the handrails. Think about how much more open and welcoming you door area will be when there aren't any vertical elements to distract.

The idea is to reduce the concrete at the entrance door from a BLOCK to a SLAB.  [smile]

Here's a photo of some of the 8" Ø Sonotubes I installed to support the front steps. Just like the foundation on your house, you want them to reach below the frost line. The photo was taken before all the Sonotubes were completed.

[attachimg=1]

Here's the poured step

[attachimg=2]

And here's a shot of the front step during the cladding process but before the NY Bluestone top surface/treads were installed. Note the stainless LED housings to light up both treads. 

[attachimg=3]

Relative to your rebar/staging questions here's the rear step that needed to be poured as the FIRST stage in laying a bluestone patio. What you can't see is all the rebar peeking out of the RH side of the step. I decided to pour the rest of the step later because I needed to spend the time installing bluestone.

[attachimg=4]

This shows the rebar exiting the step at various levels to tie the new pour into the old. This 2nd pour was done 2 years after the steps were poured.
This is also the way to address the wiring issue. If you need to pull something in the future, to repair or replace it's easy. Keep the bends gentle to ease the wire pulling task. I prefer using 12 volt lighting outside just because of the safety factor.

[attachimg=5]

[attachimg=6]

The completed step and patio.

[attachimg=7]

[attachimg=8]


Attachments

  • 0303.JPG
    0303.JPG
    568.6 KB · Views: 2,339
  • 0302.JPG
    0302.JPG
    746.4 KB · Views: 3,151
  • 301_4003.JPG
    301_4003.JPG
    551.3 KB · Views: 2,210
  • 301_4001.JPG
    301_4001.JPG
    317.4 KB · Views: 2,103
  • DSCN1756.JPG
    DSCN1756.JPG
    233.9 KB · Views: 2,996
  • 5103.JPG
    5103.JPG
    3 MB · Views: 8,981
  • 301_6727 S.JPG
    301_6727 S.JPG
    501 KB · Views: 2,344
  • 301_6718 S.JPG
    301_6718 S.JPG
    712.7 KB · Views: 2,259
These are not exactly what I'm talking about but they have the general idea.

[attachimg=1]

[attachimg=2]

[attachimg=3]

Ron
 

Attachments

  • nice-contemporary-exterior-door-design-idea-25.jpg
    nice-contemporary-exterior-door-design-idea-25.jpg
    60.5 KB · Views: 2,381
  • 7e5eab802df6ed652c847904d0c32274.jpg
    7e5eab802df6ed652c847904d0c32274.jpg
    31.7 KB · Views: 2,031
  • hawthorne_3.jpg
    hawthorne_3.jpg
    111.4 KB · Views: 5,558
I like the existing concrete.  I vote for a new wooded porch and some landscaping.
 
I agree with several of the last comments suggesting a new wood porch, steps, railing, and reducing the amount of concrete.  I don't want you to put a big concrete porch, deck right out the front door.  Also try to eliminate that first big tall concrete piece at the bottom of the stairs.  Maybe use four stairs instead of the current three.  Get the stairs down lower to reduce the amount of tall concrete and concrete steps needed.  Your first pictures of the concrete being that stone pebble covered stuff looks good and really blends in well with the country, rural, natural look of the house, area.  Better than plain gray smooth concrete does.
 
Back
Top