Preparation of live edge slab advice -- Update: Success!

ear3

Member
Joined
Jul 24, 2014
Messages
4,341
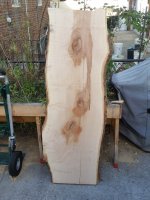
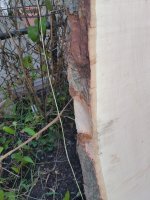
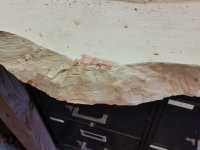
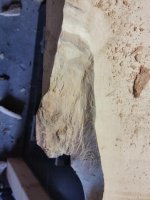
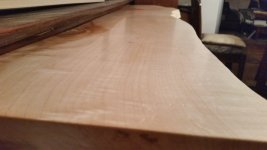
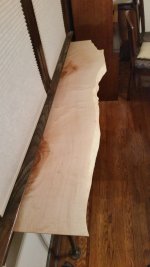
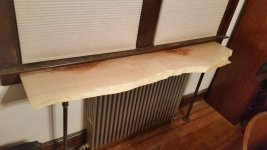
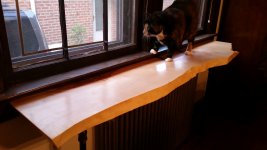
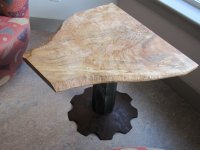
I got a gfood deal on this maple slab, which I'm going to cut down for a radiator cover/table, preserving one live edge.  The bark is peeling or already broken off in a number of places, so I'm going to remove it from the entire edge.

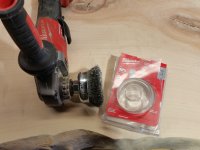
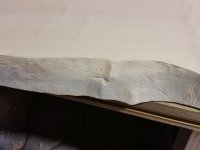
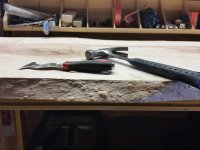
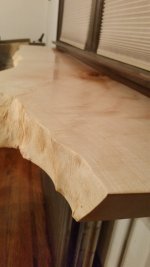
Just wondering if there are any tips for removing the bark and then cleaning up the edge so that it's clean and undamaged.  I figure I would work my way down with a chisel, then once I got the bark and substrate peeled off, move to a wire wheel or a vlies pad to get any remaining dirt.

Thanks.

[attachimg=1]

[attachimg=2]
 

Attachments

  • 20151017_160520.jpg
    20151017_160520.jpg
    2.1 MB · Views: 8,944
  • 20151017_160529.jpg
    20151017_160529.jpg
    2 MB · Views: 8,148
DiResta did a thing recently that had nothing to do with this, but he did attack the bark on a piece of wood in a similar fashion.

 
[member=37411]Edward A Reno III[/member]

Each slab is different so YMMV, but I had a Siberian elm slab and it also had part of the bark missing.  In this case, a hammer was enough to knock off most of the remaining bark.  To get the leftovers I found that using the RAS 115 with a very light touch removed the remaining heavy stuff, but left a lot of the character with lots of small imperfections and voids.  The RAS was almost overkill so the RO90 might have been enough to do the job.  The left over gunk and dirt cleaned up quite a bit with a small soft wire hand brush I got from Harbor Freight.  Finally, the RO90 was used to smooth everything out. 

Mike A.

 
Edward,

I would also remove the bark in your situation (although I have a buddy who might search for the right piece of bark elsewhere and attach it like a patch).

I do not use abrasives to clean up the live edge at all.  I start by peeling off what I can, then knock off the rest with blunted softwood wedges and a mallet.  The only time I use abrasives on the live edge is to soften the corners and any burl points.
 
Thanks for the replies.  I ended up going with the 5 in 1:

[attachthumb=1]

[attachthumb=2]

But as you can see, there was still some residue left:

[attachthumb=3]

I tried shaving it with a chisel, but didn't like the obvious resultant chisel marks:

[attachthumb=5]

So I decided to up the power on the wire wheel, and got the crimped brush angle grinder attachment.  This cut through the residue in no time.  And I like the wire brush pattern it has left on the edge:

[attachthumb=6]

[attachthumb=7]


Attachments

  • 20151018_101554.jpg
    20151018_101554.jpg
    2.6 MB · Views: 1,746
  • 20151018_101531.jpg
    20151018_101531.jpg
    2.7 MB · Views: 758
  • 20151017_174327.jpg
    20151017_174327.jpg
    2.5 MB · Views: 1,235
  • 20151017_174327.jpg
    20151017_174327.jpg
    2.5 MB · Views: 2,585
  • 20151017_170202.jpg
    20151017_170202.jpg
    736.2 KB · Views: 1,055
  • 20151017_164533.jpg
    20151017_164533.jpg
    2.5 MB · Views: 1,026
  • 20151017_164512.jpg
    20151017_164512.jpg
    2.6 MB · Views: 1,399
That's a fresh take on doing a live edge.  Nice creative technique and a great way to turn a problem into a work of art!

Thanks for sharing!

Mike A.
 
I turn natural edge bowls....big ones. If some of the bark chips off, I use Super Glue to patch the edge. You could use bark from one side to patch the missing sections of the "show" side if you want to retain the natural look. Done carefully, no one can tell.
 
I ended up going real basic.  Sanded up to Platin 200 on top and then oil and lots of wax.  Bottom and sides are oiled and sealed.  Home Depot black pipe for the legs.  The board was a bit twisted once I had cut it in half, so the legs are not quite plumb, but I anchored the flanges to the floorboards and put a couple of brackets on the underside to fix it solid to the window casing.

I still have the other half of the board, so I may do something similar with it later, and experiment more with staining the edge, as was suggested earlier.

[attachthumb=1]

[attachthumb=2]

[attachthumb=3]

[attachthumb=4]

[attachthumb=5]
 

Attachments

  • 20151019_211023.jpg
    20151019_211023.jpg
    1.6 MB · Views: 1,385
  • 20151019_210736.jpg
    20151019_210736.jpg
    3.1 MB · Views: 757
  • 20151019_210721.jpg
    20151019_210721.jpg
    3.1 MB · Views: 869
  • 20151019_210948.jpg
    20151019_210948.jpg
    3.4 MB · Views: 766
  • 20151019_210914.jpg
    20151019_210914.jpg
    3.2 MB · Views: 1,217
I like it Edward, it looks great. Better than a total radiator enclosure which cuts down the transfer of heat but at the same time, this softens the projection of the radiator into the living space.

If you have cats, your cats will love you for it.

Be warned, be careful of the LH corner, it looks like the horn of a bull and you may get gored...hopefully not too bad.
 
[member=44099]Cheese[/member] Oh yes, there is a four legged occupant of the household who does appreciate my work.

[attachimg=1]

You're right on the sharp edges.  I tried to blunt some of them when I was sanding, but now that it's in place I can see that a few are still problematic.  I fortunately don't have young ones running around who might gash their heads open on it, but nonetheless I'm going to file down the remaining sharp spots so my house is at least not an insurance hazard when friends come over to visit with their kids.

Cheese said:
I like it Edward, it looks great. Better than a total radiator enclosure which cuts down the transfer of heat but at the same time, this softens the projection of the radiator into the living space.

If you have cats, your cats will love you for it.

Be warned, be careful of the LH corner, it looks like the horn of a bull and you may get gored...hopefully not too bad.
 

Attachments

  • 20151020_075721.jpg
    20151020_075721.jpg
    3.3 MB · Views: 7,804
Edward A Reno III said:
I'm going to file down the remaining sharp spots so my house is at least not an insurance hazard when friends come over to visit with their kids.

That's funny...

It looks like a Tuxedo cat, my favorite. They have such cool personalities. [big grin]
 
Edward A Reno III said:
This cut through the residue in no time.  And I like the wire brush pattern it has left on the edge:

I like it too I think it looks really good and I don't like live edges.
Nice solution.
Tim
 
That's a great looking finish looks nice and "soft" to the eye.

How does something like that hold up long term directly above a heat source?
 
I guess we'll find out...

Getting a head start though trying to keep my house warm in 0 degree weather.

mwahaha said:
That's a great looking finish looks nice and "soft" to the eye.

How does something like that hold up long term directly above a heat source?
 
I also will be attempting to do something with a slab of Sycamore.  I got this hot off the mill today.

View attachment 1

It has spectacular color and a lot of ray flecks. The log it came from had been cut sometime ago.  How long should I let it sit before doing anything with it?  Is Sycamore a stable wood, i.e. will it cup or shrink badly after it was cut?  It's quartersawn since it came from the middle of the log. I'll post a pic of the actual slab when I get a minute.  I'm pretty excited about it as all this was given to me.  Got some post oak and bradford pear too.  Never worked with Pear.  Looks nice though...


Attachments

  • IMG_0918.JPG
    IMG_0918.JPG
    150 KB · Views: 777
Back
Top