[Project 35] Beech & sapele record player cabinet

mattbyington said:
I had heard "grain should run in the longer direction"
For a leg, stretcher, or beam, sure.
The shelf is supported from the sides, think of it as a wide and short bridge. Another problem is the long grain of the shelf seems to be glued across the grain of the partition.
Aesthetically shelf should also follow the other parts of the case.
 
[member=67555]mattbyington[/member] - what do you use to generate your design documents?  I like the way those are formatted.
 
There's a general rule of thumb about avoiding exposed endgrain, or when that is not possible (like on a solid wood top w/out breadboard construction), to have it be visible on the sides rather than the front.  When you apply the finish, the end grain of the shelf edge will be a lot darker than those of the dividers or the casing.  Because endgrain is so much harder than face or edge grain, if it's not carefully sanded there's also the potential for residual scratches in the end grain to suddenly become visible once a finish is applied, resulting in an inconsistent color or surface appearance.  As already mentioned there is also a structural issue about gluing cross-grain, but I don't think the way you've done it will have any overall negative effect, since we're just talking that one board.

Nice job on the miter joints for the casing!

mattbyington said:
[member=15585]Svar[/member] ahhh the little shelf in the middle?? Darn it!

What's the rule of thumb there? I had heard "grain should run in the longer direction" which is why I did it this way (it's deeper than it is wide) but aesthetically speaking you're saying probably better to do it to match other panels in similar parallel planes, is that it?

Thanks so much dude!

Matt
 
[member=67555]mattbyington[/member] : You might want to try putting some shellac on the exposed end grain that you can see from the front before you finish the piece in order to prevent it from darkening too much when compared to the face grain and particularly the edge grain. Do a test piece first to find out what colour you need to get the best match after finishing. That way you can at least somewhat camouflage the difference in the finished piece.
 
You could possibly setup some reference faces on either side and rebate the middle shelf to accept a thin piece of veneer for the front edge, so it’s flush with the cabinet face It’s wood triage and you could pull it off with a bit of patience?
 
You could possibly setup some reference faces on either side and rebate the middle shelf to accept a thin piece of veneer for the front edge, so it’s flush with the cabinet face It’s wood triage and you could pull it off with a bit of patience?

This is an interesting idea to address the appearance question.  My first thought was to make a little frame that bridges the part in question, and run a bearing guided router bit to take out 1/32" or so.  I'm sure there's more than one way to approach that - what would you do?
 
1. You could also put a small face frame around the entire front unit... this might look fine
2. have some hardwood edge banding around the entire front of the unit with 45 deg on the corners. You could also incorporate an inlay into the edgebanding.
3. Use a laminate edge banding instead of hardwood. It might have an interesting look, but I like wood grain personally. Laminate on the edge starts looking like IKEA (stuff) furniture.  Honestly that’s a bit of an oxymoron ikea and furniture. Lol
4. Add a second piece on top of the middle shelf anywhere from 1/4”- 3/4” to match the grain orientation and hide the laminate glue joint with some edgebanding or a strip of hardwood sapelle to match and accent the wood elsewhere? You might use a thumbnail profile for the trim piece it could work well with the angular lines or do a chamfer?
 
The problem with the middle shelf is that as wood dries/acclimatises it shrinks more in width than in length.

If the middle shelf shrinks in width it will bend the two uprights inwards.

The uprights will shrink in the depth of the unit meaning the middle shelf could end up proud of the front as that won't shrink in its length or worst case could cause the uprights to split.

Chances are it will all be fine if the timber is already acclimatised but it is definitely something to watch out for in the future.
 
That's probably what I would do.  This would be easy work for something like the MFS, leaving maybe a sliver or two excess at the joint, which could then be finished up by hand with a chisel.  But it would be relatively trivial to create the same functionality through a wooden jig.

mrFinpgh said:
You could possibly setup some reference faces on either side and rebate the middle shelf to accept a thin piece of veneer for the front edge, so it’s flush with the cabinet face It’s wood triage and you could pull it off with a bit of patience?

This is an interesting idea to address the appearance question.  My first thought was to make a little frame that bridges the part in question, and run a bearing guided router bit to take out 1/32" or so.  I'm sure there's more than one way to approach that - what would you do?
 
[member=66813]rmhinden[/member] when I post from my computer they're always right-side-up. It's when I post from my phone that is the problem.

[member=59039]mrFinpgh[/member] thank you! I use Fusion 360 to design the projects, the drawings are just the "Drawing" feature in Fusion!

[member=15585]Svar[/member] got it, thanks so much, that makes perfect sense. And yes you're right it is glued.

[member=37411]ear3[/member] thanks for the additional help and thanks so much for your kind words. Super helpful. I learn a lot from all of you.

[member=66485]hdv[/member] good idea, thanks!

[member=60789]mkasdin[/member] a good idea - I'm a little worried about doing that and not messing anything up haha but it's a good idea. Oh just read your second comment on face frame. Not a bad idea...but I already bought frameless hinges from Blum haha. Oh man. lots of decisions.

[member=34680]Doug S[/member] makes perfect sense, thanks!

[member=37411]ear3[/member] I do have an MFS..hmm...

Also - been working on the doors - lots of work ...
 
[attachimg=1]

[attachimg=2]

[attachimg=3]
 

Attachments

  • IMG_5498.jpeg
    IMG_5498.jpeg
    615.4 KB · Views: 820
  • IMG_5501.jpeg
    IMG_5501.jpeg
    550.9 KB · Views: 801
  • IMG_5505.jpeg
    IMG_5505.jpeg
    419.9 KB · Views: 807
[attachimg=1]

[attachimg=2]

[attachimg=3]
 

Attachments

  • IMG_5511.jpeg
    IMG_5511.jpeg
    577.4 KB · Views: 812
  • IMG_5516.jpeg
    IMG_5516.jpeg
    506.6 KB · Views: 800
  • IMG_5519.jpeg
    IMG_5519.jpeg
    555 KB · Views: 796
That's a really cool idea for the doors.  Did you employ any strategies when making all those narrow rips (like, choosing only the straightest grained boards) to ensure they came out so straight?  Or does the fact that you are locking them in a few inches on the top and bottom rails end up straightening even ones that might have bowed after being ripped?  They're going to look pretty sweet when finished.
 
[member=37411]ear3[/member] thank you so much! Unfortunately I was not that smart.... and indeed on one door, 3 of the strips are bowing :(

Trying to figure out options ...I tried clamping it upside down flat for two days and all kinds of things.

I'm trying to figure out if i have to add a thin horizontal support behind the slats in the middle (vertically) of the door to help prevent that......

More pics this weekend!

Matt
 
[member=67555]mattbyington[/member] - that’s a cool design for the doors.  Given you are seeing some bowing and movement now, how about a floating separator in the middle of the door.  Same mortises as on each end cut with your Shaper, only let them float side to side cut to fit the spindles only.  Make them perhaps 1/2” x 1/2” x 6” after cutting them out with the shaper.  If you press fit them, glue might not even be needed.
 
mattbyington said:
I'm trying to figure out if i have to add a thin horizontal support behind the slats in the middle (vertically) of the door to help prevent that......
I'd use a thin strip (about the same size as slats) from behind, paint it black and screw/nail it to each of the slat. I'd avoid glue just in case it doesn't work and you have to redo it differently.
 
What about using a quarter sawn piece of material for the thin stock? Also Sapelle is fairly stable, you might be able to bleach the wood to lighten the grain? I like the idea of press fitting the long strips in as the other post suggested.  Just cut a bunch of extras and if any deviate just replace them... you could change the dimensions of the strips and orient them at an (slight) angle for a louvered effect?
 
I like the design a lot, but I think it's going to be hard to predict success using solid wood.

[member=60789]mkasdin[/member] is probably right that quartersawn stock would be less prone to moving.  I think milling it down in stages might also help to identify the most unruly pieces. 

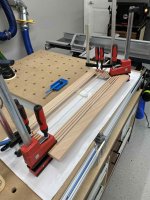
I don't know how long the time was between the ripping of the slats and installation, but I've seen some woods move a lot after being ripped.  I have some flame birch which was destined for one thing, but after ripping it bent about 1/8".  Perhaps selecting for grain, ripping oversized, letting it sit, then milling down a little more once or twice, might lead to less unpredictable materials.

 
use the same width or slightly wider but deeper. So visually it will have the same aesthetic but potentially less likely to warp? Notch the wood strips so it nests into a small dado on the side but rebates across the front face like you have it...
 
Back
Top