[Project 39] Modern coffee table - I need your help

mattbyington

Member
Joined
Mar 11, 2018
Messages
797
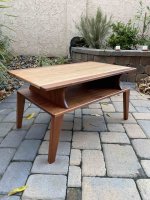
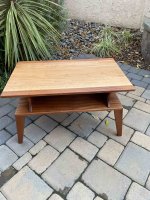
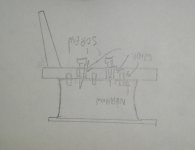
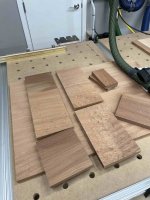
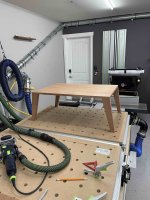
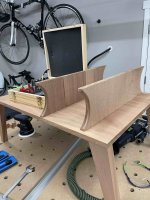
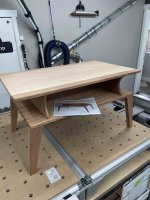
OK team, a little modern coffee table the wife and I designed for a friend.

You guys would be proud of me. After all the feedback the last few months/years, this really is the first build that I'm actually thinking ahead on how the wood will move rather than gluing everything together like I normally do.

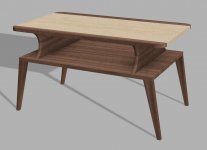
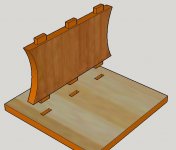
So here's the design, straight from Fusion 360.

Here are the challenges:

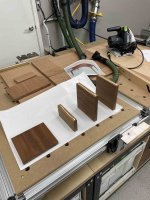
1) How to attach the top to the vertical curved "standoffs"
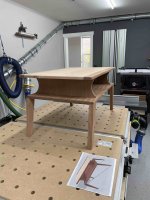
2) How to attach the bottom to the vertical curved standoffs

I feel like for (1), z clips, figure 8 fasteners, or wooden buttons with a mortise would all work fine - so I feel like that's not too hard.

However for (2), you can't do that since it'll be seen obviously. One idea I had was to drill holes for dominos with the domino as if I were going to glue them together, but make these holes go all the way through.

Then, use screws from underneath the bottom up through the domino holes in the bottom into the edge grain (pilot hole) of the vertical parts. That way as the bottom expands and contracts, the screws can move within the domino slots.

Any better ideas? (Or is that idea even a good one?)

Thanks so much in advance. Using Sapele and Cherry.

Matt

[attachimg=1]

[attachimg=2]

[attachimg=3]
 

Attachments

  • Untitled.jpeg
    Untitled.jpeg
    490.5 KB · Views: 1,229
  • IMG_6088.jpeg
    IMG_6088.jpeg
    507.1 KB · Views: 1,219
  • IMG_6111.jpeg
    IMG_6111.jpeg
    487.8 KB · Views: 1,170
Nice design Matt!  Are the legs round or square with round overs?  I like the design a lot but wondered about the legs given I don’t think you have a lathe (yet!)

On the two questions - I’d mortise the uprights into the top about 1/4”.  That will only give you about 1/2” of material so I don’t think Z-clips would give you enough material for holding.  Instead, consider a cleat along the top edge on the inside attached with elongated holes.  That would let you still get a firm attachment but set them back about 2” on each side and hide the cleats inside the space.  Even do a miter on the ‘show’ edges and that could further hide it under the top.

  If you wanted to take it on, you could do a sliding dovetail with glue only on one end to accommodate wood movement.  Create a ‘dovetail patch’ to fill one end after you assemble and it would almost be hidden.

You might also consider running the grain on the two uprights vertical rather than horizontal.  That would let you glue the uprights into the top with no worry about wood movement.  It would also allow the ‘show’ edges to be long grain rather than all end grain. 

I assume you are going to stop the mortises on the top and bottom about 1” shy of the edges and notch the uprights for a clean connection between those horizontal and vertical pieces.

On the bottom, I’d do a similar mortise but just Put three screws on each upright from under the table.  Put glue on the center 6” or so and it would allow expansion to each side.  Again, if you were go to with vertical uprights, the movement would be reduced and you could glue the full width and still use screws from below to hold it tight while the glue dries.

Domino for screw slot elongation is one way to go.  But with that small a top, you can probably use screws in holes elongated with a drill bit or round hand file.  1/4” width on the hole is probably plenty.

Sapele is a great wood to work with and finishes beautifully.  One of my favorite woods!

Neil
 
Matt,
I think any option you stated works for 1.  For #2 (assuming you're using round head screws so the flat shoulder of the head can register on the flat surface of the underside of the bottom)  it seems that, unless you are cutting a 4mm Domino mortise, that most screw heads would have a tendency to slip into the mortise when tightened.  I've had this happen when the dimensions between the screw head size and through hole are very close.  You could use an oversize washer to prevent, but it becomes a bit clumsy at that point.

I would consider a specialty router bit instead, leaving the center hole unslotted so it remains static, while cutting slots of increasing lengths towards each end.

Also, consider movement in how the overall dimensions of the bottom align with the curved standoffs.  The ends of the standoffs will not maintain exact alignment (be flush with) the edges of the bottom when the wood moves.  The ends of the standoffs will either be in a state of receding or protruding from the edges of the bottom, depending on their location when assembled and the current moisture level of the wood.  A breadboard end being a typical example .  You can disguise this by recessing the ends of the curved standoffs in from the out edges of the bottom by 1/4 - 3/8 or so.  Or play on this and attach the curved standoffs to the bottom with a sliding dovetail.

Joe

 
It's a top heavy design; I wouldn't feel comfortable of using screws alone to attach the top part to the base, just in case someone bumps into the top. I'd use both dominoes (for sturdiness) and screws (for wood movement).

See the sketch (not to scale) for my idea. The dominoes are glued to the standoffs in narrow setting while they float in wide setting in the base. The screws are used and mounted in mortises as you described. You can decide how many dominoes and screws to use.

P.S. Project #39 already? Impressive given that your join date is 2018.
 

Attachments

  • 20210101_191925.jpg
    20210101_191925.jpg
    189.7 KB · Views: 284
No screws or elongated holes. Simply orient your stand pieces with grain running vertically (which looks nicer and also the way it should be), then 3-5 tenons and glue. No different from an ordinary solid panel casework, except you have top overhanging by ~ 10 cm. If you want to impress woodworking purists - sliding dovetail. If you want accents - through tenons with contrasting wedges.


Attachments

  • pic1.JPG
    pic1.JPG
    37.1 KB · Views: 268
Hi Matt,

Interesting project.   

As [member=15585]Svar[/member] and others said, make the grain of the uprights vertical so the wood movement is the same as the top and bottom.

Probably too late for this, but you might rethink the use of cherry with the Sapele.  Over time the cherry will turn dark red and reduce the contrast with the Sapele.  You might consider something else.

Bob
 
rmhinden said:
Over time the cherry will turn dark red and reduce the contrast with the Sapele. 
Good point. Although Sapele darkens too but not as much. Hopefully it'll still be fine.
 
[member=167]neilc[/member] thank you so much man for your thoughtful reply. I really appreciate it. based on everyone's feedback, I went ahead and shifted the grain so that it would point up and down. That way it will expand with the bottom piece. Not sure how I even didn't think of that myself but that sounded like the easiest/best solution!

I also love Sapele. It looks so good with an oil finish on it (like arm r seal). Again thanks for your reply. I learned a lot from what you wrote.

With regard to your question - the top and middle panels are 4/4 stock but the legs are 6/4 Sapele. You're right; no lathe. I think I'll do a 3/8" roundever or something - and with 6/4 based on the size of the leg, they'll more or less appear round (or like an oval ish) once rounded over.

[member=3075]sawdustinmyshoes[/member] thanks so much for your reply. I think that you brought up a lot of really good points. Like you said I could have made them 1" shorter (.5" each side) and that would have made it so you wouldn't notice the shrinkage. I went ahead and decided to point the grain up and down based on others' feedback so luckily I don't have to do that (they can run full width).
Appreciate your comment and help!

[member=57948]ChuckM[/member] thanks so much. I think that's a great idea, if I were to have left the grain the way it was. Good call. And appreciate you taking the time to sketch it out man, thank you. Yes 39 projects ... I don't post the small ones here (I made a Maple box joint project last week but it was small)...

[member=15585]Svar[/member] thanks so much. That is what I am going to do. I appreciate your help. Sounds like a plan.

[member=66813]rmhinden[/member] thanks Bob. Yep - just did that this afternoon. I know about the Cherry darkening - used it before, but... I'm trying to clear the wood out in my shop for a big project coming. I am planning on building a large liquor/scotch cabinet out of curly maple. I am going to be ordering about 100-120 bf of it for the project ... will start that thread at some point.

So although Cherry and Sapele aren't ideal together ... like you said. I am really just making projects for a few friends/family so that I can clear my wood storage out for a big project coming up.

I really appreciate everyone's advice! Here are some pictures from the past few hours of me milling up the legs, tapering them, and cutting the pieces for the middle pieces so the grain runs vertically like we discussed last night. Great idea. I have the top and bottom done too now... just need to do joinery and it should be done!

Matt
 
[attachimg=1]

[attachimg=2]

[attachimg=3]
 

Attachments

  • IMG_6112.jpeg
    IMG_6112.jpeg
    543.1 KB · Views: 913
  • IMG_6115.jpeg
    IMG_6115.jpeg
    448.2 KB · Views: 944
  • IMG_6116.jpeg
    IMG_6116.jpeg
    602.9 KB · Views: 934
[attachimg=1]

[attachimg=2]
 

Attachments

  • IMG_6118.jpeg
    IMG_6118.jpeg
    530.8 KB · Views: 990
  • IMG_6117.jpeg
    IMG_6117.jpeg
    493 KB · Views: 947
[attachimg=1][attachimg=3][attachimg=2]
 

Attachments

  • IMG_6121.jpeg
    IMG_6121.jpeg
    739.5 KB · Views: 848
  • IMG_6124.jpeg
    IMG_6124.jpeg
    528.9 KB · Views: 844
  • IMG_6127.jpeg
    IMG_6127.jpeg
    480.8 KB · Views: 832
[attachimg=1]

[attachimg=2]

[attachimg=3]
 

Attachments

  • IMG_6138.jpeg
    IMG_6138.jpeg
    560.5 KB · Views: 823
  • IMG_6151.jpeg
    IMG_6151.jpeg
    414 KB · Views: 838
  • IMG_6149.jpeg
    IMG_6149.jpeg
    423 KB · Views: 822
Great work as usual. From design to exclusion of the design. What I would like to see is some suckage. Your consistent high quality output is depressing.  [big grin] Keep it up.
 
tallgrass said:
Great work as usual. From design to exclusion of the design. What I would like to see is some suckage. Your consistent high quality output is depressing.  [big grin] Keep it up.
Cheer up, tallgrass. I'm telling you, he has a show-off squeaky clean workshop (pictured), and a real workshop in the basement with dust and ruined pieces, just like the rest of us.  [big grin]
 
Wait , how is that going to make me happy. You are telling me he has two workshops. One clean and nice and another one messed up with the detritus of failure? Not sure that makes me happier. :)
 
[member=72399]CeeJay[/member] thank you!

[member=2242]tallgrass[/member] I will dig up some of my first woodworking projects from 3 years ago, if that makes you feel better. They were absolutely horrible. :)

[member=15585]Svar[/member] shhhh don't tell them about that shop
 
That turned out very nice Matt.  Nice work.  The floating top is a unique idea and the curves and vertical grain really did work well.

Are you finding the legs with no cross braces across the ends are stable enough with just the dominoes on the outside corners of the bottom? 

Appreciate your photos on progress and willingness to share your work with others here.

 
[member=167]neilc[/member] thanks so much!

I think the legs are good! I sat on the table (I'm 6'4 and about 290 pounds) and it was totally fine. It's a coffee table, but yeah I think it'll be strong enough!

Totally. the vertical grain was a great idea. thanks to all of you.

Here are the final shots. Cheers everyone.

Matt

[attachimg=1]

[attachimg=2]
 

Attachments

  • IMG_6181.jpeg
    IMG_6181.jpeg
    800.3 KB · Views: 505
  • IMG_6183.jpeg
    IMG_6183.jpeg
    816.5 KB · Views: 470
Back
Top