[Project 42] Beech Entryway Cabinet

mattbyington

Member
Joined
Mar 11, 2018
Messages
797
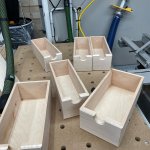
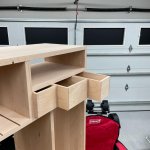
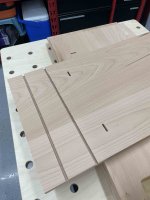
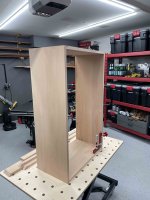
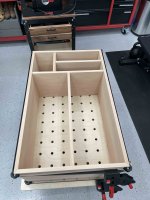
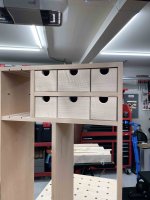
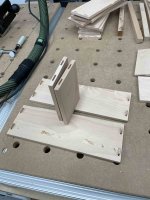
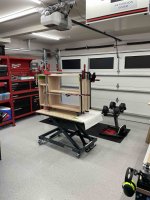
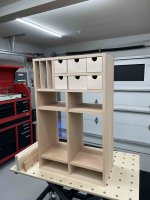
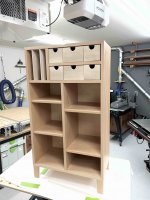
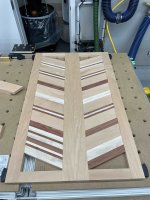
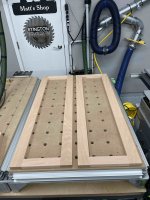
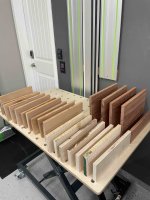
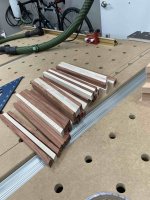
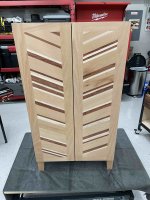
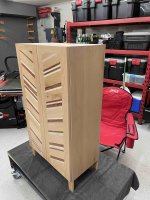
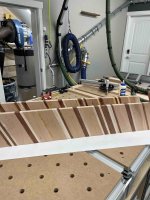
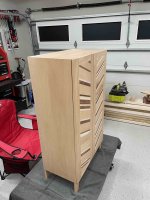
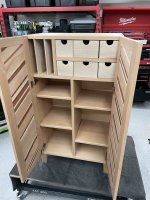
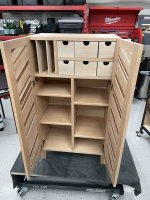
Work friend Olivia wanted an entryway cabinet for paper/mail/keys etc.

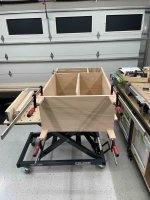
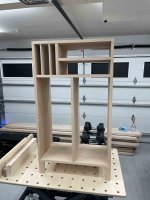
Wife and I whipped up a drawing on the computer and have been working on it for a few weeks now. Work has been busy so I haven't made as much progress as I'd like on it but hoping to make more progress this weekend.

Matt

[attachimg=1]

[attachimg=2]
 

Attachments

  • 4C4ECD48-00B9-4E69-9D9D-0CC81DA9E1EE.jpeg
    4C4ECD48-00B9-4E69-9D9D-0CC81DA9E1EE.jpeg
    386.6 KB · Views: 1,054
  • 82D381E3-9F62-4086-AD3A-7B95556CB379.jpeg
    82D381E3-9F62-4086-AD3A-7B95556CB379.jpeg
    268.3 KB · Views: 1,075
[attachimg=1]

[attachimg=2]

[attachimg=3]
 

Attachments

  • 64135066172__7CEBBD30-1794-47ED-A433-845442B4041E.jpeg
    64135066172__7CEBBD30-1794-47ED-A433-845442B4041E.jpeg
    554.4 KB · Views: 969
  • IMG_7006.jpeg
    IMG_7006.jpeg
    420.5 KB · Views: 969
  • IMG_7023.jpeg
    IMG_7023.jpeg
    439.2 KB · Views: 970
[attachimg=1]

[attachimg=2]

[attachimg=3]
 

Attachments

  • IMG_7095.jpeg
    IMG_7095.jpeg
    343.6 KB · Views: 969
  • IMG_7069.jpeg
    IMG_7069.jpeg
    531.7 KB · Views: 976
  • IMG_7042.jpeg
    IMG_7042.jpeg
    501.9 KB · Views: 984
[attachimg=1]

[attachimg=2]

[attachimg=3]
 

Attachments

  • IMG_7120.jpeg
    IMG_7120.jpeg
    387.8 KB · Views: 977
  • IMG_7147.jpeg
    IMG_7147.jpeg
    453.6 KB · Views: 960
  • IMG_7148.jpeg
    IMG_7148.jpeg
    394.1 KB · Views: 964
Another well designed and built project.  Always admire how clean your shop is.
 
Yea , you're dragging your feet.... O , please. Felder table..... nice... Have you looked into RUWI stuff, while you are busy making us all look like slackers.
 
[member=167]neilc[/member] thanks man! no glides this time, just a snug fit. Thanks for the recommendation. I'll have to try those out on a future project.

[member=4789]BIP[/member] thanks man!!

[member=72337]notenoughcash[/member] thanks so much man cheers!

[member=2242]tallgrass[/member] I did...it looks really nice. I've been checking it out. The Felder table is awesome. One of those nice-to-have's without really "needing" it but once you get it soooo useful for sanding the tops of things that are tall without repositioning all the time. Thanks man!!

[attachimg=1]

[attachimg=2]

[attachimg=3]
 

Attachments

  • IMG_7174.jpeg
    IMG_7174.jpeg
    419.5 KB · Views: 566
  • IMG_7172.jpeg
    IMG_7172.jpeg
    457.8 KB · Views: 579
  • 64402607472__07066066-CC3D-4329-A41F-69C0B9321DAC.jpeg
    64402607472__07066066-CC3D-4329-A41F-69C0B9321DAC.jpeg
    536.9 KB · Views: 575
[attachimg=1]

[attachimg=2]

[attachimg=3]

[attachimg=4]
 

Attachments

  • IMG_7197.jpeg
    IMG_7197.jpeg
    534.3 KB · Views: 576
  • IMG_7205.jpeg
    IMG_7205.jpeg
    475.6 KB · Views: 594
  • IMG_7218.jpeg
    IMG_7218.jpeg
    541.3 KB · Views: 569
[attachimg=1]

[attachimg=2]

[attachimg=3]

[attachimg=4]
 

Attachments

  • IMG_7252.jpeg
    IMG_7252.jpeg
    661.3 KB · Views: 570
  • IMG_7251.jpeg
    IMG_7251.jpeg
    572.2 KB · Views: 590
  • IMG_7232.jpeg
    IMG_7232.jpeg
    502 KB · Views: 584
  • IMG_7229.jpeg
    IMG_7229.jpeg
    505.5 KB · Views: 585
[attachimg=1]

[attachimg=2]

[attachimg=3]

[attachimg=4]
 

Attachments

  • IMG_7253.jpeg
    IMG_7253.jpeg
    506.4 KB · Views: 566
  • IMG_7254.jpeg
    IMG_7254.jpeg
    551.8 KB · Views: 567
  • IMG_7255.jpeg
    IMG_7255.jpeg
    525.3 KB · Views: 559
  • IMG_7262.jpeg
    IMG_7262.jpeg
    419.4 KB · Views: 559
Wow, that is so cool with those doors!  Another great creative design and a well-executed build.  Thanks for your continued sharing.  It provides an inspiration to all!

How are the door panels fixed in place?

Mike A.
 
[member=67555]mattbyington[/member]  really cool design.  Amazing how quickly you move from design to implementation.

I'm concerned about your panels in the doors.  Do you have any means for allowing expansion/contraction of those panels?  Given the orientation of the panel and what looks like flatsawn material, I'd expect there to be movement pushing to the top/bottom, or shrinkage throughout the year.  I know you've mentioned having climate control, but is it sufficient for no humidity change?

Still, the design is cool and you executed it very cleanly.  Your friend will be very happy.

 
Very nice looking cabinet.
It might be an optical illusion, but it looks like the drawers/bins on the right can't slide forward because of the door. If that's the case, the hinges can easily be swapped for wider throw hinges meant for cabinets with doors and inset drawers.
 
I can't see it from the photo's, but did you allow for movement of the diagonal pieces? They will definitely expand/shrink more than the stiles of the doors. Unless the room where this cabinet will be standing has the same relative humidity as your workshop, that will be a cause of concern. Not only now, but certainly over time.
 
[member=167]neilc[/member] thanks!

[member=30413]mike_aa[/member] thank you! The doors are just glued up with dominos.

[member=59039]mrFinpgh[/member] thanks so much! I'm concerned about them too. I totally recognized this. This was a point in the project where she really wanted this look, and I just didn't know how to do thin slats fixed in place at good intervals to allow for expansion - the pieces are way too thin for dominos (The accent strips). I'm certainly worried about wood movement as well. I think we'll see how it goes. Luckily, they are just doors - the carcass itself was designed with wood movement in mind (everything is going "front to back" grain-wise so it'l expand together, nothing is trapped). So worst case, I can make her new doors.

Thanks for the kind words man!

[member=1993]Frank-Jan[/member] thank you! You are right. The doors on the right don't come out hahaha. But you can take the middle drawers out and then of course just slide the ones on the right to the left a bit and they come out. It's not ideal. To your point I might change the hinges out.

[member=66485]hdv[/member] see my comment above - totally agree with you. It's a cause of concern. Totally.

Thanks everyone for the comments. This was a fun build. I am certainly worried about the movement but it is what it is. In this case it was conscious decision and not an oversight. If they break, I'll make new ones.

Matt
 
mattbyington said:
[member=59039]mrFinpgh[/member] thanks so much! I'm concerned about them too. I totally recognized this. This was a point in the project where she really wanted this look, and I just didn't know how to do thin slats fixed in place at good intervals to allow for expansion - the pieces are way too thin for dominos (The accent strips). I'm certainly worried about wood movement as well. I think we'll see how it goes. Luckily, they are just doors - the carcass itself was designed with wood movement in mind (everything is going "front to back" grain-wise so it'l expand together, nothing is trapped). So worst case, I can make her new doors.

Thanks for the kind words man!

[member=67555]mattbyington[/member] I hear you.  If I remember correctly, you have a sweet bandsaw and a drum sander.  So you're ideally positioned to get into doing veneer work.  If you did a shop-sawn veneer around 3/32-1/16th, you could glue it to MDF or Baltic Birch (both sides) and drop the risk of movement considerably.  It's possible to do it without a vacuum press, though it is much easier with one.

I was thinking about this the other day - it's pretty incredible that you're making stuff for your colleagues. I work in a related industry and it's hard to imagine doing something like that for one of them. Different corporate culture, perhaps.

 
[member=59039]mrFinpgh[/member] you are right. I have both. That's a great idea. On a future project sometime soon I will try some veneering!!

Thanks man. It's fun. I figure it's a hobby. I enjoy it. We like to live minimalist in a way and don't want to crowd our house with too much stuff. So we enjoy making things for other people. Plus...they are always so appreciative.

Here is what Olivia texted me after she picked it up the other day:

"I just have to say Matt… 1) I keep looking at this and seeing how beautiful it is and 2) it looks so incredibly professional.  A true craftsman quality work. amazing."

I think reading that ... makes it all worth it for me!

Matt
 
Back
Top