Pulling the trigger on MFT/3 Table What are the must haves?

Ray.DuBose

Member
Joined
Oct 11, 2019
Messages
27
About to pull the trigger on a MFT/3 Table and a TS75.  What are some of the must have accessories to get the most out of this table?

Thanks,
Ray
 
The MW1000 Table to use as support and extension has been something I use every project.  Also the Flop Stop for the guide rail.
 
Hi Ray,

Get the basic MFT3 and then use tall and short dogs to do your right angled cuts. This will save you buying the full MFT3 kit. There are plenty of sources for tall and short dogs - Veritas (Lee Valley), QWAS and Axminster.

Peter
 
[member=71469]Ray.DuBose[/member]

Well how much money you want to spend  [big grin] [big grin]

You'll definately need some of the quick clamps,

some clamping element,

Set of dogs,

set of rail dogs

and if ya have a few bucks left over,

MFt extension

Vacuum system set

 
You might not know it yet, but you definitively want a dust extractor.

Regarding the MFT itself: In case you're not keen on having a V-groove (to attach MW 1000 tables or Kapex UG wings) you might want to consider
=youtu.be

from this guy here on the forum.
 
There are so many possibilities from third party suppliers these days. I own the MFT3 and TS55, one of the first Festool I purchased. After investing in various dogs, etc., I found that, in my work, I just use the basics that came with the MFT3. I'd look around and see what type of dog systems are out there before buying. If your plan is to use the table/saw mostly for getting square crosscuts, then I would say you probably don't need to initially invest in anything beyond the MFT. I'm sure many will disagree but, for me, I'm sorry I didn't just keep my money. For me, the MFT3 and saw works well for the most accurate crosscutting and cutting plywood down to size ever. I've tried using the setup for ripping but, in the end, bought a small table saw for that work. So, if you buy the MFT3, I'd try it for awhile before investing in accessories. Depends how you actually use the table and saw.
 
I agree with grbmds.

Start with the MFT 'set' - it's only $100 more and comes with a 1080 rail which costs that alone.
Try out the MFT fence and definitely watch videos/read guides on squaring and use.
Definitely get a set of quick clamps. You'll need those for securing the rails/material on almost any cut as well as sanding and other uses.

Dogs and all the other accessories can be great, but can also be a lot of fiddling/learning how to get the most out of.
Personally, I like the simplest approach that gets me repeatable accuracy.  Speaking of - definitely invest in a really good square like the Woodpeckers 1281(or bigger) if you don't already have one.  Great for squaring the rail to your work or squaring the MFT fence/rail.

That's it, about $200 in extra accessories and then see what works for you and what you really need.  I've tried a lot of different accessories and add on and have gone back to basic.
 
Ray, I set up my new MFT/3 this past fall and have a few suggestions.

1. Don't assume that the factory installed stops for the guide rail supports will result in a cutting edge that is exactly 90 degrees to the front and back of the table and parallel to its CNC'd holes.

I'm sure my table left Germany well-calibrated, but by the time it reached California it was off by 1/8th of an inch over the length of my guide rail. I found the manual a bit cryptic on this point and I didn't see it discussed in the Festool setup video.

Fortunately, before making the first cut on my table I saw Andy Guile's ("The Woodgrafter") MFT/3 setup video. At 6:34 of part 1, he discusses how to check the accuracy of the factory stops and make adjustments, where needed.


2. As mentioned above, a good square is essential and I picked up a 16" x 10.5" Kinex DIN 875/1 machinist square from Taylor Toolworks for what I thought was a reasonable price. Here's a link: https://taytools.com/collections/brands-kinex/products/kinex-2-piece-din-875-1-machinist-squares?variant=18087098253363

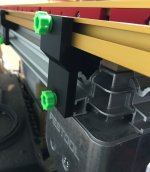
3. I found that the tab in the front guide rail support (where it connects with the channel on the bottom of the guide rail) had some play in it. Apparently, this is so common that an enterprising person developed an inexpensive product called "Slop-Stop" to deal with it. I bought one and it did the trick.

https://www.ebay.com/itm/Tune-your-Festool-MFT-rail-with-Slop-Stop/274200711773

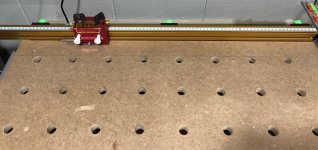
4. Peter Parfitt and others have suggested purchasing dogs for your table and I would definitely agree. Following Peter's advice, I've been getting accurate 90 degree and 45 degree cuts with my TS55 just using dogs and the calibrated guide rail. You can view Peter's excellent "New Brit Workshop" videos here:


5. Dust extractor? I tried going with a cheaper shop vac, but quickly broke down and got a CT Midi. The Festool vacs are very good.

Good luck!

 
I have the MFT but didn't get along with all the getting and keeping all the pieces square to one another (despite having a wide array of expensive setup gadgets).  Now I use the TSO GRS-16PE guide rail square (attached to the MFT flip bracket) and one of the TSO TPG parallel guides attached to the rail square. IMO this is the most accurate no-fuss setup for perfect square cuts and with the parallel guide it also makes repeatable length cuts a doddle with a minimum one time calibration.

Also, with the TSO system you get the benefit that when a large 2800x2100 sheet of material arrives I can drop it down on the floor (even on the driveway if it's heavy) on some foam and still use the parallel guides for long rip cuts and the rail square for cross-cuts. 

I have a 3m Festool rail with 2 parallel guide adaptors so I can quickly hook on the TPG 30 inch track with flip stops for rip cut. Then I have the 1.9m and 1.2m Festool rails for use with the TSO square and up to the 50 inch track and a couple of stops so I can quickly flip between lengths when making cross cuts for cabinet parts.

It's not cheap when you add up everything but for handling sheet materials it is an amazing system. If you are using the MFT setup instead of a table saw and mitre saw for real wood then other systems may suit better (actually the TSO precision triangle set is amazing for replacing the mitre saw if one desires).

 
Thanks for all the info everyone.  I went ahead with the one that comes with the track and miter. As some said it's cheaper to buy it up front and I do have projects with weird angles. 

Contacting Axminster monday to see when this set will be back in stock as I love the cam clamps and looks like this kit will fit the bill to get started.  Also it's quite a bit cheaper than the Woodpecker / Veritas Sets.  Thanks Peter for the heads up on these things and the video's you did on them!! 
https://www.axminster.co.uk/ujk-technology-accessory-kit-in-t-loc-case-106161

I started off dipping my toe in the water with festool with a Domino 700 and one of the 2019 Midi's and found I needed a better work surface to build everything off of so those that recommend getting a dust extractor I've got one.  My "Dust Extractor" prior was a shopvac I didn't hook to any tools and a leaf blower to blow it all out of the garage.. Needless to say my wife was less than thrilled with that setup.  The Midi will live by the MFT/3 for use with festool stuff.. still have my shopvac for everything else currently.

Sad part is we moved a couple years ago and waiting to see if I settle in this area or we move again so we are in a rental house and I can't hook up everything how I want it.  I have a Oneida 5HP Dust Gorilla Pro that I'll get hooked in when we are back in our own house as the Midi isn't going to keep up with my Hammer A3-31 and Hammer K3 Winner.  I usually have to just sweep after those. 
 
Sounds like you have it all sorted out. I almost balked at the price of the clamping elements but now use them, as well as the quick clamps, on nearly every project. The QWAS dogs also keep stuff from sliding around and have been invaluable.
 
Many people seem to recommend not buying the Festool hardware miter setup for the MFT. I think it depends on what you are doing. I was never sorry I bought the MFT3 set. I use it on every project I do for the most accurate cross cutting that I have ever been able to do. There are many ways to make the MFT work with your track saw and routers. For me, the MFT3 set has worked well. I own but don't use dogs much for anything but holding wood on the MFT during assembly or possibly gluing.
 
Plenty of people selling 20mm dogs on eBay for very reasonable prices.  Got nice machined aluminum black anodized set of 4 for less than brand named versions.  Can't imagine brand name versions being any better functionally.

Festool hold down clamps went for sale on the festoolrecon site. Check regularly for sales.  I find them fast to set up but occasionally short on reach.

Festool inline clamps are super nice, fast, and easy to use but expensive. One pair is all I need.

My downsizing project turned my MFT/3 to a router table as well. Added a router lift and a sweet Jessem fence.

Recently added a WoodPeckers combination t-slot/miter track to the MFT/3 which opens up a lot more hold down options.

Might add a sliding table in the future with some spare 80/20 aluminum parts...

 
Before I ever bought Festool I purchased a SawStop.  I received a reduced price by letting them keep the stock fence as I already knew I needed the Incra Joinery System instead.  I was immediately sold on the system once I watched the video which showed the 1/1000" accuracy and ability to move the fence, realize you needed one more piece of a previous dimension, and ability to return the fence to exactly the same position it was previously for identically sized pieces.

That said, the stock MFT/3 fence was a disappointment as it lacked repeatable cuts but most importantly is that it had way to much deflection for somebody who desires a high degree of accuracy.  I read on the FOG the stock fence would work well if I bought an extra fence clamp, 495541, and mounted it with 2 of these ... it was not good enough for me but FWIW I'm a bit OCD.  I also tried some fence dogs mounted from underneath and these also had enough deflection that I couldn't settle on it as a solution.

My OCD is finally settled ... I've bought the Incra Track System 52" and Shop Stop to bring the repeat-ability feature to my MFT/3 and to eliminate deflection, I spent about a few weeks designing, 3D printing, and tweaking until I had a mount which fit the MFT/3 profile perfectly.  My MFT/3 fence is now perfect and it can be removed and reinstalled easily all while keeping consistent measuring scale accuracy ...

View attachment 1

View attachment 2

View attachment 3


Attachments

  • IMG_3429.JPG
    IMG_3429.JPG
    384.8 KB · Views: 306
  • IMG_3435.JPG
    IMG_3435.JPG
    494.2 KB · Views: 283
  • IMG_3428.JPG
    IMG_3428.JPG
    557.9 KB · Views: 232
Hey Bugsy...I'm glad to see someone else that was not satisfied with the stock fence arrangement. Although in my case I wanted the additional cross cut capability.  I made model years ago using UHMW routed and screwed together, giving me 27 1/2" width cutting using the same Incra and have two stops. You'd is a much more elegant solution.  The other thing I did was extend the fence with a piece of 3/8" aluminum so that short pieces are supported thru the cut.  Also, routed the square cut line with dovetail slot so I could use another UHMW removable kerf insert.
 
Back
Top