Radiator Covers - in progress

mrFinpgh

Member
Joined
Oct 30, 2015
Messages
569
Actually, more like in the planning phase.  Hoping for some feedback in terms of design and materials.

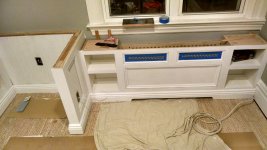
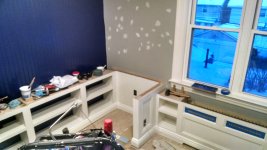
Part of what I'm doing is integrating a radiator cover into some built-ins that I'm making for my guest bedroom/home office.  However, I'm going to reproduce the same cover around the rest of the house for some continuity.

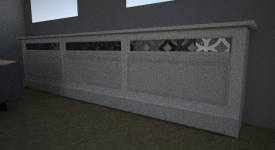
Here is a simplified mockup of what I'm thinking, in terms of style and structure.

View attachment 1

These are all going to be painted, so I was thinking about using MDF for the whole thing, except perhaps the baseboards and the trim around the panels (double ripple base cap and quarter round), which would likely be in poplar.  This would certainly keep the cost down, and I've seen some folks suggest that MDF is good for this, due to it's relative stability. 

In terms of structure, I was thinking about a box of MDF with some holes cut out of it, and then laminating an MDF frame on top of that for the panels.  Miter the trim to pin inside of that, and then making a lid by laminating  1/4" mdf  under 3/4" to create a shadow.

Alternative choices I've thought of include:
  • MDF for the box, poplar for the frame and trim.  plywood for the lid.
  • Plywood for the box, MDF for the frame, poplar trim.  Plywood lid./li]

Those obviously add a little expense, but it's only 4 radiators to cover.  If there is a significant benefit to going with one option over another, I definitely want to know about it.

Thanks,
Adam
 

Attachments

  • Screen Shot 2016-01-13 at 11.49.56 AM.png
    Screen Shot 2016-01-13 at 11.49.56 AM.png
    417.8 KB · Views: 1,013
You could put a fabric covers over it, but those too would have an insulating quality.
Are going to use some small 12V DC fans, or rely on convection to move the air?

The metal looking grill in the photo makes sense.
 
Hi Holmz,

I think Fabric would  be an interesting option - maybe speaker grill cloth?  I imagine that doesn't block much air.  I'll most likely use radiator screening from the big orange box store down the road.  I'm expecting it to be convection only.

I designed them this way based on this page, which discussed which designs were more or less efficient.  I plan on the top having perforations as well, so that heat can migrate up.

Thanks for the idea.  Now I need to make myself go focus on my work!

-Adam
 
Just a quick update.

The initial inspiration for the radiator covers was to continue the built-ins I'm making for my guest bedroom.  It's a pretty small room (10x11) with no storage, and I recently changed jobs where I work from home most days.  So having some storage and an office space seemed like the right thing to do.  Once I got started with designing the cover, I realized that I should probably come up with a consistent design for the other ones in my house.

I had asked about crown choices earlier, but I realized the ceiling has a good 5/8ths drop over 8 feet.  I'm going to probably put a piece of trim up around the beadboard, but leave the rest unadorned. 

Supposedly, this design is actually somewhat efficient, because the heat comes out the top.  I base that on some research I did on the internet, not any background in physics  ;)

I'm always surprised how long these things take me. I think that partially, it's because I can only work on it during the weekend.  Partially because I tend to start late.  Partially because I'm still pretty green to this kind of stuff and probably take a lot longer to make decisions about how to do everything.

Anyways, here's how things are coming along after this weekend.  Remarkable what some caulk will do before paint.  I need to put down some quarter round still, but things are moving along.  Incidentally, I noticed that there's a section of plaster where the top coat seems to be delaminating from the base coat, which is directly on the brick - right in the corner where I had to scribe the beadboard to the wavy walls. I think the paint may be what's holding it up.  [eek]  Anyone know whether that can be reinforced without cutting out the plaster and patching? 

View attachment 2

View attachment 3

I put a photo of what the room looked like before we put down the cork floors - that's some fine vintage linoleum.  I think the new look is an improvement.

View attachment 1

-Adam
 

Attachments

  • 10854293_10152640494707120_6832480943513856652_o.jpg
    10854293_10152640494707120_6832480943513856652_o.jpg
    212.2 KB · Views: 429
  • IMG_20160123_192939150_HDR.jpg
    IMG_20160123_192939150_HDR.jpg
    3.5 MB · Views: 752
  • IMG_20160124_173923804_HDR.jpg
    IMG_20160124_173923804_HDR.jpg
    3.2 MB · Views: 567
What a difference! Next thing on the to do list is the strike plate on the door jamb.
 
That's certainly a nice improvement, it cleans up the room a lot.

FWIW, as per Holmz inquiry, you may want to think about providing the option of using a small muffin style fan/fans to help move the air from inside the enclosure to the room. The reason is, I just noticed the square area of the cold air intake vs the warm air exhaust. Muffin fans may help mitigate the difference in size.

Also, a piece of foil faced foam board placed between the wall and the radiator will help direct the heat through the front opening of the cover. If you lack the space necessary for foam board, then try a piece of 20/22 gauge aluminum sheet or galvanized sheet metal.
 
It looks great, however.. You have at least one uninsulated exterior wall, with a double window working against you; I'd be concerned you've reduced heat output of the rad too much.  As Cheese mentioned the lower air intake looks very small, at least to my layman's eye. 

The plaster washers Peter linked to aren't going to work for you since you have plaster over brick.  I'd remove the delaminating plaster and patch/skim as needed.  If the area only needs a thin coat you could use regular drywall mud.  If it is fairly thick, say more than an 1/8", you'll need to build it up in several coats, I'd use Durabond or Structo-Lite (or a like product).       
 
A small DC fan with a thermally operated switch could also help??
 
Thanks for the feedback, everyone. 

Dave - there's actually never been a proper door for that room since I bought the place.  The hinges and strike plate have about 1/16th" of paint covering them.  I guess I'll have to deal with that soon.

Everyone who mentioned the cold air flow -- I'm curious to know more about this fan idea - I'm not familiar with the notion of putting a fan in a radiator cover, but it sounds like this is a confirmed way to improve heat output.  I am going to wait and see what the performance is like with the 1.5" opening at the bottom.

Do folks think it might be worth exploring - for the other 3 covers at least - routing a series of slots in the bottom of the cabinet to allow for greater air flow?  I considered that as an alternative design, but this design has the benefit of not requiring a router.

-Adam

 
Brice Burrell said:
The plaster washers Peter linked to aren't going to work for you since you have plaster over brick.  I'd remove the delaminating plaster and patch/skim as needed.  If the area only needs a thin coat you could use regular drywall mud.  If it is fairly thick, say more than an 1/8", you'll need to build it up in several coats, I'd use Durabond or Structo-Lite (or a like product).     

That's kind of what I suspected.  Last time I used Structo-lite, I ended up wearing a fair amount of it.  The guy I hired to fix up all my plastering errors (in judgement and technique) was able to do in 4 hours what I couldn't do in 20.  Apparently skill and experience make a difference.

-Adam
 
Holmz said:
A small DC fan with a thermally operated switch could also help??

This sounds pretty interesting.  I'll have to remember this if it turns out not to be warm enough.  I've never spent any time in the room where I wasn't working on it or the room next to it, so I've never had the opportunity to notice. 

-Adam
 
FWIW Adam, if this were my project, I'd continue in the direction that you're going. If there isn't enough heat coming from the radiator then I'd install a reflector behind the radiator and monitor the room temperature.

If the room is still not warm enough then you have a tougher decision to make. Whether to increase the size of the cold air intake or to add small muffin fans to the mix.

Increasing the size of the cold air intake is the cheapest/simplest approach however you may not be fond of the results because of aesthetic issues.

Adding muffin fans may be a perfect solution but there's a price to pay for the hardware, placement and integration. If the decision is fans, then I really like Holmz suggestion of a thermally actuated fan.
 
I like that Holmz...I may have to integrate one of those into some fans I have that are cooling older Mac audio gear. On quieter passages I hate it when I can hear the fans in the background.

The fans are hooked up to come on when the gear is turned on, but there's no need for that as the Mac stuff will take care of itself until it's used at full power output for extended periods of time. It just needs some air movement every now and then. I like...
 
[member=44099]Cheese[/member] -- Oofdah ! I hate hearing stuff over silence.
Some of the worst recorded music is the older Violent Femmes, but I like that their music has rests and quiet passages.
Of course they are a few hours south of you, or maybe south of me for he bass.
 
That is really nice work - love the panelling.  I am reading this with interest as I have just started to install some radiator covers (as part of a long ongoing project).

I am interested in the comments on heat efficiency - I agree I would make sure there is good insulation behind. I have used a combination of insulation board, then plywood, then foil covered polystyrene roll fixed with wallpaper adhesive, but there are various hi tech multi layer insulation products that I may use as I progress on to other rooms.

I looked at more radiator cover designs than you could imagine and most of them were fairly tacky. I worked out that the front of the cover needed to be heat emitting (ie open) and that was one common feature of all the designs I saw.  I suspect a large part of the heat emission of the radiator is through convection, so I don't know how much the radiation through the front actually matters.  I intended to use one of the metal screens, but ultimately decided they would look a bit dowdy, although I may use them elsewhere.

Size wise for the upper and lower airways, I decided to err on the side of caution and I decided I was happy with these fully open.

On the cover shown below (also a WIP) I used pierced mdf sheet, set in a mdf frame, all spray painted. I am happy with the effect for that location and the heat output does not seem to be compromised. Btw the top is a bit of old slate from an old fire surround - I was in two minds about whether I wanted it to be stone as of course it does heat up, but that was a common way and it works nicely.

One important trick is to paint the radiator and the visible area of wall behind a dark colour so it all disappears. I have used some Rustoleum Bronze paint that is really nicehttp://www.amazon.co.uk/gp/aw/d/B00...4414&sr=8-1&pi=SY200_QL40&keywords=rust-oleum+bronze&dpPl=1&dpID=31lWDokhG-L&ref=plSrch#immersive-view_1454154431366

Anyway here is a pic of the simple cover (and unfinished environs)


Cheers
 
scholar said:
I meant to add: how will you gain access to the radiator for servicing?

On my simple cover, I made the front a clip in using these Lamello clips

You make a very important point on providing access to the radiator. Sooner or later it will need to be bled or the valve changed when it starts to leak. I like your solution using the Lamello fast clip.  [thumbs up]

 
they look great this is my version of a rad cover with a little tropical island on the front i have since put white speaker fabric behind the front to hide the rad will put up finished pics soon
 

Attachments

  • DSCI0271.JPG
    DSCI0271.JPG
    2.5 MB · Views: 462
Back
Top