Refinishing & Rebuilding Teak Outdoor Furniture

CeeJay said:
The patio is now covered but you can see the new table. Still gets a bit of rain in storms, and is exposed to the morning sun.

[member=72399]CeeJay[/member] setting aside the fine workmanship on the table and your success w/ the Osmo UV product, that is a stunning patio.  I am envious.

 
setting aside the fine workmanship on the table and your success w/ the Osmo UV product, that is a stunning patio.  I am envious.

Thanks! It’s made a huge difference. Rather than sitting out in the garden once a month or so it’s now 2-3 times a week.

Can’t take credit for the construction. The guys who originally built our house put it together.

I do have the breakfast bar to construct next tho….

Sent from my iPhone using Tapatalk
 
That outside area is really nice...would kill for. That's my style, very very nice.  [big grin]

 
Cheese said:
Unfortunately, all were water penetrable and thus left visible marks on the furniture and obviously physical damage which meant I had to refinish these items yearly...this post is my attempt to outgrow that nasty habit.

I found a custom cover manufacturer last year and had covers made for all the furniture. My thought was that until I got the furniture cover problem under control, I'd be refinishing this stuff till the day I died...that's not a pleasant thought.
Even Sunbrella which is the standard for the marine industry must have a DWR (Durable water repellent.) If it needs to be done yearly so be it. I stored my boat outside full sun in California. Normally we actually do get rain here, although the storms in MN enthralled me. I would wash my cover in an industrial machine at a laundry mat, using something like Woolite or Nikwash wash. After washing the cover, apply Nikwax to the load. The difference in water repellency after was night and day. Sunbrella is breathable which is what keeps the mold down. Gortex chair covers might be a little expensive.

For clothing, especially for rain coats in MN, I'd first wash a couple of loads, then add the DWR to the load and run the machine but wouldn't let it drain. You can run a whole bunch of clothing thru on a single bottle.https://www.amazon.com/Nikwax-TX-Direct-Wash-in-Waterproofing/dp/B07P61CQ96https://www.amazon.com/Nikwax-Hards...IS/ref=pd_lpo_card_3?pd_rd_i=B000PGOOIS&psc=1

Vinyl would still need the thread penetrations sealed with a seam sealant. Aquaseal mixed with Cotol240 to thin it works great, or buy the single part tent seam sealer. in maintaining multiple drysuits (White water kayaking in MN after the ice breaks up can be cold), so I buy the BIG tubes of Aquaseal and freeze it between uses. Last for years that way. The quart of Cotol240 lasts years to. Sometimes it is a 50/50 mix for penetration, or for a fast dry time to get back in the water.

Cheese said:
Here's what I decided upon and I'm totally satisfied. I've had them for a year and have no regrets, be aware that if you order the heaviest gauge vinyl like I did, they do become very heavy. The next time I'd opt for the lighter version because high winds are not an issue.
https://www.alcocovers.com/?gclid=EAIaIQobChMIvPn9yJKR8QIVjm5vBB1H8QNGEAAYASAAEgJyUPD_BwE
I buy rolls of Sunbrella from Ebay for cheap when needed. Having an industrial sewing machine opens up lots of options. When I actually have some free time I plan to make a hanging chair. Hmmm...I should start looking for the right hard piece of oak still somewhere in a tree as I have been trimming them back and removing dead branches for fire prevention along with tree health. I chipped up a bunch that were dry and hard as a hickory baseball bat or so it seemed. Gotta start using more local resources.

Cheese said:
As far as snowfall is concerned, the average for Minnesota is from 38" to almost 70".  [eek]
I was freaked out when I moved to MN because of the winters. Turned out other than being cold, it's icy sometimes even with salt, but the snow storms were often pretty tame. Used to sit on the couch and enjoy them while toasty warm. A couple years in MN there wasn't enough snow to go cross country skiing more than a couple times in the winter. Being from NorCal..."Lake Tahoe gets an average of 215.4 inches of snowfall, or a little under 18 feet. Upper elevations can get between 300 and 500 inches per year." I really didn't need my Audi Quattro in MN but sometimes it was nice to have. My wife took the campus connector to the lab most every day so she rarely drove, other than to the store, and she got exercise walking to the bus stop.
 
Cheese said:
bruegf said:
On my boats I always used something like this
https://www.totalboat.com/product/2-part-teak-cleaner/

If you plan to finish the teak in any way take a look at Sikkens cetol.  It holds up better than spar varnish and is a lot less work to apply. 

Ya, I'm familiar with TotalBoat products. Good to know that their 2-part teak cleaner works well. I'll pick some up and try it. I was actually looking at the TotalBoat penetrating epoxy first before I decided to use the Smith's CPES.

Is there a particular Sikkens Cetol that you're familiar with? They offer 19 different flavors.  [smile]

I'm using this
https://www.amazon.com/Interlux-IVA316-QT-Natural-Fluid_Ounces/dp/B0017KQKX8

Fred
 
Peter_C said:
For clothing, especially for rain coats in MN, I'd first wash a couple of loads, then add the DWR to the load and run the machine but wouldn't let it drain. You can run a whole bunch of clothing thru on a single bottle.https://www.amazon.com/Nikwax-TX-Direct-Wash-in-Waterproofing/dp/B07P61CQ96https://www.amazon.com/Nikwax-Hards...IS/ref=pd_lpo_card_3?pd_rd_i=B000PGOOIS&psc=1

Interesting...didn't know that even existed.  [smile]  Thanks, there could be a lot uses for that stuff.
 
bruegf said:

Thanks...that seems very similar to the Star Brite product I'm using. Last spring I sanded the table legs and applied this stuff.

[attachimg=1]

Typically I oil or use Surfix on the legs but that stuff only lasts for 3-4 months before it starts to go away. Short unexpected rain showers, splash back from the patio and my wife with a garden hose all take their toll. The legs water stain, then turn brown/black and finally become rough probably because of the raised grain.

So I sanded the legs and applied Star Brite. One year later the legs still look like they did last spring. No stains, a uniform color and the surface is still smooth. After those results I decided to use Star Brite or Sikkens on the structural parts of the table and then use Surfix on the table top. That way the largest area that's visible has that luxurious look and smooth feel of a oiled/waxed finish.
 

Attachments

  • Starbrite Teak Sealer Classic Teak.jpg
    Starbrite Teak Sealer Classic Teak.jpg
    213.5 KB · Views: 1,591
So, after the first look-see of the teak furniture, I detected many areas that needed attention. The question then became where do you start and what is the largest potential for failure if something is not done.

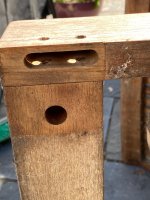
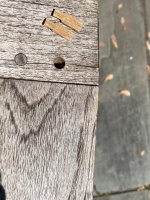
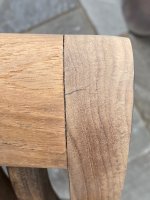
I decided that the end grain of the table legs & chair legs presented the largest liability. Once those things go soft, the only solution is to start cutting them back to good wood.

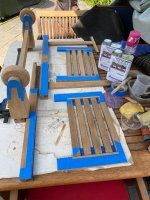
Also, knowing that it takes days to dry out the end grain, that also prompted me to attack those areas first as we'd had a week of very hot & dry weather. So, first thing is to mask the legs and sand them with 80 grit to prepare them for the epoxy.

Here's a shot of 32 of the legs masked and pointed to the heavens for drying.

[attachimg=1]

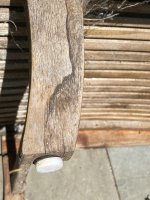
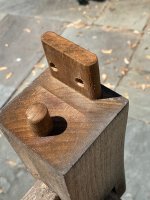
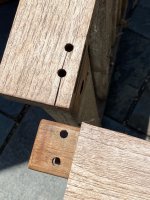
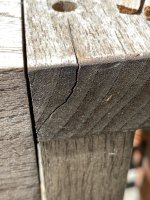
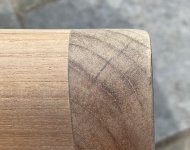
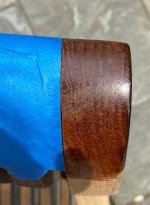
The issue is that despite the fact that I installed 1/4" thick glides on every leg, the bounce-back of the rain from the patio still got sucked up into the legs and most of them started to split. Here's a shot of the leg from the chaise lounge with the glide still installed, notice the 2 cracks.

[attachimg=2]

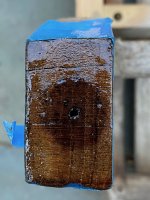
The epoxy I decided to use is Smith's Clear Penetrating Epoxy Sealer™, there has been some testing done and it will wick into the endgrain of wood up to 12". The drill I followed, was to use a foam brush and dab a large dose of the EPES on every leg and then minutes later apply another dose. Continue to do this until the leg surface begins to gloss over. I think I averaged 7-8 coatings before the legs refused to absorb more CPES. This stuff is quite popular in the wooden boat market.
http://www.smithandcompany.org/CPES/

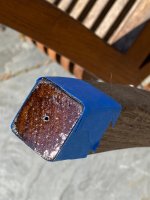
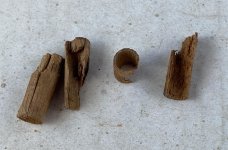
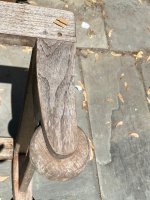
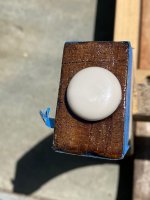
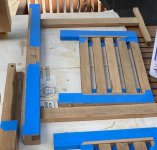
Here's a shot of the bottom of a leg after 7-8 coats of CPES. Note the original nail hole for the glide that I attached years ago.

[attachimg=3]
 

Attachments

  • 10492.jpg
    10492.jpg
    635 KB · Views: 1,567
  • 10506.jpg
    10506.jpg
    381 KB · Views: 1,509
  • 10494.jpg
    10494.jpg
    200.9 KB · Views: 1,524
I watched a Wood Whisperer video about outdoor furniture. He tapes the ends of the legs and pours a solid ‘foot’ of epoxy about 5-10mm thick to seal the ends.

He’s in Colorado and seemed pretty positive about the results after a few years.

Sent from my iPhone using Tapatalk
 
CeeJay said:
I watched a Wood Whisperer video about outdoor furniture. He tapes the ends of the legs and pours a solid ‘foot’ of epoxy about 5-10mm thick to seal the ends.

He’s in Colorado and seemed pretty positive about the results after a few years.

That's good to know, seems like I'm on the right path.  [smile]  I'll be reinstalling new glides on all of the legs, that keeps the epoxied bottom about 1/4" above the blue stone surface. It also means that as the chairs are slid across the stone surface, any wear will be on the glides and not on the epoxied legs.

When I removed all of the old glides, probably 40% of them were worn down to the surface of the nail head that attaches them, so glides do prevent a lot of wear on the chair legs. The glides also dramatically reduced the legs from chipping.
 
So as I mentioned earlier, all of the dining table chair legs have been epoxied and new glides installed, that means the chairs can be repositioned around the table, right side up and covered if necessary.

So, on to the chaise lounge which has 2 legs and 2 wheels. The wheels have end grain on 2 sides (obviously) and are in pretty rough shape. The plan is to epoxy the 2 legs and epoxy the entire wheel along with a small end grain surface that faces the bluestone.

While looking at removing the wheel assembly I noticed a crack in the frame of the chaise lounge on both sides. So this entire wheel assembly will need to be removed to work on the wheels and repair the frame.

[attachimg=1]

[attachimg=2]

[attachimg=3]

I'll need to drill out the teak dowels to remove the wheel assembly.

[attachimg=4]

[attachimg=5]

The wheel assembly was attached in a rather unique manner, a tenon and a large dowel along with the 2 small 8 mm dowels.

[attachimg=6]

[attachimg=7]

[attachimg=8]
 

Attachments

  • 10511.JPG
    10511.JPG
    789.1 KB · Views: 1,087
  • 10510.JPG
    10510.JPG
    799.2 KB · Views: 1,058
  • 10509.JPG
    10509.JPG
    953.1 KB · Views: 1,065
  • 10508a.jpg
    10508a.jpg
    199.4 KB · Views: 1,038
  • 10508.jpg
    10508.jpg
    445.5 KB · Views: 1,054
  • 10502.JPG
    10502.JPG
    906.6 KB · Views: 1,073
  • 10501.jpg
    10501.jpg
    626.9 KB · Views: 1,112
  • 10504.JPG
    10504.JPG
    838.9 KB · Views: 1,074
So, slowly but surely I'm working my way through these teak "left au naturel" issues. Here's an earlier shot of one of the the chaise lounge feet that had a glide attached for 10-15 years. Despite the leg being elevated off the patio surface, because the teak is untreated end grain, the splash back of rain on the patio still cracked the leg in two places. 

[attachimg=1]

This photo shows what the leg looks like after 6 applications of Smith's CPES. This stuff just keeps absorbing into the grain, both face grain and end grain. If I remember correctly, up to 12" in DAMAGED end grain and up to 2" in DAMAGED face grain.

[attachimg=2]

This photo is after 8 applications of CPES when the internal wicking finally stopped. I then added the new glide. So, one leg finished, only 49 left to go.  [smile]

[attachimg=3]
 

Attachments

  • 10506.jpg
    10506.jpg
    381 KB · Views: 1,028
  • 10507.JPG
    10507.JPG
    760.2 KB · Views: 1,004
  • 10507a.JPG
    10507a.JPG
    571.7 KB · Views: 1,044
As mentioned earlier, the top part of the chair back has the most exposure to weather and is also most vulnerable to leaky furniture covers. If the cover leaks, the cover becomes saturated with water and just continually transfers that moisture to the top of the chair back which is end grain wood.  [eek]

Thus, cracks develop and some of them are severe. Here's a small one but even small ones are all over the top of the chair...on every chair. After looking at the 8 dining table chairs plus the 2 club chairs and finding cracks in all the top rails, I decided to coat every top chair end grain rail with CPES to seal up the surface. Here's what it looks like.

[attachimg=1]

The nice thing about this product is that it wicks into the interior surface so that you can remove the glaze coat from the outside surface but it will still protect the wood from penetrating water. This is what it looks like sanded. You can still see the crack in the teak but it is now filled with epoxy while the rest of the surfaces look like...teak.  [smile]

[attachimg=2]

Again, CPES has been applied to the end grain of the top of the chair, it darkens the wood after each application but the excess can be sanded off revealing the natural color of the teak while also filling up the end grain. The end grain has been sealed and you are now free to top coat with whatever product you prefer.

[attachimg=3]

[attachimg=4]

[attachimg=5]


Attachments

  • 10575.jpg
    10575.jpg
    246.6 KB · Views: 954
  • 10574.jpg
    10574.jpg
    449.9 KB · Views: 1,031
  • 10573.jpg
    10573.jpg
    476.4 KB · Views: 1,029
  • 10571.JPG
    10571.JPG
    812.1 KB · Views: 1,003
  • 10570.jpg
    10570.jpg
    267.1 KB · Views: 999
The chaise lounge has 2 small pull-out teak shelves under the frame of the chaise. They originally functioned well however, they've been gradually getting more difficult to operate. I decided to pull the assembly apart and fix the problem.

Once the shelf assembly was removed I noticed several cracks on the shelf guide rail and ultimately one of the guide rails was cracked for about 8". I decided to cut the cracked item out with the Vecturo so that I could get better glue coverage when I reassembled it.

A photo of the disassembled shelf assembly along with the broken rail.

In the 2nd photo, the rail on the LH side attaches to the 8" long piece on the upper RH side.

[attachimg=1]

[attachimg=2]


Attachments

  • 10523.JPG
    10523.JPG
    875.4 KB · Views: 952
  • 10523a.JPG
    10523a.JPG
    145.5 KB · Views: 970
mwolczko said:
Did you consider immersion to seal the ends of the legs?

Yes I did, that was originally the method I was going to use because it seemed so simple, however, when I started to think about the logistics of immersing 50 legs into 50 small petri dishes my head started to hurt.  [smile]

The second concern was trying not to waste too much of the CPES. A 2 quart kit costs about $100 so I wanted to maximize the coverage.

And interesting enough, this CPES wasn't even purchased for this project. It was purchased for a window project to stiffen up some soft frames because of an excess of indoor humidity over the winter. I hadn't started the window project yet when I decided this stuff would work well for the teak furniture. 
 
That’s looking terrific! Quite a project.

What are you using to sand in between the slats of the chair backs and seats?
 
Cheese said:
Yes I did, that was originally the method I was going to use because it seemed so simple, however, when I started to think about the logistics of immersing 50 legs into 50 small petri dishes my head started to hurt.  [smile]

The second concern was trying not to waste too much of the CPES. A 2 quart kit costs about $100 so I wanted to maximize the coverage.

Fair enough.  None of the projects I’ve undertaken were amenable to immersion (too big) but I wondered about finding a few jars just wide enough to hold a leg.  From my experience curing of an open container of mixed resin takes days so you could have immersed a couple of chairs for a few hours, topped up the jars, and repeated.
But what you’re doing is great.  I’m just curious as to how well immersion works. And I’ll add my thanks for your posting details and great photos.

Mario

 
Dr. P. Venkman said:
That’s looking terrific! Quite a project.

What are you using to sand in between the slats of the chair backs and seats?

Thanks...for the seat bottoms I'm not going to sand between the slats as the chairs always have Sunbrella cushions on them.

For the chair backs I'm also going to not sand between the slats because they also always have cushions covering them, however, the backs are open from the rear and if the slats from the side look tacky, then I'll sand between them. So, I'll finish a chair first and see what it looks like, that'll dictate the direction I take.

I did pick up a LS 130 profile kit as [member=3592]mwolczko[/member] suggested so I could go that route and I also have a DX 93 that should reach between the slats.  So I do have some options. [smile]

 
When I refinished my Adirondacks a couple years ago I found the extended delta pads for the RO90 handy.
 
Back
Top