Refinishing Stairs with wooden tiles

ear3

Member
Joined
Jul 24, 2014
Messages
4,341
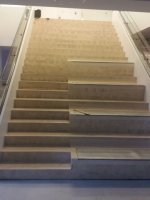
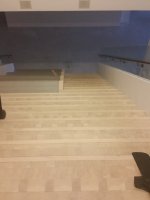
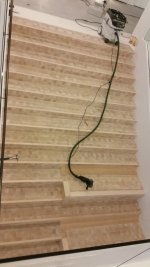
So I'm looking at a commission to refinish a large stairwell that connects two floors of this gallery:

View attachment 1

View attachment 2

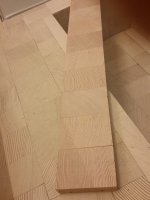
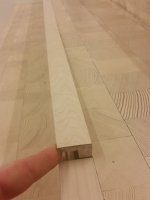
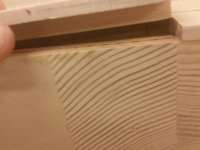
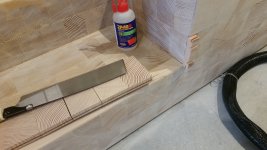
They want to do a repair job rather than a renovation/rebuild -- fine by me, as I'll be billing hourly on this -- which essentially consists of filling and sanding everything, with some spot repairs where necessary.  The RO150 and the RO90 delta pad will obviously get a good workout on this job.  The stairs are covered with these end grain softwood (spruce? fir?) tiles held together with a wire running through the slot routed along the edge, and the treads are capped with a piece of dadoed maple, which in certain places has come unglued:

View attachment 3

View attachment 4

View attachment 5

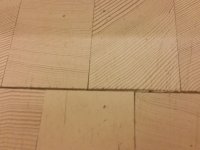
In a few places the gaps between the tiles have gotten significant, though it's hard to tell whether this is due to initial poor installation or because they have been used and abused.

View attachment 6

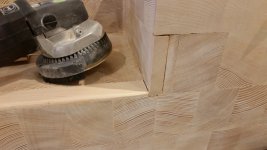
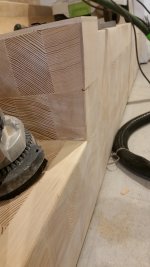
At least part of the installation was done very poorly when they installed the maples caps at a later point (the wood tiles used to go all the way to the edge of the tread), since many of them are not sanded flush with the riser and on some of them I can still see the marks of the jigsaw (!) blade that was used to cut them to width.

In those places where the maple caps or the tiles are no longer sticking, there doesn't seem to be any degradation of the underlying structure that is causing them to come undone -- the underlying structure is concrete and therefore should be pretty stable, though I'm not sure what if any buffer/underlayment there might be between the tiles and the concrete that was used for purposes of adhesion.

So questions:

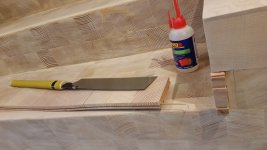
1)  Best filler for use on this sort of wood floor to fill in the gaps between the tiles?  It will be finished with a white wash so the initial color just has to be close, or at least not any darker than the wood tiles.

2) I'm going to have to pull up and then reglue maybe 3 or 4 of the maple caps, and perhaps one or two rows of tiles (though in my initial inspection I only saw three to four tiles that were no longer adhering).  So what is the best adhesive and procedure for reattaching them, since it will be difficult to generate any type of clamping force on either the tiles or the caps.  Should I go with some type of fast and strong adhesive, like 2P10, or should I use some sort of mastic with brad nails to force it down, going back later to fill the holes?

Any other thoughts or advice would also be appreciated.  Thanks much

EDIT: Since the finish is very light (some sort of water-based tinted polyurethane) I don't anticipate many problems with the paper clogging up on the ROTEX.  But is this perhaps a job for the Metabo LF724, or is that overkill (the tiles are 1/2" thick, but the dadoed part of the maple cap is slightly under 1/4"):
 

Attachments

  • 20151228_153744.jpg
    20151228_153744.jpg
    1.2 MB · Views: 382
  • 20151228_154441.jpg
    20151228_154441.jpg
    1.2 MB · Views: 287
  • 20151228_153817.jpg
    20151228_153817.jpg
    1.7 MB · Views: 261
  • 20151228_153858.jpg
    20151228_153858.jpg
    1.2 MB · Views: 295
  • 20151228_153930.jpg
    20151228_153930.jpg
    2.4 MB · Views: 274
  • 20151228_154456.jpg
    20151228_154456.jpg
    2.6 MB · Views: 257
So over the course of the past two weekends, I managed to finish the stairwell:

View attachment 1

View attachment 2

View attachment 3

I tested the Metabo briefly, but because of the uneveness of some of the tiles, it turned out not to be the right tool for the job, so I just went with the Festool sanders, riding the RO150, RO90 and RTS400 most heavily. The guy I was working with -- who has also been assembling a nice Festool arsenal -- was so impressed with the RO150 that he ordered up one for himself halfway through the project, which sped things up even more the second weekend.

The total surface area of the stairwell, including treads and risers, was about 310 square feet.  Not sure how other people would estimate the job, but I ended up logging 37 hrs.  There were 28 additional man hours contributed by various people sanding and filling, though because some of those folks were relatively new to the sanders, I think their work to time ratio was probably not as efficient as it could have been.  In those 65 hrs we sanded off the finish, applied wood filler, sanded out the filler, applied a second coat of filler to maybe 2/3rds of the surface, then sanded that off.  In addition, I spent some time nailing down the all the hardwood caps on the treads as well as some of the strips of tiles that were loose; ran a roundover bit with the 1010 over the caps; and pieced in a tiny section on the bottom riser that had broken off.  Incidentally, this last bit was a triumph for the RAS.  I simply cut a piece off one of the extra strips of tile to the dimensions of the void, glued it in with 2P10, then filed it down flush with the RAS.  After filler was added to the gaps it looked like nothing had ever gone wrong with that section:

View attachment 4

View attachment 5

View attachment 6

View attachment 7
 

Attachments

  • 20160110_161451.jpg
    20160110_161451.jpg
    1.7 MB · Views: 247
  • 20160110_160414.jpg
    20160110_160414.jpg
    2.1 MB · Views: 251
  • 20160110_160347.jpg
    20160110_160347.jpg
    1.9 MB · Views: 244
  • 20160110_181422.jpg
    20160110_181422.jpg
    2 MB · Views: 268
  • 20160110_181501.jpg
    20160110_181501.jpg
    1.6 MB · Views: 246
  • 20160110_152425.jpg
    20160110_152425.jpg
    1.7 MB · Views: 268
  • 20160110_161502.jpg
    20160110_161502.jpg
    1.7 MB · Views: 328
Lastly, I learned a valuable lesson yesterday about managing the client's decision making process.  It's a little difficult to see in the pictures in the first post, but the original finish was a white stain.  I guess they had done it to match the overall aesthetic of the office, where almost everything in the place (walls, ceilings, floors, furniture) is white, but after years of exposure the stain had turned a kind of sickly yellow.  Since they said they wanted to return the stairs to their original color, I recommended the white tinted Osmo.  We even ran a test where we applied the Osmo side by side with a new application of the original finish on one of the stairs after it had been sanded down, and they chose the Osmo.  So when I was almost finished sanding yesterday, and getting ready to do a first application of the Osmo, I took a step back and looked at the stairs.  The look of the raw wood, even including the uneven tones on some of the risers, seemed good just as it was.  There was now a nice break/contrast with the oppressive whiteness of the office space, but once a white finish were applied it would mute everything and produce an overall bland effect.  And I thought, if these were my stairs I would simply apply a clear coat of the Osmo and leave it at that.

So I contacted the guy who had contracted the job and said that I just wanted to go on the record to say if it were my decision, I would preserve the raw wood look.  He thought about it for a second, and then said we should get in contact with the office manager.  So I got him on the phone, explained what I was thinking, and asked him just to reflect for a second and see if he was sure about the color choice.  So it turns out that over the course of the last week (we were only working on weekends), many people in the office had been commenting on how beautiful the stairs now looked in their raw state.  And when we had done the side by side test, in the back of his mind he himself preferred the look of the raw wood, but didn't say anything because we had already started down the decision path of doing a white finish.  So now that he had a chance to reconsider, he was more than happy to go with my recommendation.  So we're going with a clear coat.  Moral of the story: don't do something just because that's what the client thinks they want.               
 
Very nice, How did you protect the steps during the week between start and finish? Also what did you end up using as a filler
 
Very nice job Edward...this is the first time I've seen this post, it got lost among all of the other holiday activities.

I'm so glad the grain will show through, it's beautiful.  [thumbs up]

I wonder if some of that is Douglas fir?
 
My opinion is that is douglas fir. Great job. The museum I teach at has douglas fir end grain floors in the studios. I have noticed a fair amount of gaps between the tiles, having said that it is the only end grain doug fir floor I have spent time with so the gaps may or may not be a thing with these floors.  Are the tiles floating or glued?
 
I agree with monstrol that it is Doug fir, because of what the grain pattern is and how tough the end grain wood is. You use end grain lumber for chopping boards, why wouldn't you use end grain lumber for steps...seems like a no-brainer as far as I'm concerned.

There are a ton of people on this forum that are more experienced with identifying and using Doug fir.

From my experience, as it ages it just becomes tougher and more impervious to deformation. I pulled out a number of Doug fir studs that were 40-50 years old and when I tried to reinstall them with 16P nails...the nails bent. That was my first foray into pneumatic nailers...nothing else worked.  [eek]
 
[member=5893]monstrol[/member]  It turns out it was douglas fir -- they had a box of leftovers in a closet which had an identification/product sticker.  Now...being relatively new to flooring, my understanding of the difference between floating and glued is that on floating you have some sort of tongue and glue setup that keeps them in place once they are nailed in, vs. the glue down where the edges of the tiles are straight and each individual strip/piece gets glued.  The edges of these tiles are, indeed, straight, but I was a bit confused because in some places it was behaving almost like a floating floor.  That is, some of the tiles were loose -- not just a strip but whole sections of the step -- which required nailing down to secure it (which is also what made filling it such a nightmare).  I guess the problem must have been some looseness or degradation of the underlying stair structure.  What was also confusing, though, is that some of the nails I put in didn't seem to be grabbing any of the substructure, almost as if there was an open space under some sections of the tile, while other nails clearly bit into what was underneath, and in certain sections even wouldn't go down any further with the nail set, as if it was hitting concrete or masonry.  I wish I had been able to rip up some of the tiles to find out what the heck was under there, but our mandate was repair only.   

monstrol said:
My opinion is that is douglas fir. Great job. The museum I teach at has douglas fir end grain floors in the studios. I have noticed a fair amount of gaps between the tiles, having said that it is the only end grain doug fir floor I have spent time with so the gaps may or may not be a thing with these floors.  Are the tiles floating or glued?
 
Back
Top