I have a use case coming up where I would like to be able to make repeatable cuts that result in final pieces that are 70-80 inches long. This is beyond the length of my parallel guides. I know that I could in principle use the parallel guide to take off the short end of the cut (e.g., remove 16 inches from a 96 inch panel to get to 80), but I am concerned that simply assuming the factory edge to be true in this case could cause problems with my application. Does anyone have suggestions for how to make operations like this repeatable?
You are using an out of date browser. It may not display this or other websites correctly.
You should upgrade or use an alternative browser.
You should upgrade or use an alternative browser.
Repeatable Cross Cuts for Long Panel with a Track Saw
- Thread starter TomInNC
- Start date
waho6o9
Member
Generally speaking one cuts about .5 inch off the width and length of the sheet goods to avoid factory edge discrepancies. I generally cut 1.5 to 2" off to use as back rails......
Maybe make a jig to cut your sheet goods to length?
All the best
Maybe make a jig to cut your sheet goods to length?
All the best
The final panels will be 16 inches wide by approximately 7 feet long. I do own an MFT.How wide are the panels? Do you own an MFT?
Tom
I don't have a Kapex (yet). Are you referring to an extension to a stand for the Kapex?Kapex extensions work with the MFT. You should be able to get at least 80 inches to the end of the stop.
Packard
Member
Make two measuring sticks that you will clamp to the panels, one aligned with one edge, and the other aligned with the opposite edge .Then butt the track against the ends of the measuring sticks. Then clamp your track to the panel.
This will be as accurate and repeatable as parallel guides. It is, of course not adjustable, but if the measuring sticks are the right length, and both are the same size, you should do fine.
This will be as accurate and repeatable as parallel guides. It is, of course not adjustable, but if the measuring sticks are the right length, and both are the same size, you should do fine.
tjbnwi
Member
- Joined
- May 12, 2008
- Messages
- 7,299
The reason I asked about the MFT is, it is an ideal tool to do what you want to do.The final panels will be 16 inches wide by approximately 7 feet long. I do own an MFT.
I own 7 MFT’s and the Kapex’s wings (and Kapex’s). Both allow for accurate long length cutting.
Reading I see you do not have the wings, spend a few minutes to come up with a solution. Believe it or not the right combination of Systainers equal the height of the MFT.


This picture shows the fence bolted in place and extended to both sides of the cut. The eight stops on this set up allowed for set it once and forget it.

Someone mentioned the Kapex’s wings should handle the 80” cut requirement. With the track on the MFT in the “normal factory” position the distance from the splinter guard to the left side of the MFT is ~32”, the extension on the wings is ~84” this gives you about 116” to work within.
Tom
Dog Island Offcuts
Member
- Joined
- Dec 18, 2024
- Messages
- 7
If you are concerned about the factory edge, that's the first issue. I understand it's a common practice to take your biggest track and cut 1/8" from the full sheet of plywood. This new edge becomes your 'reference' for straight and you can use it to make accurate parallel cuts and 90-degree crosscuts. (This presumes that you have the first long track and a really good 90-degree crosscut tool.)
Once you have a known good edge, Woodpeckers and TSO certainly have beautiful track saw parallel guides that link with any standard track to make these sort of consistent, repeatable cuts possible. They are a little pricey, but if this type of cut is a regular thing then they are fantastic to have. You can get into the whole "Do I even need a table saw??" conversation.
I have made my own parallel guides for repeatable track saw cuts - got the plans from Warrenton Woodworks. The premise is quite simple - if you can make something that has a hook or stop to connect with the good edge, sits at 90-degrees to the good edge and references with a clean connection to the track saw guide, and has a consistent length (you can match a pair of parallel guides together, as Warrenton does here), then voila - you have a parallel guide.
The TSO Parallel guides are very sexy, and when they are calibrated correctly, it's delightful to set the measurements, walk over to your plywood, and then slap it down and make the cut. But it's also possible (as Packard suggests, above) to use a basic measuring stick similar to the Warrenton solution. This would be kind of a 'story stick' for the track saw - just with two of them.
- Create your clean reference edge on the plywood.
- Mark your measurement of 16 inches - and then set the track on that measurement.
- Poke one of your measuring sticks against your track to set the first part of a 'parallel' set.
- Set your second measuring stick against your first measuring stick, to exactly match lengths.
- Use the pair of measuring sticks to lay your track down, parallel to the clean reference edge.
- Cut your piece. Repeat for additional pieces of the same width.
Thanks so much for the suggestions. Regarding the parallel guide suggestion, I do have the TSO guides and am very happy with them. If there was some way to connect their guides to get 90+ inches of reach, I would just use those for the cross cuts, but I haven't found any solutions like that.
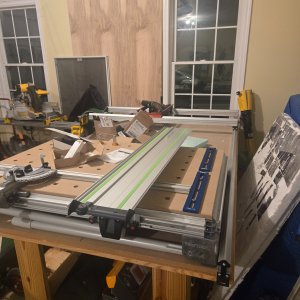
I had no idea about using these wings with the MFT, but I am starting to see the benefits here. To give you a better sense of my current setup, I have one MFT that lives with its legs folded up on top of a large 4x8 work table that also does double duty as the top of a slab flattening table with the Woodpeckers slab jig. I attached the Woodpeckers rails with knobs so that when I need the MFT, I can just remove one of the Woodpeckers rails. You can think of it as a very large MFT cart. See attached.
After watching some videos using the extension wings, it almost seems like I could use the Kapex extensions folded up and attached to the MFT to get the stops and functionality that I am after. Am I thinking about this correctly? That is, can the Kapex wings be leveled enough to have the MFT and extensions function on the same plane with the legs folded up? I could obviously take the MFT down and unfold the legs for use, but this requires moving a bunch of stuff around in the garage that I prefer to not do on a regular basis.
My next question is this: if you have an MFT setup with the extension wings, is there any need for a miter saw if you don't need the double bevel functionality?
Attachments
Packard
Member
I would make my repeated cuts on long boards on my old Sears radial arm saw. I paid $100.00 for mine and it was lightly used. For cuts up to about 16”, a dream to use.
I would guess you could find a used one for about $75.00 nowadays, cheaper than a MFT table.
But note: If the rails are set too loose and the saw head can rock up and down, you need to adjust the runners. If it is too loose, it can become the most dangerous saw in your shop. Well-adjusted, it is safe and easy to use. I never use mine for angle cuts, so it is set at 90 degrees always. You need to use a saw blade with a negative hook angle, as well as a dado head with a negative hook angle.
An advantage, both sets of blades make cleaner cuts than blades with a positive hook angle, but the feed rates are slower.
tjbnwi
Member
- Joined
- May 12, 2008
- Messages
- 7,299
Looking at the picture the wing would attach to the MFT’s left profile. From the look of things the leg would go to the floor (I don’t see any table to the left). How the leg adjustment work will be affected by the height of the MFT on the flattening table. The leg is designed to work in a range with the MFT at a “normal” height. It might be a little tight getting to the thumb screw to secure the wing. If the wing wobbles you did not get the plate that secures the wing properly in place.
The miter saw is faster for stock up to it’s capacity.
You can mount both wings to one side of the MFT to support wider work pieces.

The miter saw is faster for stock up to it’s capacity.
You can mount both wings to one side of the MFT to support wider work pieces.
Depends on what you're going to be cutting. Constantly fiddling with the height of the MFT cross cut rail to accommodate different thickness materials is a pain. You probably can't use the extensions with anything other than right angle cuts either.My next question is this: if you have an MFT setup with the extension wings, is there any need for a miter saw if you don't need the double bevel functionality?
I should have been more clear in the previous post. The rails for the flattening jig are easily removable. My plan would be to remove the jig rail that you see on the left and then rotate the MFT clockwise as viewed in the picture. At that point, would it be possible to attach the extension to the MFT with the extension on top of the table with its leg folded?Looking at the picture the wing would attach to the MFT’s left profile. From the look of things the leg would go to the floor (I don’t see any table to the left). How the leg adjustment work will be affected by the height of the MFT on the flattening table. The leg is designed to work in a range with the MFT at a “normal” height. It might be a little tight getting to the thumb screw to secure the wing. If the wing wobbles you did not get the plate that secures the wing properly in place.
The miter saw is faster for stock up to it’s capacity.
You can mount both wings to one side of the MFT to support wider work pieces.
View attachment 380732


Thanks for all of the feedback. I was thinking about this some more, and I wondering if it would make more sense for me to use a second MFT instead of the extension wings since I want this mounted on a work surface. It looks like hooking MFTs together is pretty straightforward. Is there also any way to also link fence components together? Or a much longer 3rd party fence that would extend out to the 7 feet or so? I am looking for a much larger dedicated shop space, and whenever that happens, I plan on having a larger dedicated MFT setup, so this approach might be more useful in the long run.
My two cents is back up and evaluate if this type of cutting is something you will do frequently in the future:
If yes, then investing in some sort of adjustable, repeatable solution like Kapex wings makes total sense.
If no, then a simple shop made, repeatable (but non adjustable) story stick type fixture would only take a few minutes to make and allow you to proceed with your build.
(or even careful use of tape measure if you just need to make a couple cuts, a lower tolerance might be just fine on a 7' long piece)
Packard
Member
That was my opinion from the start. Making a significant investment for a process that might only occurs infrequently makes little sense to me.My two cents is back up and evaluate if this type of cutting is something you will do frequently in the future:
If yes, then investing in some sort of adjustable, repeatable solution like Kapex wings makes total sense.
If no, then a simple shop made, repeatable (but non adjustable) story stick type fixture would only take a few minutes to make and allow you to proceed with your build.
(or even careful use of tape measure if you just need to make a couple cuts, a lower tolerance might be just fine on a 7' long piece)
Similar threads
- Replies
- 3
- Views
- 1K
- Replies
- 32
- Views
- 5K
- Replies
- 20
- Views
- 2K