Repeatable mid panel domino case joinery

ear3

Member
Joined
Jul 24, 2014
Messages
4,342
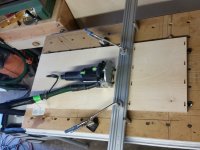
I'm making a series of plywood office dividers, and stumbled across a decent solution for doing repeat mortises. The basic precondition is cutting the boards square. Then the mft hole pattern, a mix of qwas and parf dogs, and the 2000mm mfs profile do the rest. I had some leeway on the height of the fixed shelf, so I was able to just use the hole pattern as given, plus the different width of the qwas vs parf dogs, to set the position of the mfs extrusion. If I needed the row of mortises to be at a precise height, though, then I could simply cut a wooden spacer to slide in between the end of the board and the dogs. Once the mortises were plunged on the first board, I simply slid in the others and repeated the operation. I put pencil marks on the extrusion to mark the position of the mortises so i wouldnt have to measure every time. Super fast and precise.


Attachments

  • 20160317_135918.jpg
    20160317_135918.jpg
    2.7 MB · Views: 669
Nice idea. I assume you're using the rulers on the MFS as your guide for positioning too?

I guess if you could "capture" the piece somehow you could use custom spacer blocks at one end to change the distance to the MFS profile so you didn't have to rely on 96mm spacing. Going to have to try that.

Hmmmm... got me thinking. Maybe use the Kapex UG wings on the end of my MFT with the stop flags for different positions.
 
Sort of -- since I'm metrically challenged I had to measure it out on my imperial tape measure and transfer those marks to the MFS metric scale.  Only added a couple of seconds to the setup...

Looking at the picture again I realize it probably makes more sense to push the mfs BACK into the parf dogs, as opposed to having the dogs on the mortising side.  The Kreg automaxx clamps keep it secure, but there's always the off chance of pulling the extrusion back slightly while you're clamping it down if you don't hold it firmly in place with your hands when engaging the clamps.

GarryMartin said:
Nice idea. I assume you're using the rulers on the MFS as your guide for positioning too?

I guess if you could "capture" the piece somehow you could use custom spacer blocks at one end to change the distance to the MFS profile so you didn't have to rely on 96mm spacing. Going to have to try that.

Hmmmm... got me thinking. Maybe use the Kapex UG wings on the end of my MFT with the stop flags for different positions.
 
I made this fixture to fabricate 480 side panels for vanities. I hinged it so loading and unloading was easy, the witness marks allowed for easy alignment. The panels squared to the side as the fixture was lowered.

Tom
 

Attachments

  • IMG_2915.jpg
    IMG_2915.jpg
    44.3 KB · Views: 449
And most importantly, the large reminder to PLUNGE at 12mm!

tjbnwi said:
I made this fixture to fabricate 480 side panels for vanities. I hinged it so loading and unloading was easy, the witness marks allowed for easy alignment. The panels squared to the side as the fixture was lowered.

Tom
 
Back
Top