Repetitive Thin Rips

Curt said:
Pretty genius!  Sort of what I was thinking about but my thoughts trended to 2 pairs of tracks each pair connected at the sides but sliding to act as the stops - outer tracks anchored by dogs which also act as rail stops.  Consider your idea stolen.  Thank you very much!

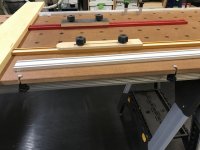
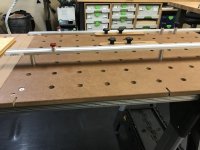
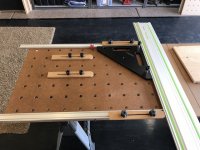
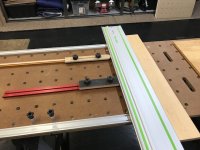
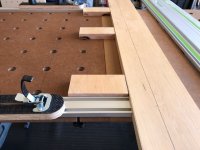
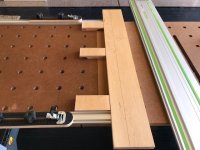
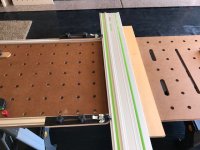
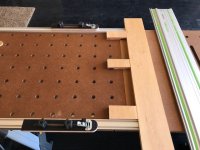
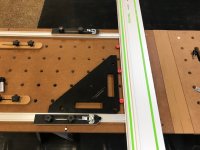
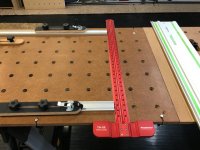
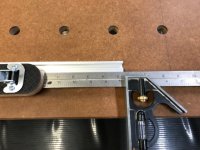
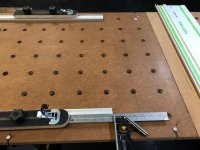
Sounds like your idea is similar to the fence setup I use.  I slotted the edge of my MFT top so I could easily attach and square the Woodpeckers t-track I use for my fence, but you could also use rail dogs.  By placing a sliding stop or block on top of the track essentially you have a thin-rip guide. Use the track as the stop for the material being cut and a few pieces of scrap material as a spacer to make the guide rail sit flat.  I like the WP track, but Incra track would work also. Really simple.
 

Attachments

  • MFT_Thin Rip1.JPG
    MFT_Thin Rip1.JPG
    96.4 KB · Views: 590
  • MFT_Thin Rip2.JPG
    MFT_Thin Rip2.JPG
    101.1 KB · Views: 595
  • MFT_Thin Rip3.JPG
    MFT_Thin Rip3.JPG
    121.2 KB · Views: 571
  • MFT_Thin Rip4.JPG
    MFT_Thin Rip4.JPG
    99.4 KB · Views: 874
  • MFT_Thin Rip5.JPG
    MFT_Thin Rip5.JPG
    105.3 KB · Views: 699
I must be missing something? If you are only using the WP rule as the backstop for your cutting wood, how are you keeping this parallel to your cut line, unless you are using the 2 outboard aluminum rules as well, or the incra rule ?? Thank you
 
Intex said:
I must be missing something? If you are only using the WP rule as the backstop for your cutting wood, how are you keeping this parallel to your cut line, unless you are using the 2 outboard aluminum rules as well, or the incra rule ?? Thank you

Sorry .. the photos might have been confusing.  I was just showing that you can use WP (red) or Incra (gold) track to easily make thin rip/cut stops.  The photos below might help. The clear anodized track shown is also from WP .. the same as they use for many of their products, just not anodized red.  I don't use an MFT3 table any longer, just a couple of Festool MFT tops, so I'm able to cut slots in the edges and attach the track to the edges to use as my fence. I have DIY rail stops for different thicknesses of material.  I recently added a couple of toggle latches to hold the rail in place when cutting.  For thin rips/cuts I can use the actual track as the material stop and lock the guide rail stops on the track to get the thin width cut I need.  The 3 scraps of the same material are just to make sure the guide rail sits flat.  As mentioned before, I always draw a cut line down the rail and check before cutting the first strip. The example shown is a 2" cut.
 

Attachments

  • MFT Slide Stops24.JPG
    MFT Slide Stops24.JPG
    88.9 KB · Views: 764
  • MFT Slide Stops23.jpg
    MFT Slide Stops23.jpg
    89 KB · Views: 486
  • MFT Slide Stops22.jpg
    MFT Slide Stops22.jpg
    90.6 KB · Views: 573
  • MFT Slide Stops21.jpg
    MFT Slide Stops21.jpg
    90.5 KB · Views: 608
Tracktubes, It looks like you have multiple ways to cut thin strips.  I'm still confused how you do the initial setup and get everything at right angles and get both stops set at exactly the same measurement.

When I try this I have a hard time cutting a 2.5 inch board evenly.  Always seems like I get 2.55 on one end and 2.45 on the other end.  How are you able to set both stops accurately?

I'm trying to use a method where I have one model 2.5 inch board that I push the stops against to get them both set at once.  And yes I am challenged reading the small print on tape measures. 

 
air19 said:
Tracktubes, It looks like you have multiple ways to cut thin strips.  I'm still confused how you do the initial setup and get everything at right angles and get both stops set at exactly the same measurement.

When I try this I have a hard time cutting a 2.5 inch board evenly.  Always seems like I get 2.55 on one end and 2.45 on the other end.  How are you able to set both stops accurately?

I'm trying to use a method where I have one model 2.5 inch board that I push the stops against to get them both set at once.  And yes I am challenged reading the small print on tape measures.

First, square the material stops (t-track) up by using some bench dogs and a guide rail or T-square as shown.  I use my Woodpeckers MFT square to square everything up, but not necessary.  Once your t-tracks are locked down, use a combo square to set your width of cut.  I know my guide rail cuts at 186 mm or 7 5/16" ... so I use simple math and a combo square to set my guide rail stop.  Just subtract the width of cut you want from your guide rail cut width and you should be good.  Using a combo square keeps both ends of the cuts the same, so you don't have to worry about measuring each one individually.  Can't help you on reading your tape measure .. I have the same problem!
 

Attachments

  • IMG_8999.jpg
    IMG_8999.jpg
    83.6 KB · Views: 593
  • IMG_9001.jpg
    IMG_9001.jpg
    100.7 KB · Views: 633
  • IMG_9003.jpg
    IMG_9003.jpg
    93 KB · Views: 473
  • IMG_9005.jpg
    IMG_9005.jpg
    101.2 KB · Views: 532
Thanks Track Tubes.

Using the combo square explains it.  Simple - set the distance once and use that to set each stop. 

Also noticed in your custom MFT top you have a replaceable cutting area where the saw is running - nice.

And THANKS for all the pictures.  Across your multiple explanations to many of us there are many great ideas here. 
 
I've come to terms with the fact that even you can work around without a table saw, sometimes it is just better and faster. On the other hand, everything I used to look for in a table saw (being very large to handle large sheets) has changed since I got my tracksaw. I don't need mobility so much as I want to be able to pack most of my woodworking stuff up into a corner of my garage, and bring it out as need be, so I have decided to get a "job site" table saw to handle tasks such as small rips. Here is a great review of what is out in the market right now.

We choose THE BEST 2018 Jobsite Table Saw - Bosch, Dewalt, Makita, SawStop, SkilSaw


-guys some really helpful pointers being shared here.

While developing our new TPG-Series Parallel Guide ,we have given a good deal of thought to this topic and also cut more than a few narrow stock pieces.We come to the conclusion that a (job site-) table saw is the simplest way to cut face frame and other narrow stock parts.

However: you can also our new TPG-30 parallel Guide with the aid of a re-usable spacer cut from 10-inch wide piece of sheet goods of the same thickness as your narrow stock. Use a few short strips of 2- inch wide  tape to temporarily secure  the narrow stock material to your 10-inch spacer and -Bingo -you no longer have a problem with narrow stock.

you can check it out here:https://tsoproducts.com/tso-parallel-guide-system/

The 10 inch spacer board provides the support AND anti-slip connection for the Guide Rail. This does not require an MFT of 20mm worktop. Any flat surface will do.

For folks who have only one or no GRS-16 Guide Rail Square, we will have a Guide Rail Adapter available for purchase as an individual part further into this summer - just finished testing the prototype Adapter and going into production now.

Hans
 
Back
Top