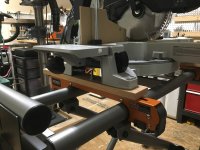
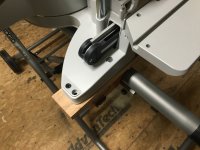
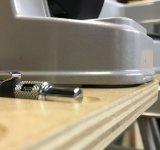
Ridgid Mobile Miter Saw Stand - Half Price at Only $99 Through 12/2/15

Here is what I did

I removed the rubber feet off the Kapex to provide a more solid mounting of the wood to the Kapex.  I mounted the kapex to the wooden block using the holes, on the Kapex, next to the ones that the rubber feet were mounted to and the hole half way back where a hex head bolt can be dropped into the Kapex base.  I also drilled a 4th hole in the wooden block that is inline with the hex head bolt hole.  I dropped a long hex head bolt through the hole in the kapex so it protudes through he wood enough to be used to also mount the Ridgid saw mounting block to the wood.  I then used one of the carriage bolts that was provided with the Ridgid stand to add a second mounting point of the Ridgid saw mount to the wooden block.  So there are now 3 points mounting the Kapex to the wooden block (hex bolt and 2 cap screws through the holes next to the rubber feet mounting holes) and 2 points where the wooden block mounts to the Ridgid saw mount (hex bolt that goes all the way to the Kapex and a carriage bolt). 

One thing I forgot to mention.  I used a Forstner bit to back drill the holes where the cap head screws mount to the wooden block so the washer and nut don't protrude below the wood.

This seems to provide a pretty sold mount of the Kapex to the Ridgid stand and didn't require and modifications to the Kapex other than unscrewing the rubber feet.

I may do a little redesign of what I've done as because of some of the internal parts on the Ridgid saw mounts that hold the mount to the mobile base I couldn't line wooden block up exactly centered on the mounting block.  But for now, this is nice and solid and works.

Hopefully this description is understandable
 

Attachments

  • IMG_0507.JPG
    IMG_0507.JPG
    2 MB · Views: 781
  • IMG_0508.JPG
    IMG_0508.JPG
    1.9 MB · Views: 489
Why don't you reinstall those rubber feet onto the bottom of your Kapex and drill holes in your mounting boards to accommodate them? You know, the same way the Kapex fits onto the MFT tops.

Hey, you know that you'll lose those rubber feet if you don't.  [wink]
 
[scared] Lose the rubber feet OMG!!

I put them in the drawer with the plastic table inserts I replaced with a zero clearance insert.  I'll either lose both or remember where all my kapex parts are.

That being said, your idea has some merit.
 
That's a great deal, but I just can't get over how large these miter saw stands are. The Ridgid, Delta, Bosch -- they're all so huge. If it's raining I like to put the Kapex in my truck bed with tonneau cover, which fits with plenty of room to spare but wouldn't even come close to fitting on one of these stands. Only the Festool UG Stand seems to be a reasonable size...wish someone else made a (cheaper) smaller one.
 
sae said:
Thats why the saw stand has quick release rails...

I think it is a nice feature that by releasing 2 locking levers you can completely remove the Kapex from the stand. 

I do agree though that the stand is pretty big.  My favorite feature is the built in work piece supports.  Those are very convenient.
 
I may have to think about ordering one of those. For $99 you cannot really go wrong with a miter station. I was going to build a station at my house out of 80/20 but that is expensive and also takes my time away from paying jobs. Just like the new tables I need to build for the last 6 months.
 
FWIW..I concurr with Corwin, when I adapted my Kapex to a Milwaukee (Fulton StableMate) stand, I used a forstner bit to flatspot 4 shallow recesses for the Kapex feet. The rubber feet help to isolate the saw from the stand and to mitigate vibration.

In the picture below you can see that the Kapex frame is not bottomed out on the plywood adapter plate.

[attachthumb=1]
 

Attachments

  • 2170.jpg
    2170.jpg
    900.4 KB · Views: 458
Cheese said:
FWIW..I concurr with Corwin, when I adapted my Kapex to a Milwaukee (Fulton StableMate) stand, I used a forstner bit to flatspot 4 shallow recesses for the Kapex feet. The rubber feet help to isolate the saw from the stand and to mitigate vibration.

In the picture below you can see that the Kapex frame is not bottomed out on the plywood adapter plate.

[attachthumb=1]

To keep weight down I used 2 oak slats instead of a sheet of plywood the size of the Kapex Base.  What I saw was that the 2 rubber feet are in one line and the mounting holes for the saw were in a line parallel to the feet.  With the feet installed the wood slat was torqued because the feet didn't let the slat sit flush to the saw base.  I could see this would be different using a sheet of plywood but I didn't think this a good situation when just using slats of wood.
 
sae said:
Thats why the saw stand has quick release rails...

That's true, good point! For me though the roller stand is a way to not have to lift the saw out of the truck (it's easier to grab the stand), so it would defeat the purpose. Still, for $99...
 
itasor said:
sae said:
Thats why the saw stand has quick release rails...

That's true, good point! For me though the roller stand is a way to not have to lift the saw out of the truck (it's easier to grab the stand), so it would defeat the purpose. Still, for $99...
Or you do what I do, which is I typically grab my SCMS off the stand and leave the BIG heavy stand at home, and throw the saw on the ground with a box to keep the work flat at the ends. Of course most of my jobs away are smaller and only take a few weeks to complete. At home the stand is great to have for comfort and function.
 
Back
Top