- Joined
- Jan 22, 2007
- Messages
- 1,486
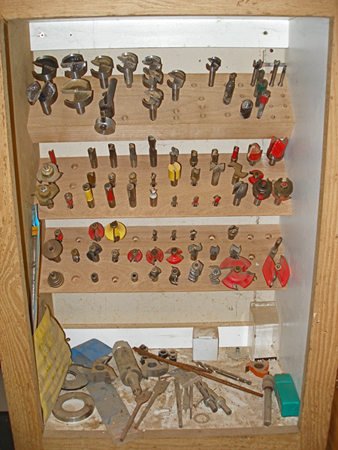
For 10 years I have wanted to rebuild my router bit cabinet, mainly because I never planned for shaper cutters in the original design. Then over the recent years, it just didn't even have enough space for all of the new router bits either. This will be the third generation, with each version a little bit nicer and a little bit larger.
The most difficult part of the build was the necessary planning for the wider variety of bits and pieces I wanted to store in this cabinet. The older version (version 2) didn’t take much planning for the bits, except for the set of forstner bits. (Yuck, that's ugly!! [scared])
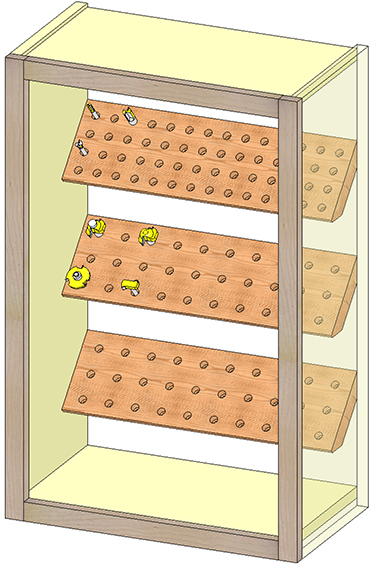
The core design is based on angled shelves for efficient use of space while also being easy to see and access all the bits. Below is the original SolidWorks model I created several years ago when I contemplated writing a magazine article describing the build. Since then, I decided to enlarge it and not use faceframe construction.
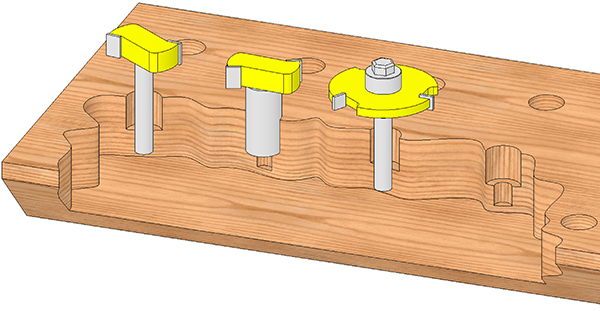
The reason why I contemplated writing a magazine article is because in the 20 years since I built the first model of router bit cabinet, I have never seen my method of storing the bits published before. The key to the design is that I can mix 1/4" and 1/2" bits in the same set of holes. This means I can keep all of the bits organized by shape or function, without throwing that organization into a tizzy if I add new bits.
The secret is that I first drill 1/2" holes 5/8" deep, and then drill 1/4" holes in the center of the first hole down an additional 1/2".
I use forstner bits in the drill press to drill these holes for flat bottoms. I also used a fence with the drill press to ensure that the rows of holes were perfectly straight. Because I needed to drill two sets of holes over the top of each other, once I set the fence, I didn’t change it until all of the holes were drilled. To be more efficient, I used a spacer between the fence and the workpiece to drill one row, and then removed the spacer to drill the next row. This way I could add/remove the spacer without changing the position of the main fence. (Sorry, I forgot to get a picture of this setup.)
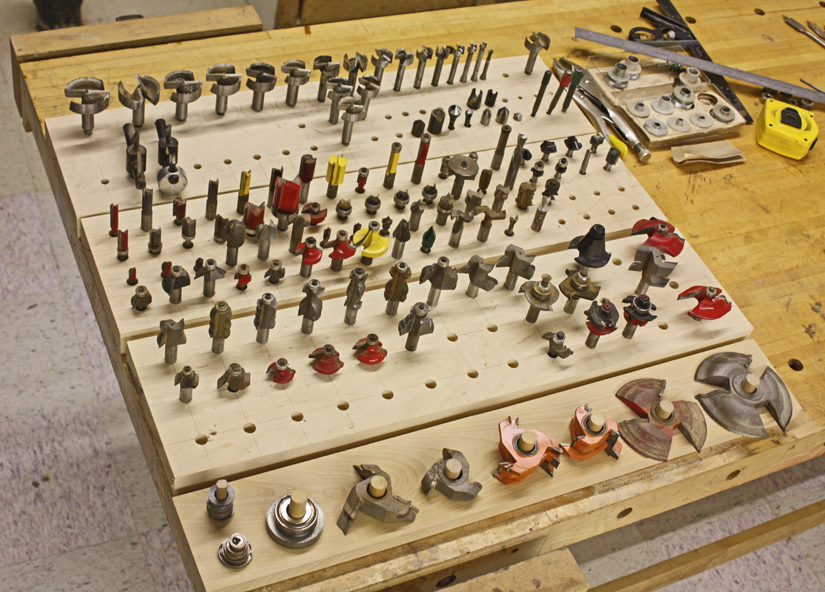
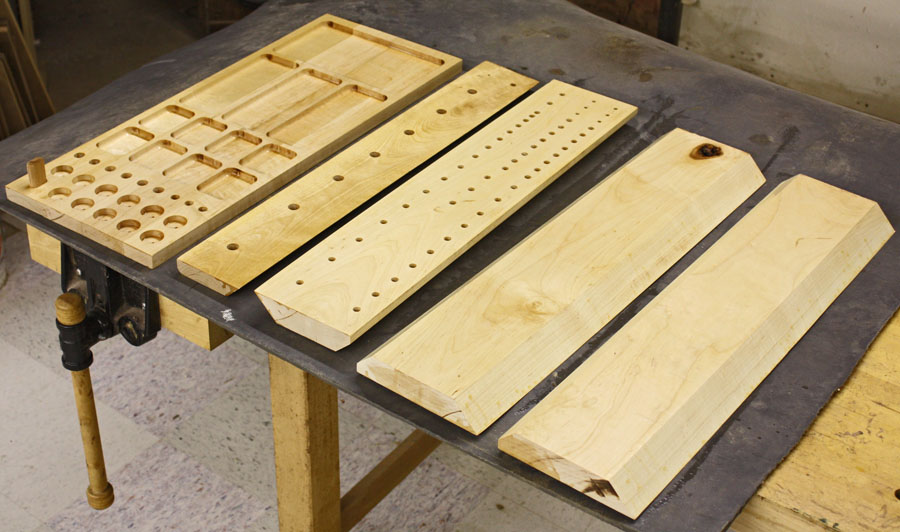
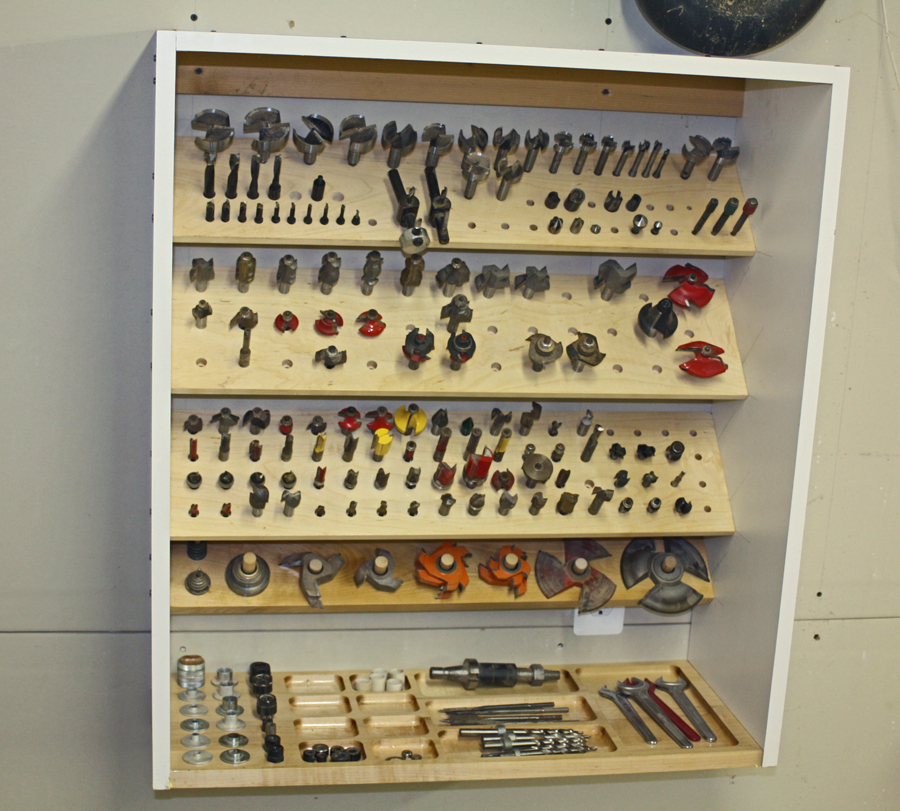
I based my layout on 4 angled shelves. The upper shelf focused on the forstner bit set with a few other odds and ends filling in the rest. However, at the last minute before assembly, I decided to add holes for the 14 Domino cutters I have. The next shelf was for moulding cutters, panel raisers, and other larger bits. The next shelf was for smaller profile cutters, dado and groving bits, and pattern bits. The final shelf is for the shaper cutters.
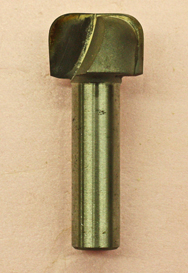
I spent some time contemplating what to do with the bottom of the cabinet. I didn’t want to just leave it flat because the original cabinet bottom was always a disorganized mess. Then I found this flat-bottom rounding router bit that I didn’t even know I had. I bought a box of router bits at an estate sale years ago, but never went through them because I didn’t have room for them in the router bit cabinet. Its designed to create rounded wells, such as pencil trays for desk drawers.
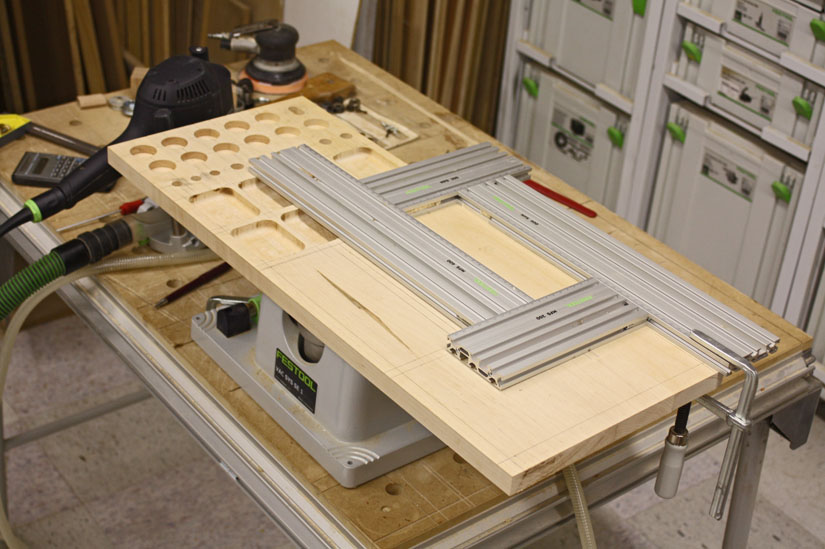
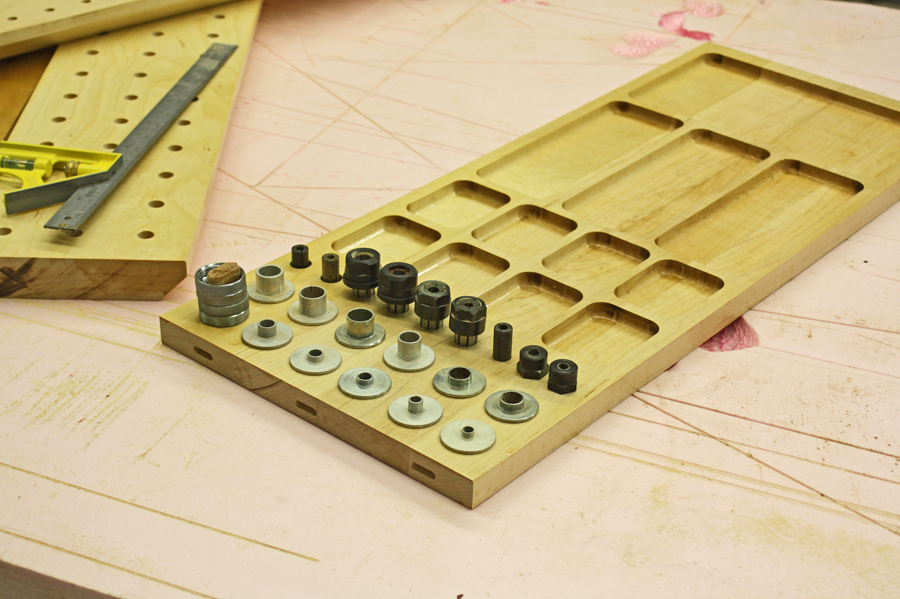
With that discovery, the layout for the cabinet bottom came together. I would drill holes for all of the template guides on one side, then router collet storage, and the rest I would fill with various sized pockets. The MFS guide was invaluable for creating the pockets. It was a gift from Christian Oltzscher years ago and he sent me both the large and small sets. I set it up on VacSys to I could securely clamp the MFS to the board without fighting with the table. Then I set up the OF1400 with the large template guide, and plunged the pockets in two passes. The tricky part was aligning the MFS perfectly to the previous pockets so they would all line up.
I don’t normally put a finish on shop cabinets, but the previous cabinet collected a lot of dust. So I decided to brush on some lacquer to the shelves this time. I knew that doing that would require me to ream out all of the holes, but it wasn’t very difficult, and I used a C12 by hand to do it. Actually I'm glad I did, because the main forstner bit was exactly 1/2" and a little too snug for the bits. I found a cheap brad-point bit that was slightly oversized for the reaming.
I laid out the bits several times to make sure I wasn't forgetting anything in the planning. It was also kind of cool looking at the miniature forest of bits. [big grin]

The next step was the most critical, and one I had been dreading from the beginning (because I knew it would take about 5 hands and I only come equipped with two [scared] ). I needed to mock up the shelves to determine the best spacing between them to ensure bits could be inserted and removed from all of the holes, but at the same time, I wanted the shelves as close together as possible. This cabinet was already taller than the original, but I wanted to keep it as short as possible so the upper shelf wasn’t too high.
I couldn’t cut the melamine yet, so I took some scrap plywood sides and first clamped them to the horizontal bottom shelf. Then one shelf at a time, I clamped them between the sides just snug enough that I could reposition the shelf with a mallet until it was where I wanted it. As each shelf was added, I checked the bit storage holes above the previous shelf for clearance. When they were all in place and tightly clamped, I marked their positions so I could transfer the layout to the actual melamine side pieces later.
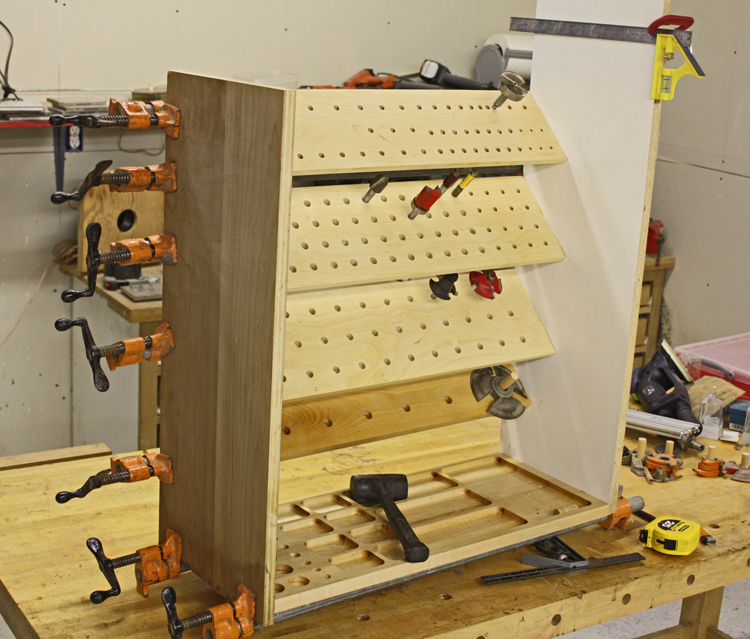
The final assembly wasn't too difficult. I Dominoed the carcase using 6mm tenons. To get a good glue joint, I scraped the melamine clear using the CMS, OF2200, and a 3/4" dado bit just a couple thousandths of an inch deep. (Oh, this was when I decided to add the Domino cutters to the cabinet, because I realized how much of a pain it was to dig the 6mm cutter out of the Domino Systainer.)
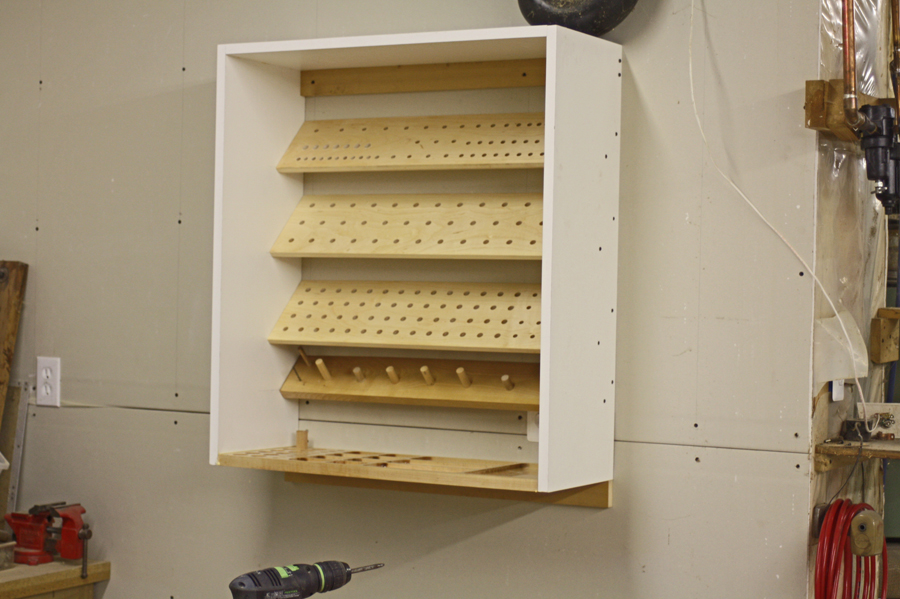
I first glued and clamped the carcase together. After the glue was dry I installed each of the shelves similar to how I did it with the mock-up using clamps. But this time I could put them in place while the cabinet was laying face-down to make it easier. I had accurate layout lines drawn on the melamine so I could line up the shelves with the lines before screwing them in place. I added a couple of cleats, hung it on the wall, and filled it with all of the bits. Voila, done!
P.S. I'd prefer to not put doors on this, but if it turns out to be a mess again, I can always add them later. The very first version I made 20 years ago is in my dad's workshop, and it has a glass door.
The most difficult part of the build was the necessary planning for the wider variety of bits and pieces I wanted to store in this cabinet. The older version (version 2) didn’t take much planning for the bits, except for the set of forstner bits. (Yuck, that's ugly!! [scared])
The core design is based on angled shelves for efficient use of space while also being easy to see and access all the bits. Below is the original SolidWorks model I created several years ago when I contemplated writing a magazine article describing the build. Since then, I decided to enlarge it and not use faceframe construction.
The reason why I contemplated writing a magazine article is because in the 20 years since I built the first model of router bit cabinet, I have never seen my method of storing the bits published before. The key to the design is that I can mix 1/4" and 1/2" bits in the same set of holes. This means I can keep all of the bits organized by shape or function, without throwing that organization into a tizzy if I add new bits.
The secret is that I first drill 1/2" holes 5/8" deep, and then drill 1/4" holes in the center of the first hole down an additional 1/2".
I use forstner bits in the drill press to drill these holes for flat bottoms. I also used a fence with the drill press to ensure that the rows of holes were perfectly straight. Because I needed to drill two sets of holes over the top of each other, once I set the fence, I didn’t change it until all of the holes were drilled. To be more efficient, I used a spacer between the fence and the workpiece to drill one row, and then removed the spacer to drill the next row. This way I could add/remove the spacer without changing the position of the main fence. (Sorry, I forgot to get a picture of this setup.)
I based my layout on 4 angled shelves. The upper shelf focused on the forstner bit set with a few other odds and ends filling in the rest. However, at the last minute before assembly, I decided to add holes for the 14 Domino cutters I have. The next shelf was for moulding cutters, panel raisers, and other larger bits. The next shelf was for smaller profile cutters, dado and groving bits, and pattern bits. The final shelf is for the shaper cutters.
I spent some time contemplating what to do with the bottom of the cabinet. I didn’t want to just leave it flat because the original cabinet bottom was always a disorganized mess. Then I found this flat-bottom rounding router bit that I didn’t even know I had. I bought a box of router bits at an estate sale years ago, but never went through them because I didn’t have room for them in the router bit cabinet. Its designed to create rounded wells, such as pencil trays for desk drawers.
With that discovery, the layout for the cabinet bottom came together. I would drill holes for all of the template guides on one side, then router collet storage, and the rest I would fill with various sized pockets. The MFS guide was invaluable for creating the pockets. It was a gift from Christian Oltzscher years ago and he sent me both the large and small sets. I set it up on VacSys to I could securely clamp the MFS to the board without fighting with the table. Then I set up the OF1400 with the large template guide, and plunged the pockets in two passes. The tricky part was aligning the MFS perfectly to the previous pockets so they would all line up.
I don’t normally put a finish on shop cabinets, but the previous cabinet collected a lot of dust. So I decided to brush on some lacquer to the shelves this time. I knew that doing that would require me to ream out all of the holes, but it wasn’t very difficult, and I used a C12 by hand to do it. Actually I'm glad I did, because the main forstner bit was exactly 1/2" and a little too snug for the bits. I found a cheap brad-point bit that was slightly oversized for the reaming.
I laid out the bits several times to make sure I wasn't forgetting anything in the planning. It was also kind of cool looking at the miniature forest of bits. [big grin]
The next step was the most critical, and one I had been dreading from the beginning (because I knew it would take about 5 hands and I only come equipped with two [scared] ). I needed to mock up the shelves to determine the best spacing between them to ensure bits could be inserted and removed from all of the holes, but at the same time, I wanted the shelves as close together as possible. This cabinet was already taller than the original, but I wanted to keep it as short as possible so the upper shelf wasn’t too high.
I couldn’t cut the melamine yet, so I took some scrap plywood sides and first clamped them to the horizontal bottom shelf. Then one shelf at a time, I clamped them between the sides just snug enough that I could reposition the shelf with a mallet until it was where I wanted it. As each shelf was added, I checked the bit storage holes above the previous shelf for clearance. When they were all in place and tightly clamped, I marked their positions so I could transfer the layout to the actual melamine side pieces later.
The final assembly wasn't too difficult. I Dominoed the carcase using 6mm tenons. To get a good glue joint, I scraped the melamine clear using the CMS, OF2200, and a 3/4" dado bit just a couple thousandths of an inch deep. (Oh, this was when I decided to add the Domino cutters to the cabinet, because I realized how much of a pain it was to dig the 6mm cutter out of the Domino Systainer.)
I first glued and clamped the carcase together. After the glue was dry I installed each of the shelves similar to how I did it with the mock-up using clamps. But this time I could put them in place while the cabinet was laying face-down to make it easier. I had accurate layout lines drawn on the melamine so I could line up the shelves with the lines before screwing them in place. I added a couple of cleats, hung it on the wall, and filled it with all of the bits. Voila, done!
P.S. I'd prefer to not put doors on this, but if it turns out to be a mess again, I can always add them later. The very first version I made 20 years ago is in my dad's workshop, and it has a glass door.

")