Router or Hand Plane for Trimming 3/4” Edge Band?

Corwin said:
Svar said:
android said:
This is the best way that I have seen to do this...
Flush cutting edge banding is about 7 minutes in.
http://www.youtube.com/watch?time_continue=3&v=AddH8IgL7wY
I built a fence with a rabbet like this and tried it and it works pretty well. I probably need to build a more precise fence to get perfect trims, mine was bit off.
It only works if you have banding along one edge. Two adjacent edges and you piece cannot be placed flush to the fence.

Uhm, one [adjacent] edge at a time.

Do both ends first. Then, do the front and rear  edges.

I like this method but since I’ve already glued all 4 sides it won’t work. In the future, I may glue only 2 sides and then try this method.
 
I was really thinking to go with the hand plane but seems I need to check more into the MFK 700 and see what kind of results it produces. If I went that way, I wonder how well of a finish it would produce in terms of putting an edge guide on it and a bit which is 1-2mm thick and routing a tiny groove where the edgebanding and plywood meet ...it would be a sort of decorative border and perhaps remove the glue at the same time making it hard to distinguish not being perfectly flush.
 
I've used my Lie Neilson #140 skew block planes with the edge guide after cutting close with a router.
 
Mario Turcot said:
android said:
This is the best way that I have seen to do this...

Flush cutting edge banding is about 7 minutes in.

http://www.youtube.com/watch?time_continue=3&v=AddH8IgL7wY

I built a fence with a rabbet like this and tried it and it works pretty well. I probably need to build a more precise fence to get perfect trims, mine was bit off.

[member=66756]android[/member]

That fence jig is on my todo list. What did you used as finish, wax?

So William has another video where he shows the build of the fence, so you should watch that if you haven't.
I put some clear poly on mine followed by some paste wax. That's pretty much what' I've been doing on all my jigs and fixtures.
 
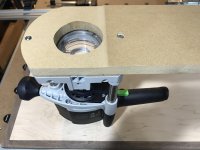
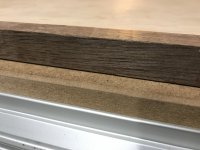
Since I already have edge banding on all 4 sides of my first shelf, the tall fence for router table or table saw methods wouldn’t work so I decided to build a jig for my OF1400. While it didn’t turn out terrible, and it’s mostly fine, I’m not completely sold that it’s how I’ll trim edge banding in the future.

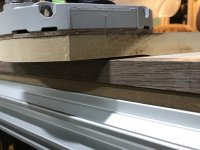
I got a slightly damaged 2’ x 4’ sheet of MDF from HD for $5. I ripped a piece as wide as the router and cross cut it to about a foot long.  I traced the front of the router to the board and cut it off with a jigsaw for better appearance. I then removed the bottom plate of the router, traced the 2 bolt and center holes, and drilled/cut them out. Finally, I put a piece of painters tape on my jointer and ran the MDF through the jointer until the back lined up with the tape, shut the jointer off, lowered it for a deeper cut, and repeated a few times until I’d removed about 2mm from the front half of the jig.

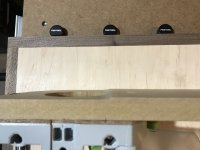
View attachment 1View attachment 2View attachment 3

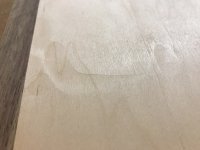
For the most part the jig works amazing and finished the edge banding very nicely; however, the edge banding has a few places were it’s not completely smooth and there’s a few small marks in the plywood veneer.  I’m not sure if it’s because the plywood is not perfectly straight or because the router has a tendency to tilt forward and I didn’t hold the back down hard enough. 

I can hand plane / sand most of the marks, and the systainers will cover most of the shelf anyways, but if I had to do this again, I’d try to mitigate these issues by making the jig a little longer so I didn’t have to work so hard to hold it down (the bit was only 1/2” wide, I couldn’t see well through the dust hood, and corners take some finagling so it took several minutes to complete). 

View attachment 4View attachment 5

That said, it would be much quicker and take far less muscle to take one or two passes down the table saw with a tall fence, which I can really appreciate, so I’ll try this method on next few shelves and post my progress so everybody can see the results.

Stay tuned ...
 

Attachments

  • 5478701A-0463-4B23-8C1F-413D256DF9C9.jpeg
    5478701A-0463-4B23-8C1F-413D256DF9C9.jpeg
    2 MB · Views: 437
  • 667A5C4C-A90D-4493-80C3-7E00F8B245AF.jpeg
    667A5C4C-A90D-4493-80C3-7E00F8B245AF.jpeg
    2 MB · Views: 311
  • 3655736F-C2FD-4ED4-994D-EE6791A38197.jpeg
    3655736F-C2FD-4ED4-994D-EE6791A38197.jpeg
    1.9 MB · Views: 338
  • 7AFBA94C-5D59-40A0-94E3-1A17F5020FD5.jpeg
    7AFBA94C-5D59-40A0-94E3-1A17F5020FD5.jpeg
    1.9 MB · Views: 302
  • B20CF0F7-0160-4321-8FB7-19549255CBC6.jpeg
    B20CF0F7-0160-4321-8FB7-19549255CBC6.jpeg
    2.1 MB · Views: 350
Bugsysiegals said:
I was really thinking to go with the hand plane but seems I need to check more into the MFK 700 and see what kind of results it produces. If I went that way, I wonder how well of a finish it would produce in terms of putting an edge guide on it and a bit which is 1-2mm thick and routing a tiny groove where the edgebanding and plywood meet ...it would be a sort of decorative border and perhaps remove the glue at the same time making it hard to distinguish not being perfectly flush.

If you want to use a hand plane, then you have a choice of two, and either will produce excellent results.

To clarify, tear out occurs when you plane into reversing grain. A plane with a 60 degree cutting angle is unlikely to tear out. Your one choice here is a block plane, such as the LN 60 1/2, and add a 50 degree secondary micro bevel to the blade. That will create a 62 degree cutting angle. It will do the job.

The second plane is a Bailey style, such as a Stanley or LN #3 or #4. You could use the LN with a 55 degree frog - not my cup of tea. I would rather use one of these with a closed up chipbreaker. This is a technique that needs a little practice but, once down, you can plane ANY grain and never experience tear out.

Regards from Perth

Derek
 
Corwin said:
For tasks like this, here's the plane that's been on my wish list:

Lie-Lielsen Chisle Plane

Be Careful...I needed to trim about 150 Jatoba plugs in maple treads & Jatoba edging flush, so I decided to use the Lie Nielsen chisel plane. The Jatoba plugs were about .060"-.090" (1/16" - 3/32") proud of the surface. Using the paring/slicing method with the chisel plane, I still got a lot of tear out.  [sad]  If the plugs were only .015" (1/64") or less proud of the surface, then maybe the plane would have worked better. I noticed in the video the plugs that were being trimmed were almost flush with the surface already.

After butchering 2 or 3 plugs, I went back to using a veneer saw.  [crying]
 

Attachments

  • 4644.jpg
    4644.jpg
    1.7 MB · Views: 581
Bugsysiegals said:
Forget about the refurbished 700, it doesn’t come with the 1/4 collet, dust hood, cord, vertical and horizontal base, or feeler bearing set.

I’m trying to understand whether a jig underneath my OF1400 with the right bit, not sure what’s best, would be every bit as good as the MFK700 with the spiral bit??  Perhaps I buy a smoothing hand planer or something instead and give it a light shave if the bit doesn’t finish as well.  Or is a new 700 worth it?

Look at Festool Part # 486052 and 486058.  These 2 parts essentially make your OF1400 a MFK router for flush trimming.  There are 1 or 2 youtube videos out there about these parts and the OF1400
 
Re. [member=44099]Cheese[/member]  Paring face grain plugs.

Had to do a lot of this at one time. Found that marking the direction of the grain (looking at the side of the plug) allowed tear out free paring. Marking was a bit of a hassle so switched to propping the motherboard at an angle on the drill press table so the plugs had a guaranteed physical indication of grain direction.

On a subsequent project after I’d acquired an old AEG belt sander with frame none of the above mattered. Just set the depth of the belt to about .2mm above the surface and run over the plugs. Easy peasy as long as there was enough room for the machine.
 
Hey [member=297]Michael Kellough[/member] thanks 🙏 for the input. Everyday there’s something new to learn.  [cool]

When I did this floor/stairs project, I cut all the plugs and installed all of them with the grain running in the same direction. What I didn’t anticipate was how was I going to trim them down and what tool I was going to use.  [sad]  Consequently, of the 6 plugs used on each tread, 2 on each side we’re only 1 1/2” from the apron and 3 we’re only 2” from the riser. Thus there was only 1 plug on each tread where I could approach it from 360 degrees.  [doh]
 
Back
Top