Router sled for the MFT

Shawnrader

Member
Joined
Jan 7, 2020
Messages
12
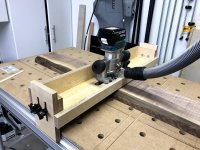
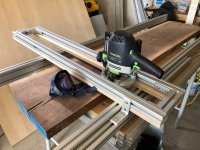
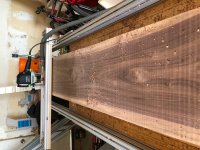
I needed a router sled to flatten some walnut, and decided to utilize the V slot extrusion on the MFT as the rails.  I made it adjustable to handle various thickness materials.

[attachimg=2]

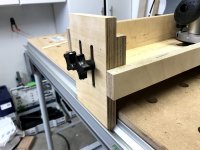
I used some jig hardware for the height adjustment.  The V groove was cut on my table saw.  Everything made of Baltic Birch.

[attachimg=1]
 

Attachments

  • router_sled2.jpg
    router_sled2.jpg
    563.2 KB · Views: 7,410
  • router_sled1.jpg
    router_sled1.jpg
    449.4 KB · Views: 10,379
Good job!

Reminds me of the two long MFT/3 extrusions that are waiting to be turned into a bigger MFT, need to increase my trawling the usual used sites to obtain the rest of the parts...
 
Excellent. I like the way the sides keep the base the router runs on horizontal.

Andrew
 
Just curious why you made the slot in the sled for your router but so short, now you are limited to board width.  Unless im missing something here.  Besides that, i freaking love this idea.  Was just looking at sleds today.  This is a much cheaper way to go that looks like it works well. 
 
Very cool. What kind of router bit do you use with this tiny Makita router? I have one as well, and I really like your idea
 
Very nice!

Out of interest, did you consider using a copying ring on the router versus putting sides on the sledge?

Sent from my iPhone using Tapatalk
 
This tiny Makita works very well with CT26 for edge "processing" and such, basically, no dust left on any surfaces.
I wonder how much "mess" did you end up having to clean after your flattening exercise?
 
Dusty.Tools said:
Very nice!

Out of interest, did you consider using a copying ring on the router versus putting sides on the sledge?

Sent from my iPhone using Tapatalk

You need the side so the sledge doesn’t sag.
 
Michael Kellough said:
Dusty.Tools said:
Very nice!

Out of interest, did you consider using a copying ring on the router versus putting sides on the sledge?

Sent from my iPhone using Tapatalk

You need the side so the sledge doesn’t sag.
Yes that makes for structure, it looks like it’s also the guide for the router.

Sent from my iPhone using Tapatalk
 
Yeah the sides are to keeping it from sagging in the middle.  The front is lower to make room for the dust collection port.
Dust collection is not great, captures maybe 50%. I think it would have been better if I had designed it around the Makita trim base which has much better dust collection than the plunge base.  I assembled it dry with dominos and screws so I can reconfigure it.
 
I'm wondering if the sled could be done by using an mcw 1000 extension table with the table top removed. That would leave you with two parallel extrusions that won't sag. When your done just put the extension table top back on and you don't need to store a large plywood sled somewhere in the shop.
 
Joelm said:
I'm wondering if the sled could be done by using an mcw 1000 extension table with the table top removed. That would leave you with two parallel extrusions that won't sag. When your done just put the extension table top back on and you don't need to store a large plywood sled somewhere in the shop.
I expect the frame of a MW 1000 table to be unstable with the top removed, some applied pressure and the plastic corners might need replacement...
 
I like that design. 

I rigged up some 8 foot lengths of 80/20  and clamped it to the MFT with some 5/16 hardware and large washers through the 20mm holes.  Allows me to handle longer pieces.  This could be a really good addition to handle wider stuff.


Attachments

  • IMG_3529.jpg
    IMG_3529.jpg
    778.6 KB · Views: 7,015
  • IMG_3544.jpg
    IMG_3544.jpg
    916.2 KB · Views: 998
Back
Top