Routing with a fixed space from edge?

Wuffles

Member
Joined
May 23, 2013
Messages
1,315
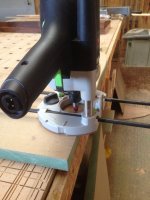
I've got form for getting these things muddled in my head, but here's what I am trying to do.

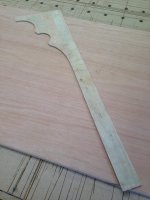
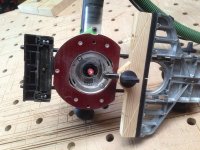
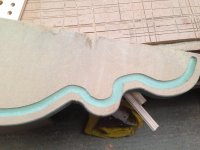
I want to route a line/flute/whatever about an inch (but ideally adjustable) inside the edge of an irregular shaped object. If it were square it'd be easy enough. Kind of like faux panelling if that makes sense.

[attachthumb=1]

So before I reinvent the wheel with something awful, does a thing exist that does this already?
 

Attachments

  • 2015-03-06 11.17.39.jpg
    2015-03-06 11.17.39.jpg
    1.6 MB · Views: 368
I'm not sure it will on the shape I have to do. Quite tight curves in and out, needs something more of a bearing based copier?

If there were a way of mounting the bearing based copier I actually have (which is only good for doing outside edges) into the edge guide then I'd be in business.
 
Not enough coffee yet this morning so I missed it was flutes you wanted to route. For that an edge guide is the tool or a jig like this:
http://www.rockler.com/router-fluting-jig

[edit]
To make it follow an outside curve one side on such jig would have to be modified to a round point instead of long/square such that it can follow the curve. Imagine screwing a parf dog on the right side of the jig so it gets a point of rotation.
 
Screw a sharply-convex shaped piece onto the front of the edge guide with the apex in line with the centre of the bit. This will enable you to follow closely the edge of your workpiece.
 
rvieceli said:

Already have those, but they're for doing an outside copy...not inside unfortunately. I went for those first thing thinking "finally, a use for them".

mwildt said:
To make it follow an outside curve one side on such jig would have to be modified to a round point instead of long/square such that it can follow the curve. Imagine screwing a parf dog on the right side of the jig so it gets a point of rotation.

and

RL said:
Screw a sharply-convex shaped piece onto the front of the edge guide with the apex in line with the centre of the bit. This will enable you to follow closely the edge of your workpiece.

Both hit the nail on the head. Thinking outside the box isn't my thing, so thanks for the prompt. I'll attach a piece of wood to the edge guide and then perhaps force the copier scanner wheel into that and use it to copy. A bit of everything.

If it works I'll take a photo.
 
A couple of ideas for you that I meant to post earlier.  The importance with the singular "pointed" one is to ensure that your router is properly positioned to the point of contact.  If you have al outside curves the two pointed version will take care of that for you.

[attachimg=1]

Peter
 

Attachments

  • ideasalt.jpg
    ideasalt.jpg
    174.4 KB · Views: 728
Peter Halle said:
A couple of ideas for you that I meant to post earlier.  The importance with the singular "pointed" one is to ensure that your router is properly positioned to the point of contact.  If you have al outside curves the two pointed version will take care of that for you.

[attachimg=1]

Peter

Almost exactly what was in my head, but with the copying set ball-bearing mounted in it. But rather than make a piece of wood, just use the guides with a bit of wood nailed to it.

I'm not as crazy as I thought though if a few people are on the same lines.
 
I thought I had it cracked with the Heath Robinson effort I had knocked up, but it's just too much effort to keep it at 90 degrees, especially when going around the curves - see attached photo of a scrap piece.

I'd say "back to the drawing board", but I have no idea what I'd be drawing.

This has surely come up as a thing before? Or is this router alchemy?

[attachthumb=1]

[attachthumb=2]
 

Attachments

  • 2015-03-11 12.52.21.jpg
    2015-03-11 12.52.21.jpg
    2.4 MB · Views: 256
  • 2015-03-11 12.52.33.jpg
    2015-03-11 12.52.33.jpg
    861.4 KB · Views: 209
    Yeah, that's gonna be tough. You need the single point to negotiate the inside curves  but that allows the orientation of the router to "swing" and thus alter the space from the edge.

      CNC shop near by?

Seth
 
I think you need to make a template that you can follow with a bearing. Trace your design on a 1/4" MDF, cut with a jig saw and clean the edges as best you can. Using a compass, open it up to the width you need (how far in from the edge you want the flute, making allowances for bit radius and bearing), and follow the outside edge with the point, marking a smaller version of the pattern. As best you can, keep the axis formed by the pencil-point on the compass perpendicular to the shape you are trying to follow. Cut out and clean the template edges.

Using double sided tape, place the template on the piece, and using a bearing bit, follow the template and cut your flutes.
 
pugilato said:
I think you need to make a template that you can follow with a bearing. Trace your design on a 1/4" MDF, cut with a jig saw and clean the edges as best you can. Using a compass, open it up to the width you need (how far in from the edge you want the flute, making allowances for bit radius and bearing), and follow the outside edge with the point, marking a smaller version of the pattern. As best you can, keep the axis formed by the pencil-point on the compass perpendicular to the shape you are trying to follow. Cut out and clean the template edges.

Using double sided tape, place the template on the piece, and using a bearing bit, follow the template and cut your flutes.

Funny story. That's how I made the shapes (there are three upstands holding a breakfast bar counter top up). I routed the three of them using the same template with double sided tape and a flush cutter. So I kind of already have a perfectly good template, albeit the exact same profile. Just have to put some visual stops in place to remember to quit at a certain point.

Either way [smacks face about] duh. I can probably do it with the same bit and the smallest guide bush I have knocking about too. The straight edges are simple enough to do by hand.

Thanks all.
 
waho6o9 said:
Can you use your messed up piece as a template?

That's a jigsawn rough piece from the other side of the template. No need, I still have the original template. Failing that I could have flush cut another one again from the actual pieces.

[attachthumb=1]

I'm just trying to give these (see below) awful pieces of MRMDF a little something to make them less like awful pieces of MRMDF. There was a time I would have been happy with what I already have achieved. Ignore the rough sawn wood holding them upright, they're temporary.

So I'm considering a flute inside the entire shape and then just round over the edge. What do you lot reckon?

[attachthumb=2]
 

Attachments

  • 2015-03-11 14.40.19.jpg
    2015-03-11 14.40.19.jpg
    2.2 MB · Views: 227
  • 2015-03-11 15.02.43.jpg
    2015-03-11 15.02.43.jpg
    1.9 MB · Views: 209
Back
Top