So I was at a festool demo last month and the rep demoed sanding in rotary drive mode only. All the way to infinity and beyond. He used a ro150 with the vac on full suction. He claimed since you cannot stop the pad in gear drive mode, that swirl marks will not show up. He took a rough, rough glue up and ground it flat. Then polished it all the way to a sheepskin, keeping the sander in aggressive mode. Does anyone else sand this way?
You are using an out of date browser. It may not display this or other websites correctly.
You should upgrade or use an alternative browser.
You should upgrade or use an alternative browser.
Sanding with a rotex all the time
- Thread starter batcave
- Start date
tjbnwi
Member
- Joined
- May 12, 2008
- Messages
- 7,394
I have, but not to the sheep skin. Depends on what I'm trying to accomplish. He's correct about the CT all the way up in gear mode, normally it is rough surface and the sander has more than enough power to overcome any draw down as the surface gets smoother. Just remember, ya gotta keep the sander moving.
Tom
Tom
- Joined
- Jan 22, 2007
- Messages
- 1,486
batcave said:He claimed since you cannot stop the pad in gear drive mode, that swirl marks will not show up.
Unfortunately a lot of people think that they are supposed to make the sanding pad appear to stop rotating when in random orbit mode. It sounds like your rep was one of those. That is the exact opposite of what you want to do, and will just cause the pad to move in a standard orbital mode. For less visible scratches, the pad should appear to be freewheeling as much as possible. This is why a light pressure produces better sanding results. This is counter-intuitive from what your eyes are seeing, and this is why so many people think you are supposed to stop the pad from rotating.
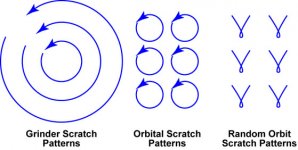
All sanders are going to leave scratches all the time, but the differences will be whether the scratches are across the grain or with the grain. The scratches across the grain will be more visible to the eye, so it is desired to minimize how many are across the grain. There is also more resistance to sanding across the grain, and this is the key for what makes a random orbit sander produce less visible scratches. As the pad orbits, the individual grit on the pad will try to stay moving in-line with the wood grain because it poses the least resistance to movement. The result is that instead of getting circular scratches on the wood, they are more V-shaped. The size of the loop at the bottom of the V determines how visible the scratch will be.
[attachimg=#]
Attachments
I think he did switch it random orbit for the sheepskin. But he used rotary up to that. I thought the oak board came out very nice., but it was one 2 x 2 piece. I didn't rake a light across it either. It seems unconventional, but it also seems like it would speed the sanding process.
- Joined
- Jan 22, 2007
- Messages
- 1,486
batcave said:I think he did switch it random orbit for the sheepskin. But he used rotary up to that. I thought the oak board came out very nice., but it was one 2 x 2 piece. I didn't rake a light across it either. It seems unconventional, but it also seems like it would speed the sanding process.
It wouldn't necessarily be time saving if he had to use unnecessary grits to achieve the finish. You indicated this was an oak board. Sanding to 180 grit would be considered typical, and anything above 220 is in the realm of burnishing. Going above that just for the sake of using Rotex mode defeats the concept of minimizing the visible scratches in the least amount of work.
Because Rotex mode is more aggressive, you would start out your flattening sanding in Rotex mode with a finer grit paper than normally effective for the task. Then keeping the same grit in place, switch to random mode to clean up the Rotex scratches, and then progress through the grits from there. Generally speaking, the finer grits are mainly to remove evidence of the coarser grits.
Rick Christopherson said:batcave said:I think he did switch it random orbit for the sheepskin. But he used rotary up to that. I thought the oak board came out very nice., but it was one 2 x 2 piece. I didn't rake a light across it either. It seems unconventional, but it also seems like it would speed the sanding process.
It wouldn't necessarily be time saving if he had to use unnecessary grits to achieve the finish. You indicated this was an oak board. Sanding to 180 grit would be considered typical, and anything above 220 is in the realm of burnishing. Going above that just for the sake of using Rotex mode defeats the concept of minimizing the visible scratches in the least amount of work.
Because Rotex mode is more aggressive, you would start out your flattening sanding in Rotex mode with a finer grit paper than normally effective for the task. Then keeping the same grit in place, switch to random mode to clean up the Rotex scratches, and then progress through the grits from there. Generally speaking, the finer grits are mainly to remove evidence of the coarser grits.
I agree - this is exactly what I was taught by Mr Phil Beckley of Festool UK and I now use his method all of the time.
Peter
He claimed not to skip the low end grits (under 100). Then skip some after. He only went over 220 to polish it out. Then left a coat of wax. Then the sheepskin.
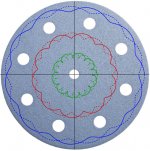
The scratch pattern of the rotex is actually a large flower type shape. It has 10 or so humps with the bottom of the humps meeting in a v. It is not a true circle. Is this what you see?
The scratch pattern of the rotex is actually a large flower type shape. It has 10 or so humps with the bottom of the humps meeting in a v. It is not a true circle. Is this what you see?
Rick Christopherson said:batcave said:He claimed since you cannot stop the pad in gear drive mode, that swirl marks will not show up.
Unfortunately a lot of people think that they are supposed to make the sanding pad appear to stop rotating when in random orbit mode. It sounds like your rep was one of those. That is the exact opposite of what you want to do, and will just cause the pad to move in a standard orbital mode. For less visible scratches, the pad should appear to be freewheeling as much as possible. This is why a light pressure produces better sanding results. This is counter-intuitive from what your eyes are seeing, and this is why so many people think you are supposed to stop the pad from rotating.
All sanders are going to leave scratches all the time, but the differences will be whether the scratches are across the grain or with the grain. The scratches across the grain will be more visible to the eye, so it is desired to minimize how many are across the grain. There is also more resistance to sanding across the grain, and this is the key for what makes a random orbit sander produce less visible scratches. As the pad orbits, the individual grit on the pad will try to stay moving in-line with the wood grain because it poses the least resistance to movement. The result is that instead of getting circular scratches on the wood, they are more V-shaped. The size of the loop at the bottom of the V determines how visible the scratch will be.
[attachimg=#]
I was not clear enough on this statement. The rep said swirls marks show up from the pad sitting still. Just as you have stated in your reply. You are both on the same page there. He claimed since there is no way any human could stop the pad from spinning in rotex mode, that swirl marks will not appear.
- Joined
- Jan 22, 2007
- Messages
- 1,486
batcave said:The scratch pattern of the rotex is actually a large flower type shape. It has 10 or so humps with the bottom of the humps meeting in a v. It is not a true circle. Is this what you see?
Below is a fairly accurate representation of Rotex-mode movement that varies with the distance from the center of rotation. I can't remember which model I used to represent this, but it was mathematically modeled from the specific parameters of the Rotex sander. (I don't recall the orbit diameter and gear ratio used.)
As you get closer to the center of rotation, the path of each piece of sandpaper grit gets closer and closer to a circular motion. What differs between this and a random orbital motion is that the paths will be distorted into a more in-line motion with the direction of the grain. I wanted to also draw that motion, but it came out very convoluted looking and wasn't very easy to set up the mathematical model.
What you should take away from this image is that when gear driven, the grit is forced to take a cross-grained path. This is what makes them agressive, but also what leaves the visible scratches.
[attachimg=#]
Edit: Just in case an astute reader notices that my Rotex graphic looks slightly different from a similar graphic shown in some Festool documents, that's because mine is showing the same direction of pad rotation and orbit, such as used for the RO125/RO150. The RO90 uses contra-rotating motion, where the pad rotates in the opposite direction from the orbital motion. Most people wouldn't notice the difference, but since this is the FOG, I am sure someone out there would have. [big grin]
Attachments
- Joined
- Jan 22, 2007
- Messages
- 1,486
batcave said:I was not clear enough on this statement. The rep said swirls marks show up from the pad sitting still. Just as you have stated in your reply. You are both on the same page there. He claimed since there is no way any human could stop the pad from spinning in rotex mode, that swirl marks will not appear.
Sorry, I was already typing when you posted this. What the rep misunderstood is the exact nature of that rotation. What looks like just a high speed rotation in random orbit mode is actually a freewheel motion that will speed up and slow down as necessary to counteract resistance in the cross-grain motion. It is hard to describe, but as the orbit is moving in a cross-grain direction, the rotation will speed up and slow down to minimize this. Only at the apogee of the orbit can the rotation not nearly cancel out the orbit motion, and this is where you get the little loop in the bottom of the V-shape I showed previously.
Jason Kehl
Member
- Joined
- Sep 28, 2010
- Messages
- 113
What is the preferred approach to minimize sanding time and yet avoid rotary scratches? I understand a previous statement to use rotary mode when starting the sanding process (eg. 80grit) and then switch to random orbit with the same grit. After using 80 grit and then going through successive grits (120, 180 etc...)should this pattern be repeated each time, or is it better to only use random orbit mode ?
Thanks
J
Thanks
J
chrisrosenb
Member
- Joined
- Sep 1, 2007
- Messages
- 1,232
I start with 150 grit on a RO150 in Rotex mode for my first sanding.
I then use a RO150 in RO mode or a ETS 150 with 180 grit for the final sanding.
Most all of my work is stained. Scratches have never been a problem.
I then use a RO150 in RO mode or a ETS 150 with 180 grit for the final sanding.
Most all of my work is stained. Scratches have never been a problem.
- Joined
- Jan 22, 2007
- Messages
- 1,486
There is no direct answer Jason, because it depends on what you have to start with. The most important advice I can give you is to not start any more aggressively than is necessary. Depending on what you are doing, even 80 grit is pretty aggressive. Instead, consider going up in grit and using Rotex mode to do your leveling.
Oh, after re-reading your question, you were actually asking whether you should alternate between Rotex and random mode through the successive grits. No, I would not do this unless there was some reason you were forced to skip a grit. About the only other time I could see this is if you started with a really coarse grit, and then you may want to go with a couple of successive grits in Rotex mode.
Oh, after re-reading your question, you were actually asking whether you should alternate between Rotex and random mode through the successive grits. No, I would not do this unless there was some reason you were forced to skip a grit. About the only other time I could see this is if you started with a really coarse grit, and then you may want to go with a couple of successive grits in Rotex mode.
Rick Christopherson said:There is no direct answer Jason, because it depends on what you have to start with. The most important advice I can give you is to not start any more aggressively than is necessary. Depending on what you are doing, even 80 grit is pretty aggressive. Instead, consider going up in grit and using Rotex mode to do your leveling.
Oh, after re-reading your question, you were actually asking whether you should alternate between Rotex and random mode through the successive grits. No, I would not do this unless there was some reason you were forced to skip a grit. About the only other time I could see this is if you started with a really coarse grit, and then you may want to go with a couple of successive grits in Rotex mode.
I am sure that Mr Beckley told me to go thorugh the grits, rotary then random with each.
Peter
- Joined
- Jan 22, 2007
- Messages
- 1,486
I am sorry, but I would disagree with that. You would be putting new cross-grain scratches in with the intention of removing cross-grain scratches. That may be applicable at the very coarse grits, but not something I would recommend beyond the coarse grits.
Thanks for all the input. I think he was showing that the speed of rotex mode will remove the scratch pattern of the previous grit a lot faster than a orbital mode would. I think that would be why one would switch from rotex to orbit between every grit. If I ever get the right project, I will test his theory. I have always used the orbit mode and saved rotex for the special occasion. It is not hard to tell how powerful the rotex mode is because it is exhausting to run it for long periods. I will watch out for the things shown here.
Kevin
Kevin
Jason Kehl
Member
- Joined
- Sep 28, 2010
- Messages
- 113
Thanks guys. My tendancy has been to reserve using Rotex mode for only when I was really in need of aggresive sanding, usually planer tear-out removal. After that I usually do what Rick has suggested and leave the sander in RO mode. It sounds like I've been on the right track although perhaps I'll try what Peter does at some point.
J
J
I know the rep in question and I have seen that demo. It does work, and I have seen the results under close scrutiny (sidelight). I don't use the technique myself because at a reasonable point I switch to the ETS 150/3. I love the RO to get started for flattening and getting that first uniformity, then I move to the ETS, starting with the same grit I left off with on the RO, and go on from there, usually switching at about 150 grit. If I did not have the ETS I would probably use the RO as demonstrated.
This is a bit like breaking in a rebuilt engine. Ask 10 mechanics how to do it and you get 10 different answers. I remember that observation from reading an article about rebuilding when I was a kid. The author then said "Here is another one you can add to the list that works." We all experiment until we find a comfort level, and then spend the rest of our lives trying to improve on it. [doh] [scratch chin]
This is a bit like breaking in a rebuilt engine. Ask 10 mechanics how to do it and you get 10 different answers. I remember that observation from reading an article about rebuilding when I was a kid. The author then said "Here is another one you can add to the list that works." We all experiment until we find a comfort level, and then spend the rest of our lives trying to improve on it. [doh] [scratch chin]
Rick Christopherson said:batcave said:I think he did switch it random orbit for the sheepskin. But he used rotary up to that. I thought the oak board came out very nice., but it was one 2 x 2 piece. I didn't rake a light across it either. It seems unconventional, but it also seems like it would speed the sanding process.
It wouldn't necessarily be time saving if he had to use unnecessary grits to achieve the finish. You indicated this was an oak board. Sanding to 180 grit would be considered typical, and anything above 220 is in the realm of burnishing. Going above that just for the sake of using Rotex mode defeats the concept of minimizing the visible scratches in the least amount of work.
Because Rotex mode is more aggressive, you would start out your flattening sanding in Rotex mode with a finer grit paper than normally effective for the task. Then keeping the same grit in place, switch to random mode to clean up the Rotex scratches, and then progress through the grits from there. Generally speaking, the finer grits are mainly to remove evidence of the coarser grits.
I don't have the technical backround to support or refute what Rick is saying, but I have found that switching from the coarse to fine sander mode at the same grit has helped minimize scratch marks. In otherwords my experience with the RO150 is in line with what Rick is saying.
When I sand, I go up to 120 to 150 grit in the aggressive mode then start with the last grit used in aggressive mode as the starting point for the fine mode (120-150) and work up from there. Since I've adopted that technique, I haven't had problems with scratch marks.
Similar threads
- Replies
- 18
- Views
- 5K
- Replies
- 18
- Views
- 974
- Replies
- 7
- Views
- 1K