Sanity check - stair repair

mrFinpgh

Member
Joined
Oct 30, 2015
Messages
568
All,

In a prior thread, I had brought up a question around repairing my staircase : link

With the long weekend coming up, I was once again considering making this repair.

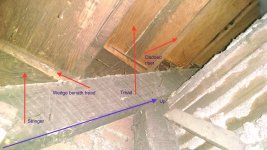
My staircase is a combination of house stringer on one side and open/closed on the other.  The risers in the open part are mitered to the open stringer. 

From what I can see, it looks as if the riser also is dadoed to receive the tread.

I'm not really able to access the back of the staircase from below, as it is plastered and painted with ~85 years of paint and other parts of the house have known asbestos in the plaster.

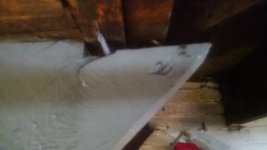
What I'm thinking about doing is bolstering the existing stringers with either 2x material or laminated plywood to create a broader bearing area for the treads to rest upon.  Perhaps also filling the housed stringer mortises to level with the other stringers.

I'm thinking that I can attach to the bolsters with structural screws and ample adhesive.  Then I will attach the treads using more adhesive and trim head screws.

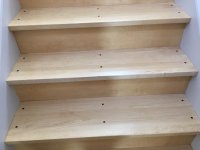
I'll be using pine treads, which will be finished using a combination of dye, gel stain, and varnish.

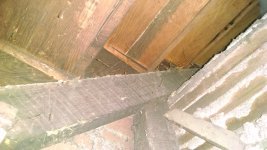
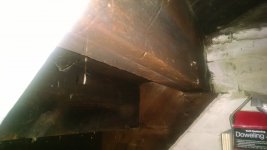
Below is a photo of what I can see from the basement.

View attachment 1

Admittedly, this isn't the most optimal approach, but I'm not certain that there is even sufficient room to reseat wedges given the 2x that is below the stringer.

Do folks think this approach would be successful?  If so, would I be better served using plywood or 2x material?  Any other ideas?

Thanks,
Adam
 

Attachments

  • IMG_20160829_123708377.jpg
    IMG_20160829_123708377.jpg
    2.5 MB · Views: 563
If it were not for the split treads, missing wedges, very loud squeaking on nearly every step, and nails that end up projecting above the tread due to the flex in the tread.. I would.  :-\

 
Can't really orient myself on the picture but i think you are saying you wish to remove the current treads and put in new treads. The problem is you don't have much space to seat the new treads onto the existing stringers?

If that's the case you could do it a few ways. Small 2x blocks glued and screwed to the stringer has worked for me in the past. You could even use a framing nailer to attach them if the stringer isnt too fragile.

Other even better option is to remove all the treads and sister another stringer onto the one side from the top. Cut the angles at the top and bottom and lay the new stringer next to the existing, scribe the stairs and then cut them. Sister it with adhesive and framing nailed and you'll have a solid area to lay your treads.

If I'm completely off base with what your asking advice on please let me know 😳
 
mrFinpgh said:
If it were not for the split treads, missing wedges, very loud squeaking on nearly every step, and nails that end up projecting above the tread due to the flex in the tread.. I would.  :-\

You make some convincing points.
In this case you want to do it right.
 
rizzoa13 said:
Can't really orient myself on the picture but i think you are saying you wish to remove the current treads and put in new treads. The problem is you don't have much space to seat the new treads onto the existing stringers?

If that's the case you could do it a few ways. Small 2x blocks glued and screwed to the stringer has worked for me in the past. You could even use a framing nailer to attach them if the stringer isnt too fragile.

Other even better option is to remove all the treads and sister another stringer onto the one side from the top. Cut the angles at the top and bottom and lay the new stringer next to the existing, scribe the stairs and then cut them. Sister it with adhesive and framing nailed and you'll have a solid area to lay your treads.

If I'm completely off base with what your asking advice on please let me know 😳

I think you have the idea.  The problem is that there are wedges that have worked themselves loose over the past 85+ years, and now I need to create a seat for some new treads.

I'm interested in the blocks attached to the stringer, as that seems the most accessible to me under the circumstances.  I think that sistering another stringer might be a challenge due to the way this one seems to be attached at the bottom.

Do you think it makes sense to try and get as much wood as possible attached to the existing stringer?  Or do you think I only need a bit?  My thinking is that the more glue, screws, adhesive I can put on the extra block, the more it will be securely attached to the old one.

And do you think that 2X would be better than plywood?  I was thinking the plywood might have more stability.  On the other hand, I suspect the 2x will hold fasteners a little better, especially into the side.

I annotated the photo and included it below, for reference:

View attachment 1
 

Attachments

  • IMG_20160829_123708377a.jpg
    IMG_20160829_123708377a.jpg
    2.5 MB · Views: 369
Holmz said:
mrFinpgh said:
If it were not for the split treads, missing wedges, very loud squeaking on nearly every step, and nails that end up projecting above the tread due to the flex in the tread.. I would.  :-\

You make some convincing points.
In this case you want to do it right.

I do.  I'm just not 100% certain what 'right' is.
 
2x will be your better bet for glueing and screwing.

Blocking will work just fine but the more area you sister on the better for stability. If you put a full length stringer up against it you don't necessarily need to have the bottom attach to the landing. If the existing stringer is sound you could just cut off that hard to make piece on the bottom and do all of your nailing to the existing stringer.
 
rizzoa13 said:
2x will be your better bet for glueing and screwing.

Blocking will work just fine but the more area you sister on the better for stability. If you put a full length stringer up against it you don't necessarily need to have the bottom attach to the landing. If the existing stringer is sound you could just cut off that hard to make piece on the bottom and do all of your nailing to the existing stringer.

Thanks. There is about 8" of height/depth between each step internally.  Do you think if I sistered on individual 8x8 triangles using structural screws and pl premium, that it would be sufficient?

At the moment, I was only thinking about adding these to the joist with the housing.  I could also take time time to add to the center stringer, too.

 
Yup those 8" triangles will be more than enough. If you have space to use a framing nailer I'd suggest it, nothing holds shear weight like a nail.

You could also put blocking from stringer to stringer to help with the middle one deflecting and causing squeaks over time. Good luck!
 
Great.  Thanks for your help.

I'm going to pick up a boatload of fasteners tomorrow along with a lot of adhesive and some lumber.

With any luck, I'll make some good progress over the long weekend - these stairs have been a thorn in my side since I purchased the place. It's probably the project I've been least looking forward to doing. 

I imagine I'll use my rotex to handle a lot of the refinishing after completed.  I'm looking forward to that part.  ;D

-Adam

 
Well, today was informative.  [scared]

I started off by removing the end nosing, scotia, balusters, and fillets (plowed rail).  I have those soaking in soy-gel (someone decided to paint them at some point, but they are oak underneath that).  Those sliding dovetails look like something I would make with a rubber mallet and a hard fork.

The treads, which were the main reason I'm doing all of this.  Well, they were put on with vigor and enthusiasm at some point.

Each tread is dadoed onto the riser beneath it and has a tongue to go into the riser above it.  Those are all glued and nailed tight.  On average, I'm finding an additional 15-20 nails in each tread.  So removal is going very slowly.  So slowly, in fact, that I only got two treads off this afternoon.  I am trying to be careful about breaking the tongue and groove/dados, but I'm not too optimistic about that working out in the long run.  Despite their failings, these things were built to stay together, and someone else added some more nails to try and ensure that.

I don't know how much the tongue and grooves will really matter in the long run. I'll be putting up new scotia, painting the risers, and plan on a generous amount of adhesive at each joint.  I'll be screwing each tread/riser with minimum of nine screws per.  At the end of the day, the stairs will probably be more stable than they ever were with nails. 

The other item I realized today is that the upper 5 stairs are actually captive between two mortised skirtboards.  I thought the one on the right side was just base!!  [huh]  I only saw it once I got the trim off.  So now I'm not sure how the heck I will get those treads out without completely obliterating them. I was thinking about just using my multimaster to cut a bit off one side, but I'd still have the problem of actually getting the tread vertically out of the capturing skirting.  I'd love to hear any ideas about how I could pull that off, short of sawzall and new treads!

Some of those, I'd really like to get out, as they are split in the middle.  If I can't get them out.. I'll probably try to figure a way to pocket screw them together with a lot of glue in there.  I'm not too worried about plugs, as only the outer inch or so on each side will be visible once the rug is down.

I had to close down for the day, so I just temporarily added 8" triangle blocks to the exposed stringers with a couple of screws and no glue.  I screwed the treads back down and screwed the riser to the block as well.

Even with 3 trim head screws per tread and 1 per riser, the stairs already feel / sound significantly more solid - no squeaks, just the *thunk* of my heavy footsteps.  Apparently tripling the surface area helps.  I'll be interested to see what more screws and a lot of pl premium do to it.

Thanks,
Adam

 
mrFinpgh said:
1. Each tread is dadoed onto the riser beneath it and has a tongue to go into the riser above it. 

2. I don't know how much the tongue and grooves will really matter in the long run.

3. I'll be screwing each tread/riser with minimum of nine screws per. 

4. I'll be interested to see what more screws and a lot of pl premium do to it.

While I can certainly applaud all of the elements of this design, dados, T&G, rabbits, captured ends of treads and adjustable locking taper shims, I think this is a great case of too many cooks in the kitchen. All of the interwoven and interlaced pieces insured it would never just fall apart, however, it also insured that it would never remain tight (too many interrelated elements expanding & contracting at the same time in opposite directions) and that's the reason you have squeaks and cracked members because they were relying on nails for tightness.

I'd keep it simple, 2x6 or 2x8 pieces for additional blocking, slices off of the treads to be used as infill in the dados in the stringer, new treads and either new or reused risers depending upon their condition and your taste or pocketbook. If you use treads that have a square front or if you use traditional bull nosed treads but extend them 1/8", the square/extended profile will cover the front witness line of the old infilled stringer dado.

I redid a stairway to the bedroom loft about 12-14 years ago and installed new maple treads and I laminated the existing risers with resawn 1/8" thick birds-eye maple. I used PL Premium, stainless screws and plugged each hole with Brazilian cherry. Years later, and tens of thousands of trips up and down those stairs by many people and many animals, and there isn't one tread that squeaks.

You don't need/want a lot of screws holding this together. The screws only act like clamps to hold the tread in place and flat until the PL cures. Once cured, it's the adhesive that does 95% of the work.


Attachments

  • 3464.JPG
    3464.JPG
    1.6 MB · Views: 543
First off, those steps look very nice. How did you fasten the risers? Or did you just overlay the maple on top?

In general, I think we're in agreement - the housed stringers are impressive for the sheer level of complexity, but they are susceptible to going 'wrong' in so many ways.  Especially those wedges.  Great if you can get to them to fix it up, but problematic otherwise.

A couple of the wedges back there were actually nailed to the stringer..  [huh]

Just adding the blocking seems to be making a huge difference.  That may be because the tread isn't sliding against the inside of the stringer anymore.  It feels a lot more solid to me. 

Unfortunately, deconstructing the steps and pulling all the nails took way longer than I thought it would (story of my life..) so none of the treads are back down with glue yet, just held in with a couple screws.  On the bright side, all the paint is off the balusters.  Whoever painted them did a terrible job, and they painted over some nice quartersawn stock.  I need to do a lead test, but i'm hoping to give them a thorough refinish.

I took the 9 screws per tread from a Gary Striegler video.  Did you use adhesive on the connection from the rear of the tread to the bottom of the riser?    It seems like the more glue I can get on each connection, the better.

-Adam

 
mrFinpgh said:
How did you fasten the risers? Or did you just overlay the maple on top?

Did you use adhesive on the connection from the rear of the tread to the bottom of the riser?    It seems like the more glue I can get on each connection, the better.

The original risers were fir and they were nailed in. I decided to remove them and then PL and screw them in and that really helped firm things up. Then I laminated the birds-eye maple over them to cover all the fasteners.

You are correct, I ran 2 thin beads of PL along the back edge of the tread to adhere it to each riser.
 
I'm almost wrapped up with this one (finally).

There was a bit of scope creep, as I found some nice white oak balusters under a thick and poor paint job.  Further investigation revealed that the staircase + trim had been painted directly over old shellac (and I believe, wax and nicotine).  Since it was already peeling off at the mildest insult, I opted to strip and repaint as well.  This time with two coats of primer and two coats of Advance in Satin.

Ultimately, I ended up stripping and refinishing the newel post and handrail as well as the balusters, stripping the old treads and refinishing (without sanding.. going to play up the 100 year old look), and reinstalling.  The handrail appeared to be red oak, as opposed to the newel and balusters.    Sherwin Williams did a good job getting me a stain that could almost match up with the look of the old white oak.  Glazing over the whole thing with gel stain has me at a very close match.

At this point, what remains is to finish fabricating a transition up at the landing to provide a bullnose and level edge to the floating cork floor on the second floor, stain and install new scotia molding, and finally install the runner.  Cheese, I was inspired by your maple treads and thought a similar look might be a good transition between the oak to the lighter colored cork.  I will probably use Padauk for the plugs, since I have some.  [laughing]

In the meantime, I noticed something interesting about my basement steps - they appear to be separating at the Stringer - Joist connection!  It looks like they were being held in primarily by big nails.

I'm not interested in a replay of what I just went through.  Are there any good mechanical means to reattach the stringers to the joist?  I'm thinking large steel plates and heavy screws?

Thanks,
Adam
 
Here are some photos of the issue that I mentioned earlier in the week: the stringers are notched around the joists, and it looks as if they have separated a bit over time.

I'd like to get them back up against the joists and secured.  Although I can't say I've actually noticed movement or any deviation in height between the first floor and the first step into the basement.

View attachment 1
View attachment 2
 

Attachments

  • IMG_20160921_093642463.jpg
    IMG_20160921_093642463.jpg
    1.9 MB · Views: 285
  • IMG_20160921_093655587.jpg
    IMG_20160921_093655587.jpg
    1.6 MB · Views: 238
As long as the bottom end of the stringer is locked in place the stringers cannot fall.

You can try jacking it back in place carefully. Keep an eye on everything as you apply pressure.

Tom
 
Adam, I don't think I'd bother trying to jack the stringers back into place.  If you're worried about farther movement you can use a metal connector(s) like this, or what even Home Depot has that will work.  Be sure to use the right fasteners, the nails or screw you want will be right there with all the metal connectors.  Don't use drywall screws or roofing nails. 
 
I've got to disagree, I'd definitely get that stringer back up and in line with the others. Either that or sister a new stringer right next to it at the correct height.

If you don't address it your stair won't sit flat and you'll eventually get squeaks from the void where the tread doesn't contact the stringer. Simpson strong tie brackets are a good idea but only once you get it back up in place.
 
Back
Top