Hello everyone!
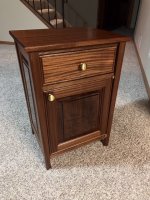
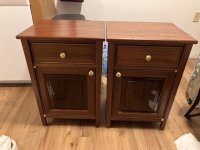
I wanted to share a project I’ve been working on for quite some time. I made a couple nightstands to match a bed frame I made a few years back. This was my most challenging project to date as I decided to do full-extension sliding dovetail drawer slides taking advantage of the repeatability and accuracy of the Incra LS Positioner. This was very difficult since I couldn’t find a whole lot of info on how to do this online. With a lot of planning though it worked out")
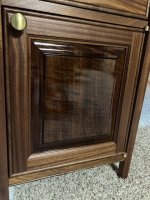
It is made of quartersawn sapele, with claro walnut panels. The front panel on the door is curly claro walnut. The drawer and door have claro walnut cock beading as do the panels on the side and back (overkill I know [eek]).
[attachimg=1][attachimg=2][attachimg=3][attachimg=4][attachimg=5][attachimg=6]
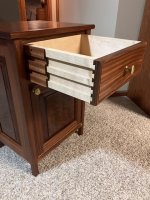
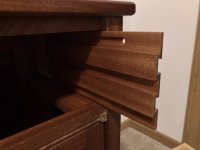
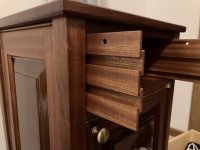
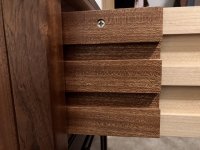
The sliding drawers consist of three parts: a maple runner on the inside of the cabinet, a sapele slide, and the maple drawer sides. There are two stopped grooves on the inside of the sapele slide that act as stops for the catches. The first catch is a #8 screw attached to the drawer sides in a strategic location. The drawer pulls out about halfway and the catch hits the stop in the groove. Then the slides come out of the cabinet until the second catch, which is a #8 screw in the runner on the cabinet side, hits its stop. This brings the drawer to full extension.
[attachimg=7][attachimg=8][attachimg=9][attachimg=10][attachimg=11]
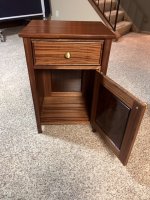
The doors of the cabinet have bullet catches from Brusso along with Brusso offset knife hinges. Brusso makes beautiful (but expensive) brass hardware. The claro walnut panels received a dye stain made by Behlen (I believe Mohawk bought them out now) so the walnut color does not fade.
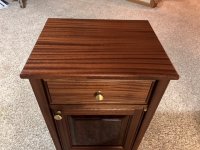
The tops were coated with danish oil to bring out the ribbons on the quartersawn sapele. They were then coated with Minwax poly along with the rest of the cabinet parts. The walnut panels were finished with gloss to bring out the amazing figure in the wood. The rest of the nightstands were coated in satin and rubbed out with steel wool, white scotch brite pads, and paste wax.
This was a really fun project I nearly finished last year until the cold MN weather prevented me from spraying finish I procrastinated this year but just finished before it got too cold.
Thanks for looking!
Michael
I wanted to share a project I’ve been working on for quite some time. I made a couple nightstands to match a bed frame I made a few years back. This was my most challenging project to date as I decided to do full-extension sliding dovetail drawer slides taking advantage of the repeatability and accuracy of the Incra LS Positioner. This was very difficult since I couldn’t find a whole lot of info on how to do this online. With a lot of planning though it worked out
It is made of quartersawn sapele, with claro walnut panels. The front panel on the door is curly claro walnut. The drawer and door have claro walnut cock beading as do the panels on the side and back (overkill I know [eek]).
[attachimg=1][attachimg=2][attachimg=3][attachimg=4][attachimg=5][attachimg=6]
The sliding drawers consist of three parts: a maple runner on the inside of the cabinet, a sapele slide, and the maple drawer sides. There are two stopped grooves on the inside of the sapele slide that act as stops for the catches. The first catch is a #8 screw attached to the drawer sides in a strategic location. The drawer pulls out about halfway and the catch hits the stop in the groove. Then the slides come out of the cabinet until the second catch, which is a #8 screw in the runner on the cabinet side, hits its stop. This brings the drawer to full extension.
[attachimg=7][attachimg=8][attachimg=9][attachimg=10][attachimg=11]
The doors of the cabinet have bullet catches from Brusso along with Brusso offset knife hinges. Brusso makes beautiful (but expensive) brass hardware. The claro walnut panels received a dye stain made by Behlen (I believe Mohawk bought them out now) so the walnut color does not fade.
The tops were coated with danish oil to bring out the ribbons on the quartersawn sapele. They were then coated with Minwax poly along with the rest of the cabinet parts. The walnut panels were finished with gloss to bring out the amazing figure in the wood. The rest of the nightstands were coated in satin and rubbed out with steel wool, white scotch brite pads, and paste wax.
This was a really fun project I nearly finished last year until the cold MN weather prevented me from spraying finish
I procrastinated this year but just finished before it got too cold.Thanks for looking!
Michael
Attachments
-
 38F2EE39-D314-4886-9F99-E8156C3EBE8F.jpeg132.1 KB · Views: 648
 -
 043D1452-9D89-4029-AA32-ACF26ECBFF74.jpeg116.9 KB · Views: 595
 -
 2020B7DB-8750-4258-92E9-5BA3977F0AF2.jpeg125.7 KB · Views: 595
 -
 46C99FC2-2D0D-4EAC-B862-C9DFBE63B974.jpeg135.4 KB · Views: 592
 -
 226BE489-482F-4938-8B98-487BFD7229AA.jpeg123.6 KB · Views: 590
 -
 52EF4E2D-B0BE-4855-ADD4-756035EA89FD.jpeg80.1 KB · Views: 597
 -
 25461F8B-4F57-4788-9009-DA5D45E49CB4.jpeg116.4 KB · Views: 607
 -
 684942A0-9429-4ED3-85C0-6518D4AC781C.jpeg57.1 KB · Views: 596
 -
 2A0974C3-96CD-49F0-8F9D-B97816528205.jpeg77.2 KB · Views: 598
 -
 01121296-7678-471C-A0B0-29E925CD486E.jpeg98.1 KB · Views: 591
 -
 EAA78F22-AE91-4C14-859E-1C9F60CEA7B1.jpeg105 KB · Views: 588

") has such tall dovetail drawer slides been used on historical furniture? I never recall seeing anything like this? (with this much height of course)
has such tall dovetail drawer slides been used on historical furniture? I never recall seeing anything like this? (with this much height of course)