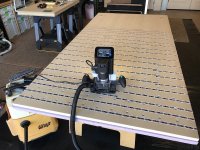
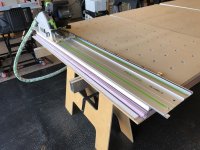
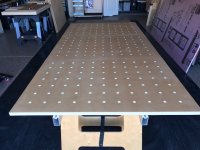
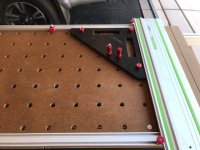
I finally decided to try my Shaper Origin for making some MFT tops out of a foam core panel I've had for some time, but needed an .svg file for a custom size. I initially tried the ontool design features by using the "grid" pattern and "hole" shapes, but was having some problems and seemed a little slow. Brenden at Shaper Tools let me know about an online MFT top generator that is quick and easy to use. It only took a few minutes and I had a file ready to cut a full 4 x 8 sheet of 20mm holes. Using the "helical" feature and a 1/2" router bit, the holes and grid spacing came out perfect! I then cut the full sheet into 3 pieces and trimmed all edges square to the holes. If you have an SO, or are thinking of getting one, and don't know about the MFT generator, check it out at ... http://dve2000.pythonanywhere.com.
You are using an out of date browser. It may not display this or other websites correctly.
You should upgrade or use an alternative browser.
You should upgrade or use an alternative browser.
Shaper Origin for MFT tops
- Thread starter Grev
- Start date
Michael Kellough
Member
Is the Z axis operation automatic as you move from hole to hole?
Cheese
Member
Did you check for dog location squareness before you cut the MFT into pieces?
It'd be interesting to place a tight/snug dog at the end of each leg of a generic 3'-4'-5' triangle and measure the leg lengths.
That's always been an issue with standard MFT tops.
It'd be interesting to place a tight/snug dog at the end of each leg of a generic 3'-4'-5' triangle and measure the leg lengths.
That's always been an issue with standard MFT tops.
One of the first thing I tried with my Shaper was using the x/y function and it gave me perfect spacing and hole diameter. I haven't actually created a new top as I have a bunch done with my LR-23. It is also great for creating circles of perfect diameters.
Made a bunch of acrylic diameters for customers and created a jig for creating diameter recess' for hand mirrors that I make for my daughter to sell.
Made a bunch of acrylic diameters for customers and created a jig for creating diameter recess' for hand mirrors that I make for my daughter to sell.
AlexThePalex
Member
- Joined
- Nov 12, 2008
- Messages
- 7,757
Curious how precise this turn out to be. All your work on the table depends on it.
- Joined
- Nov 21, 2015
- Messages
- 614
MFT top CAD files in popular overall sizes up to 4x8 ft are available for free download on the TSO website:
https://tsoproducts.com/plans-drawings/worktop-cnc-routing-files/
One suggestion to anyone creating their own 20mm pattern tops: what ever method used, check the fist hole(s) before cutting up a whole sheet of MDF or other sheet material.
We have seen hole variations based on different specific material. Sometimes a Baltic Birch worked better than MDF and others have reported just the opposite. This becomes especially important for woodworkers who choose to push the tolerance envelope with Parf Dogs and TSO's CF-Dogs which have the same Close FIt dimensions.
All wood sheet goods do not react the same to a Router cutter - remember it's still "wood"!
There are times when our general purpose (non CF-) Dogs are more practically dimensioned for all around use.
hope this helps.
Hans
Michael Kellough said:Is the Z axis operation automatic as you move from hole to hole?
yes ... once the router is placed over the hole you simply press the "cut" button with your right thumb and the "helical" cut is completely automatic. You can adjust both the cut and plunge speed based on your material/bit to get the best cut. I've added a link to a short video on my Instagram page to show the process.
https://www.instagram.com/p/Bv4gICOAGlN/
Cheese said:Did you check for dog location squareness before you cut the MFT into pieces?
It'd be interesting to place a tight/snug dog at the end of each leg of a generic 3'-4'-5' triangle and measure the leg lengths.
That's always been an issue with standard MFT tops.
I started out using the ontool grid and shape system on one end .. then switched to an .svg file for the other end, so not able to check the full length as a continuous grid ... due to "operator error" when placing the .svg file, I knew the different sections would be off a bit. Once cut down and stacked, the grid pattern seems to be right on, at least diagonally over 48". Even though I don't use the dog holes for squaring/cutting with my track saw, I'll still do a 5 sided cut in the future to check the holes. Not a big deal with this project, as it's only going to be used to replace my foam board for breaking down sheet goods. It was just a good opportunity to get more familiar with the tool. Finished panels turned out good.
Attachments
Cheese
Member
TrackTubesGuy said:1. yes ... once the router is placed over the hole you simply press the "cut" button with your right thumb and the "helical" cut is completely automatic.
2. You can adjust both the cut and plunge speed based on your material/bit to get the best cut.
3. Not a big deal with this project, as it's only going to be used to replace my foam board for breaking down sheet goods.
1. That's pretty slick [big grin]
2. On the fly or does it have to be pre-programmed in?
3. That'd come in handy when trimming that slight twisted slab that should be clamped down.
I just watched the video. Does the Shaper want to move at all during the process because of the router bit rotating and because it'e being forced to follow a router bit path?
nclemmons
Member
[member=44099]Cheese[/member] - I find I do have to hold with two hands. I typically let each 'pinkie' finger rest on the surface to give a little extra control.
The tool WILL move if you don't maintain good surface contact. Particularly if you are cutting more than 1/4" depth at a time in hardwoods.
But it does a great job with the helix cut.
The tool WILL move if you don't maintain good surface contact. Particularly if you are cutting more than 1/4" depth at a time in hardwoods.
But it does a great job with the helix cut.
Michael Kellough
Member
Helix cut equals spiral? Around and down at the same time?
Cheese
Member
Michael Kellough said:Helix cut equals spiral? Around and down at the same time?
You got it Michael...if you watch the instagram video you can see the process, pretty cool. [smile]
Thanks [member=167]neilc[/member] for the info. I assumed that condition because of the old axiom "...an opposite and equal reaction."
I'm assuming you can tweak the hole diameter in .001" increments.
So bore the hole tight, fit the dog, dial in say .001" more diameter, place the Shaper into position, the hole gets enlarged by .001". Is this correct? Is this even possible or am I way off?
nclemmons
Member
[member=44099]Cheese[/member] - Yes. It’s that easy to dial in a fit!
Cheese
Member
neilc said:[member=44099]Cheese[/member] - Yes. It’s that easy to dial in a fit!
Whoa...Whoa That puts inlays in a whole new light. [big grin]
Cheese said:1. That's pretty slick [big grin]
2. On the fly or does it have to be pre-programmed in?
3. That'd come in handy when trimming that slight twisted slab that should be clamped down.
I just watched the video. Does the Shaper want to move at all during the process because of the router bit rotating and because it'e being forced to follow a router bit path?
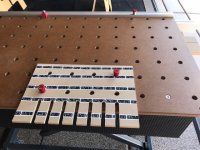
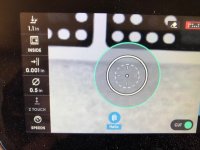
2.) As [member=167]neilc[/member] said, you can adjust the size/offset of the hole on the fly using the touchpad screen. Only takes a few seconds. Here's some photos of the screen. Just select offset icon > select pre-defined offset or enter your own > select done. FYI .. since you cut holes with an "inside cut," you need to actually make the offset a negative (-) value so it will cut a slightly larger hole.
I found using the online MFT top generator and using the defined hole size of .7874, with my 1/2" router bit, the holes were perfect and didn't need any offset. In fact, most my dogs fit slightly tighter than in my Festool tops.
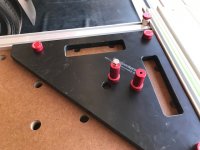
I also cut out a router template for making notches in the edge of my tops for the fence system I use and the 96mm o/c holes lined up perfectly with the holes in the Festool top. This makes it quick and easy to modify my tops.
Attachments


Cheese
Member
TrackTubesGuy said:As [member=167]neilc[/member] said, you can adjust the size/offset of the hole on the fly using the touchpad screen. Only takes a few seconds. Here's some photos of the screen. Just select offset icon > select pre-defined offset or enter your own > select done. FYI .. since you cut holes with an "inside cut," you need to actually make the offset a negative (-) value so it will cut a slightly larger hole.
Thanks for the photos...they really help. So the .001" offset is a user option. [smile]
Are those Woodpecker dogs? If so they're what I have and so I could start with the same .7874" diameter and see what I think.
Michael Kellough
Member
[member=63307]TrackTubesGuy[/member] is there a finish on that new panel? Wax?
Cheese said:Thanks for the photos...they really help. So the .001" offset is a user option. [smile]
Are those Woodpecker dogs? If so they're what I have and so I could start with the same .7874" diameter and see what I think.
Yes .. offsets are user options.
Yes .. Woodpecker dogs that came with my MFT Square. I really liked them and the fact they have a hole (non-threaded) in the bottom allows me to easily tap a 1/4"-20 thread, which I use for most my jigs and accessories. WP doesn't show them on their website, but if you call they may have some available.
Michael Kellough said:[member=63307]TrackTubesGuy[/member] is there a finish on that new panel? Wax?
I use Howard Feed-N-Wax on my tops.
Attachments
Cheese
Member
TrackTubesGuy said:Yes .. Woodpecker dogs that came with my MFT Square. I really liked them and the fact they have a hole (non-threaded) in the bottom allows me to easily tap a 1/4"-20 thread, which I use for most my jigs and accessories.
Thanks...Like you I ordered 2 extra dogs from Woodpecker when I ordered my MFT square. And I don't even own an MFT. [eek] However, it looked like it would be super handy for fixturing and clamping jobs.
ryanjg117
Member
- Joined
- May 18, 2015
- Messages
- 328
murbano said:Apologies for reviving an old thread here but I was wondering which 1/2" bit you used for the cuts.
Me too - I haven't gone any larger than 1/4" spiral bits in the SO. Curious how it handles if you doing more than just helical cuts.
Similar threads
- Replies
- 6
- Views
- 652
- Replies
- 4
- Views
- 536
- Replies
- 0
- Views
- 436