Shaper Origin Mini Systainer

Crazyraceguy

Member
Joined
Oct 16, 2015
Messages
4,897
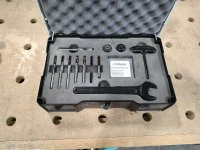
I bought a mini a week of so ago, with the 8mm bit, and just settled on a layout for it.
Since it is mostly about bit storage and changes, that's the focus. I still have the bit Sys1 for the Workstation accessories, even though I haven't cut into it in all this time. I'm glad I waited until now. Some of what I would have put in it will have changed now.
It's still a little fuzzy, I should have cleaned it better and blown it out. I think it would be better to do the pocketing with a O flute bit, like I did here, but then switch to a down-cut for the inside cut to finish it out.
Down-cuts aren't happy with closed spaces, but as a finishing pass inside a pocket, should be better.
I've never cut foam before, so live and learn, better on a small job.
 

Attachments

  • Shaper Sys mini.jpg
    Shaper Sys mini.jpg
    501.3 KB · Views: 227
I cut the foam in my Shaper Systainer last week following Dr.BuckyLab's layout. It took a lot longer than I thought it would.

I used the 8mm bit for its extra length. The cuts were OK. Pocket cuts were the most time consuming and I found myself sometimes clearing too much foam and having the cut foam tear off and wrap around the bit.

In one of the Sessions videos, I saw them doing pocket-like operations with Auto Pass by changing the offset, pushing the initial cut to the middle, and working your way out. I'll file that technique away for another time but yeah, cutting the foam is kinda tricky.

Systainer.Store sells the replacement foam so I may give it another go.
 
[member=75283]4nthony[/member] I have seen that particular layout too. It has been part of my analysis paralysis. Since I added the collet wrench and collets themselves to this mini for bits, I have changed my needs a little too.
Now "theoretically" the bigger one doesn't need to accommodate those items. It can be Workstation only, I guess? I ordered a couple of the foam inserts too. I'm thinking maybe a Sys2 size, so I can make a space for a 2nd spindle. (if they ever come back in stock)
First-world problems for sure, but the job I was doing today could have greatly benefitted from it.
 
Crazyraceguy said:
[member=75283]4nthony[/member] I have seen that particular layout too. It has been part of my analysis paralysis. Since I added the collet wrench and collets themselves to this mini for bits, I have changed my needs a little too.

"Analysis paralysis". Yep. I hemmed & hawed for weeks trying to think of what to do, how to design a super efficient layout, etc. etc. I finally decided to just flip a coin and after several coin flips, ended up at that layout. It's not perfect, but good enough for now and more useful than dumping out the bags each time I need something.

I'm thinking maybe a Sys2 size, so I can make a space for a 2nd spindle. (if they ever come back in stock)
First-world problems for sure, but the job I was doing today could have greatly benefitted from it.

I've been eyeing a second spindle, too. I don't change bits too often, but find myself always swapping out to the engraving bit (upside down) for gridding operations. A second spindle would for sure be a nice-to-have.

With swapping bits for gridding my current workflow interrupter, that got me thinking I could build a "dummy" spindle just for gridding.

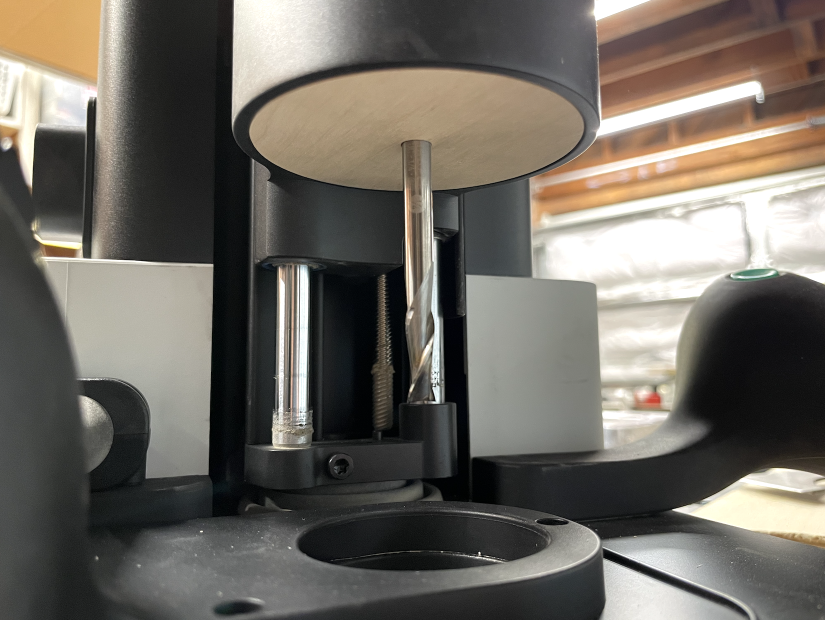
I started off with a single 70mm diameter puck that has a nice friction fit:
Monosnap_2023-06-02_17-09-03.png


I made a second puck that I can slide into the top so there's even pressure in the spindle lock when snugged.
I used a 1/4" bit to see how square the holes were. I'm sure with some patience I can get it more square than this.
Monosnap_2023-06-02_17-10-00.png


I ordered some 8mm rods to use as my faux bit and a piece of acrylic tubing that has a 70mm OD to act as a spindle. The plan was to cut the tubing down to about 3", then put a couple pucks inside the tubing at the top and bottom for it to more closely mimic the size of the actual spindle. A single puck installed at the bottom of the spindle holder could become seated at an angle. A couple of pucks installed in the tubing would -- hopefully --remain square to the tubing and in the spindle holder.

Unfortunately, the diameter of the tubing is 70.56mm and that extra .56 makes a bit too much friction for easily sliding in and out of the spindle holder, even when the screw if fully loosened. It'll go, but requires a bit more pressure than I like.
Monosnap_2023-06-02_17-17-46.png


I've got an idea to cut a kerf lengthwise in the tubing while adding slightly smaller diameter pucks. The kerf should allow the tubing to have a flexible diameter and "shrink" to the size of the pucks (65.90 diameter pucks and 2.05mm thick walls should get me back to 70mm). Fingers crossed. Also, the kerf will kinda act like the alignment channel that is on the existing spindle.

In hindsight, I probably would be just fine with a single puck. This is what I get for being an over-thinker. Ha [cool]

**Update**

Was looking around on Shaper Hub and found this very simple idea.

ShaperHub_2023-06-02_20-40-54.png


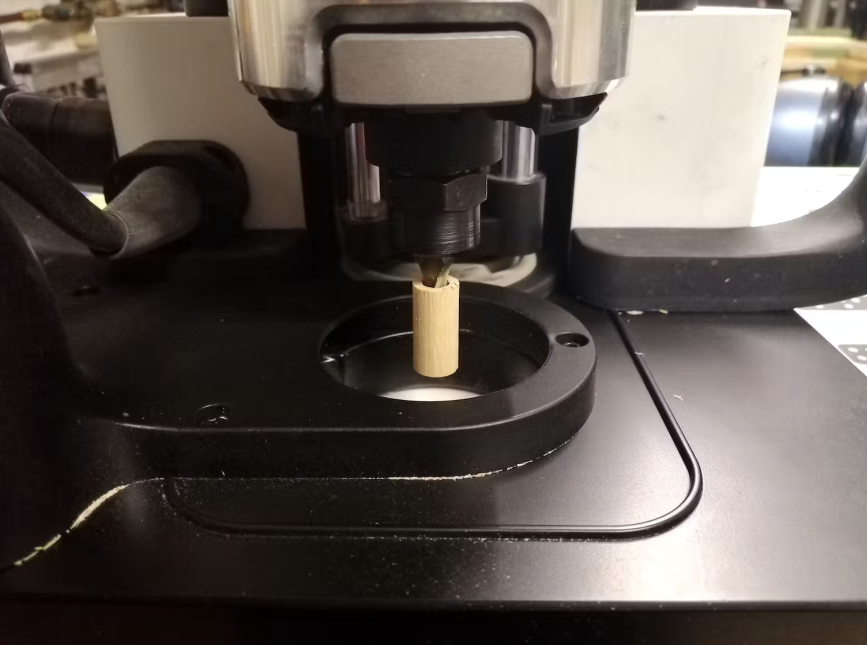
What I ended up with. Did a few test grids and it seems to be as accurate as gridding with the spindle. [cool]

Monosnap_2023-06-03_17-00-40.png
 
I ordered a 4" long piece of drill rod on Amazon, way back when I first got the Origin. I just didn't like the backward bit thing, but it's only 1/4". It just seemed like the simplest way, since 1/4" is one of the default diameters in the selection screen. Sure, you could type in anything, but 1/4" is already there.
[member=75283]4nthony[/member] I like the idea of the acrylic tubing. Did you just buy it that way? as 70mm? or is that what you get as 3" nowadays? Do you just run the carriage down to where the cylinder almost touches?
I assume that you can't see the bit during the depth setting process? 8mm for a reason? maybe because you can make the pucks with a 1/4" bit, rather than having to go smaller and have depth and/or flex issues?
Weeks....haha. I've hemmed and hawed for over a year.  [unsure] Not wanting to mess up a piece that I couldn't replace or being unhappy with the layout were major concerns. Now that I am much more fluent with Studio, more confident in my ability to use Origin, and able to get more foam, I will crack on with it.

As far as the second spindle, it just seems to fit my mentality of excess with routers in general  [eek]
I like the ability to pocket with a bigger bit, then swap to a 1/8 (or smaller) to get into detailed shapes.
Then there was this latest project with the 45 degree sides and flat bottom. I did 4 of those, so a lot of bit changes. A second spindle would have just been a few seconds and a Z-touch.
$300 quite expensive for that convenience, but after the amount of money I'm going to have in the "first" TS60, child's play.
 
Crazyraceguy said:
I bought a mini a week of so ago, with the 8mm bit, and just settled on a layout for it.
Since it is mostly about bit storage and changes, that's the focus. I still have the bit Sys1 for the Workstation accessories, even though I haven't cut into it in all this time. I'm glad I waited until now. Some of what I would have put in it will have changed now.

What you have in the mini is 90% of what I use regularly.  The full setup in the SYS1 gets used way less frequently.  When I cut out the SYS1, I didn't have as many bits and only one collet.  I've considered getting a new block of foam and re-cutting it, but satisficing continues to win the day.

4nthony said:
That's pretty brilliant.
What I ended up with. Did a few test grids and it seems to be as accurate as gridding with the spindle. [cool]

Monosnap_2023-06-03_17-00-40.png
 
Crazyraceguy said:
I ordered a 4" long piece of drill rod on Amazon, way back when I first got the Origin. I just didn't like the backward bit thing, but it's only 1/4". It just seemed like the simplest way, since 1/4" is one of the default diameters in the selection screen. Sure, you could type in anything, but 1/4" is already there.

I rarely use the engraving bit, but I always felt like there was the potential for damage when inserting it cutter first into the collet. I never even thought to buy some 1/4" rod as an alternative until I thought about making the spindle.  [embarassed]

Crazyraceguy said:
[member=75283]4nthony[/member] I like the idea of the acrylic tubing. Did you just buy it that way? as 70mm? or is that what you get as 3" nowadays? Do you just run the carriage down to where the cylinder almost touches?
I assume that you can't see the bit during the depth setting process? 8mm for a reason? maybe because you can make the pucks with a 1/4" bit, rather than having to go smaller and have depth and/or flex issues?

The tubing and stainless rod are from Amazon. The tubing is sold as 70mm OD (66 ID). There are many sellers to choose from. I ordered a 12" length.

As for the 8mm rod, it was available for next day delivery, same as the tubing, so I went with it. Almost instant gratification.  [big grin]

Crazyraceguy said:
Weeks....haha. I've hemmed and hawed for over a year.  [unsure] Not wanting to mess up a piece that I couldn't replace or being unhappy with the layout were major concerns. Now that I am much more fluent with Studio, more confident in my ability to use Origin, and able to get more foam, I will crack on with it.

As far as the second spindle, it just seems to fit my mentality of excess with routers in general  [eek]
I like the ability to pocket with a bigger bit, then swap to a 1/8 (or smaller) to get into detailed shapes.
Then there was this latest project with the 45 degree sides and flat bottom. I did 4 of those, so a lot of bit changes. A second spindle would have just been a few seconds and a Z-touch.
$300 quite expensive for that convenience, but after the amount of money I'm going to have in the "first" TS60, child's play.

Now I'll need to pick up a new foam insert and rethink my layout so I can accommodate my faux spindle. I've used my Origin more in the last month than I have since buying it 11 months ago so its usefulness is become more and more apparent to me. A second spindle is most likely in my future (along with another foam reconfiguration!)
 
This is a totally sellable item if someone can mass produce them. Removing a ready to go bit just to install the engraving bit and then switching back is a complete pain and waste of time. I too have thought of buying a second spindle for this purpose only.
 
JimH2 said:
This is a totally sellable item if someone can mass produce them. Removing a ready to go bit just to install the engraving bit and then switching back is a complaint pain and waste of time. I too have thought of buying a second spindle for this purpose only.

It would be pretty sweet to have this machined out of aluminum.

On that note, I had to make some changes. If you look at the earlier photo of the spindle mounted in the Origin, there's no way the rod will extend beyond the base when lowered.

When I made my grid tests, I hadn't seated the rod fully into the hole and there was only a couple mil extending beyond the base. I did a few more assemblies, fully seated the rod, taking the above pictures, but didn't do another test.

I was looking at the photo this morning and realized something looked off. I checked and the rod wasn't long enough to clear the base.

I made a couple changes, adding a longer rod, and some smaller pucks. This works much better:

fake_spindle_revision.png


There's now a slight discrepancy between gridding with the homemade spindle compared to the Origin spindle. I was placing a dot at the following coordinates:

X: 150
Y: 20, 30, 40, 50, 60, 70, 80, 90

Homemade spindle is H, Origin spindle is S:

fake_spindle_accuracy.png


It's less than 1mm and I don't think it will matter as long as I don't mix spindles on a project when gridding.

I did notice that when gridding with the engraving bit, I always told Origin that the bit was 6.35mm when my calipers measured a consistent 6.32. When measuring the rod on the homemade spindle, my calipers fluctuated between 7.99 and 8mm.

Even with the 6.32/6.35 bit size difference, the Origin spindle is closer to X:150. My spindle is just long.

engraving_bit_diameter.png


[member=75283]4nthony[/member] I would say, for the way I use the machine, (so far anyway) that is more than good enough.
I have yet to need to be that precise from the edges. My first projects the grid really only served to keep my placement parallel to the front edge.
I have done a few barrel hinges and SOSS hinges, but .5mm wouldn't have affected their functionality, and no other way I could have done it would have been more accurate.
I'm going to check into getting some of that acrylic and giving it a go. Thanks for sharing.
I still will get a second spindle for bit swapping, but who knows how long restocking might take or how many they even had in the first place. Seems like they went quick.

 
Crazyraceguy said:
[member=75283]4nthony[/member] I would say, for the way I use the machine, (so far anyway) that is more than good enough.
I have yet to need to be that precise from the edges. My first projects the grid really only served to keep my placement parallel to the front edge.
I have done a few barrel hinges and SOSS hinges, but .5mm wouldn't have affected their functionality, and no other way I could have done it would have been more accurate.
I'm going to check into getting some of that acrylic and giving it a go. Thanks for sharing.
I still will get a second spindle for bit swapping, but who knows how long restocking might take or how many they even had in the first place. Seems like they went quick.

Here are links to the parts I ordered (I should've posted these earlier):

Tubing:https://www.amazon.com/dp/B08ZM3M3P1?ref=ppx_yo2ov_dt_b_product_details&th=1

8mm rods:https://www.amazon.com/dp/B082ZNFMXV?psc=1&ref=ppx_yo2ov_dt_b_product_details

If one really needed to be super accurate and make up that .5mm edge difference, you could increase or decrease the size of your bit on Origin, depending on how far it was off and in which direction.
 
Crazyraceguy said:
...
Now "theoretically" the bigger one doesn't need to accommodate those items. It can be Workstation only, I guess?
...
Yep, this is the way to go. Having "same type" accessories at multiple places is just bad. Consumes mental capacity for no good reason.

I had this with drills and routers. Each drill/router had its accessories and some drill bits to go along. Ended up with the wrong "some" drill/router bits all the time, missing those which were with the "other" drill/router. Not good(TM).

Now my tools have only their dedicated accessories with them. No chargers, no batteries, no shared consumables. Results in many tools fitting in smaller systainers. So at the end of the day I carry a similar systainer volume, just without the semi-chaos of what is where.

$300 quite expensive for that convenience, but after the amount of money I'm going to have in the "first" TS60, child's play.
Seen as a percentage of the Origin price ...  [big grin]
 
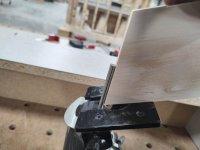
[member=75283]4nthony[/member] The main reason I went with 1/4" was because it does double duty for setting the angle of my tilt base router. The scales on those things are notoriously bad, so I cut a piece of scrap to the correct angle on my mitersaw to compare.
In years past, I just used a long 1/4" flush-trim bit, but the smooth rod is much better. It cost me a whopping $2.68
I ordered the tubing yesterday, should be in tomorrow.

[member=61254]mino[/member] this is something I have been messing with in a mild form, for a while now.
I keep my drill bits in one place, except for the Centrotec ones. They are in the CXS Systainer, with the only drill that can use them.
Router bits are mostly in one place. The exceptions there the 8mm shank ones, they are in a drawer, separate from the rest. Oh, and the ones that are "Origin only".
Fortunately for me, all of my stuff is in a fairly well defined space and I don't have to be mobile.
 

Attachments

  • Angle .jpg
    Angle .jpg
    203.6 KB · Views: 95
Back
Top