ryanjg117
Member
- Joined
- May 18, 2015
- Messages
- 333
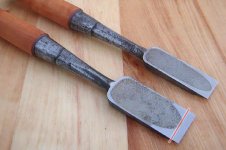
I inherited some old Japanese chisels and have purchased a honing guide to go about sharpening them. Some of these chisels have been well worn--and my guess is, sharpened on a bench grinder :'(--so some of these chisels have been reduced down to a point where the back (dished) part of the grind is now almost at the cutting edge. Here's a little graphic example of what I'm talking about (see my imaginary red line):
[attachimg=1]
When it gets to this point, should I just toss the chisel, or try to grind flat the ENTIRE back to get it to be flat? I did just get an Atoma 140 grit diamond plate so I'm sure with some elbow grease I can get them flat pretty quick, but I will be losing a good amount of material.
[attachimg=1]
When it gets to this point, should I just toss the chisel, or try to grind flat the ENTIRE back to get it to be flat? I did just get an Atoma 140 grit diamond plate so I'm sure with some elbow grease I can get them flat pretty quick, but I will be losing a good amount of material.
") .
.