Hi all,
I thought id start my first post here with some things ive built.
Due to our first week long covid lock-down in the NT ( australia) i started to clean out my shed and told my wife i needed to build stuff to use the tools i had and wanted to fix the fence that was broken in a cyclone a few years back (classic delay tactic [big grin] )
After building a miter station ( upgraded the makita to a festool to finish it) and work bench, i purchased a not so shiny new gold table saw ( another story) and a few festool items.
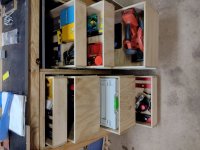
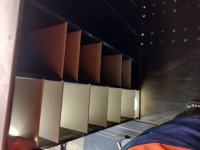
Decided i wanted storage under one side of the miter station and it was going to be all draws.
I went with form-ply as it was black and that matched the miter station and work bench, and i didnt have to paint or oil it when i was done.
View attachment 10
View attachment 2
View attachment 3
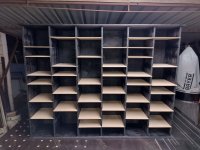
I did not want handles at all, it turns out i spent as much on draw slides ( push to open) as i spent on the wood to make them.
I sorted out the sizing based on width,(which worked out perfectly suited to Systainers !!) and height and the amount of junk i was constantly moving around to use everything, nothing was really set in stone and i changed things as i went along and worked out what would work for me.
The kick panels were planned to be draws after watching some you tubes and liking the idea, which i inted to use when i get good enough to redo our kitchen.
Along the way i found out that gluing dados joints in our humidity/ heat does not give me the many minutes of work time i needed which was a little frustrating, but as spelunker use to say on the loading screen - patience is a virtue - so many coffees and large angrily swung rubber mallet and a few weekends later i had all 9 draws sorted.
I used the blue brand draw slide jig which did help but may have just been a little waste of money.
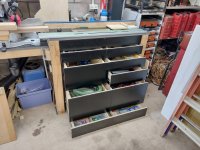
I had a fair bit of stuffing around once the draws were in location to get them to sit roughly the same distance out.
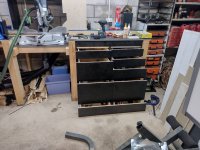
Cutting the fronts and screwing them on was a little tedious, but i wanted a particular look and draw gap, which works fine, if i only open one at a time, there are a lot of things i still have to learn as i go.
I wanted it to look like one large panel so i think i was trying to get 1mm gaps, so each peice had to be cut after the first.
The very top 2 pieces are just fillers to cover the pine used for the miter station build.
I still have to do some internal works for saw blades and other items but thats not super important yet...
View attachment 4
View attachment 5
Latest project was my wife wanting me to use all the new tools for house items eg large tv cabinet ( wall to wall) and to replace a few mismatched pieces through out the house.
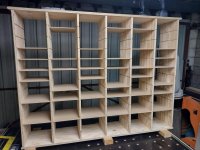
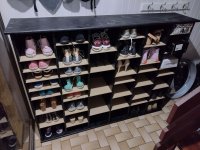
I showed her a shoe rack design i found on redit ( Imelda Marcos immediately tells me its too small..... [blink]) and i design something bigger.
All draw slides ( bar one) freely move in and out, she can and has set it up how she wants it and then tells me after its only half full she can now buy more shoes - really??,i told i needed more tools before she needs more shoes [laughing]
Cutting the dados was a pain in the proverbial and i used some very average ply which i regretted afterwards, but that was all i had available to me.
But this gave me an excuse to use my new RO150 for more than the 1 job i got it for.
Found out me and dowels will not be friends, so everything is screwed together, and i realised afterwards i should have dado'd the top and bottom for the uprights, next time!
View attachment 6
Tried to see what leds would look like, but there was not enough light behind the single spacing with shoes to light them up so the idea was abandoned, i still think it would look awesome with them in there however.
View attachment 7
View attachment 8
Finished painting the sucker, beveling the shelf edges and waxing the sides of the shelves, all 36 of them....
View attachment 9
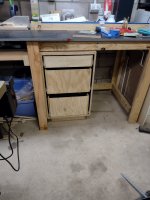
This last picture was meant to be at the top... but anyway
Aaaand were done.
Cheers if you made it this far.
Kurt
I thought id start my first post here with some things ive built.
Due to our first week long covid lock-down in the NT ( australia) i started to clean out my shed and told my wife i needed to build stuff to use the tools i had and wanted to fix the fence that was broken in a cyclone a few years back (classic delay tactic [big grin] )
After building a miter station ( upgraded the makita to a festool to finish it) and work bench, i purchased a not so shiny new gold table saw ( another story) and a few festool items.
Decided i wanted storage under one side of the miter station and it was going to be all draws.
I went with form-ply as it was black and that matched the miter station and work bench, and i didnt have to paint or oil it when i was done.
View attachment 10
View attachment 2
View attachment 3
I did not want handles at all, it turns out i spent as much on draw slides ( push to open) as i spent on the wood to make them.
I sorted out the sizing based on width,(which worked out perfectly suited to Systainers !!) and height and the amount of junk i was constantly moving around to use everything, nothing was really set in stone and i changed things as i went along and worked out what would work for me.
The kick panels were planned to be draws after watching some you tubes and liking the idea, which i inted to use when i get good enough to redo our kitchen.
Along the way i found out that gluing dados joints in our humidity/ heat does not give me the many minutes of work time i needed which was a little frustrating, but as spelunker use to say on the loading screen - patience is a virtue - so many coffees and large angrily swung rubber mallet and a few weekends later i had all 9 draws sorted.
I used the blue brand draw slide jig which did help but may have just been a little waste of money.
I had a fair bit of stuffing around once the draws were in location to get them to sit roughly the same distance out.
Cutting the fronts and screwing them on was a little tedious, but i wanted a particular look and draw gap, which works fine, if i only open one at a time, there are a lot of things i still have to learn as i go.
I wanted it to look like one large panel so i think i was trying to get 1mm gaps, so each peice had to be cut after the first.
The very top 2 pieces are just fillers to cover the pine used for the miter station build.
I still have to do some internal works for saw blades and other items but thats not super important yet...
View attachment 4
View attachment 5
Latest project was my wife wanting me to use all the new tools for house items eg large tv cabinet ( wall to wall) and to replace a few mismatched pieces through out the house.
I showed her a shoe rack design i found on redit ( Imelda Marcos immediately tells me its too small..... [blink]) and i design something bigger.
All draw slides ( bar one) freely move in and out, she can and has set it up how she wants it and then tells me after its only half full she can now buy more shoes - really??,i told i needed more tools before she needs more shoes [laughing]
Cutting the dados was a pain in the proverbial and i used some very average ply which i regretted afterwards, but that was all i had available to me.
But this gave me an excuse to use my new RO150 for more than the 1 job i got it for.
Found out me and dowels will not be friends, so everything is screwed together, and i realised afterwards i should have dado'd the top and bottom for the uprights, next time!
View attachment 6
Tried to see what leds would look like, but there was not enough light behind the single spacing with shoes to light them up so the idea was abandoned, i still think it would look awesome with them in there however.
View attachment 7
View attachment 8
Finished painting the sucker, beveling the shelf edges and waxing the sides of the shelves, all 36 of them....
View attachment 9
This last picture was meant to be at the top... but anyway
Aaaand were done.
Cheers if you made it this far.
Kurt
Attachments
-
 b2_191631968.jpg362.2 KB · Views: 156
 -
 b3_191900250_HDR.jpg313.4 KB · Views: 581
 -
 b4_103922636_HDR.jpg401.6 KB · Views: 169
 -
 b5_131404343_HDR.jpg167.5 KB · Views: 108
 -
 s11_182748080_HDR.jpg370.3 KB · Views: 199
 -
 s12_194504645_HDR.jpg349.3 KB · Views: 99
 -
 s13_185806157_HDR.jpg273 KB · Views: 136
 -
 s14_224008931_HDR.jpg302.9 KB · Views: 208
 -
 b1_191454556.jpg576.2 KB · Views: 113