Shop/Addition build has commenced

Tayler_mann

Member
Joined
Nov 23, 2014
Messages
416
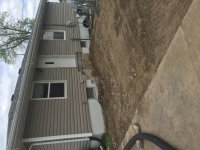
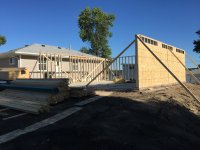
This weekend marks the first step of the shop and addition my fiancé and I are doing this summer. It started out as just a detached garage and now has became so much more than that. I swear that's the tune whenever a significant other gets involved. I have built several homes before and have a good idea and have a good deal of friends who are either commercial or residential contractors so I am doing the entire build except the foundation work. We will frame it, side it, rood it, drywall, most of the electrical, and all of the finish work on the build.

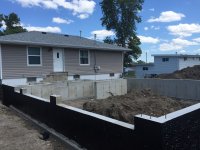
We are attaching a 900 sqft shop with a 200-300 sqft mudroom and a second floor above the garage attached inside the house with another 900 sqft. The upstairs is going to be our master suite and living room. Now enough about the living space lets get down to the most important part of the build...the shop.

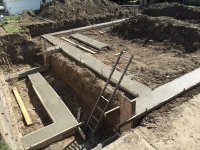
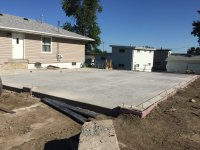
The shop will have 6 ft footing all the way around with a 5" slab rebar 12" on center. The floor will not have a drain and will consist of 9 10' X 10' slabs. The front three will slant out the door for any drainage that might be needed. The back 6 pads will be perfectly flat and level for ease of butting tables, saws and machinery alto eah other with a common height of 900 mm. The slab will have radiant heat and that will be how the shop is heated. It will have 9' ceilings with 2 12' wide doors. Located in the center of the slabs there will be a power box of 4 or 5 220 v circuits and 2 20 A 110 circuits all connected to a 400 amp panel [big grin]. Unfortunately there is not way to get 3 phase in my shop without a converter :'(. The shop will be lit with LED fixtures and they will be a mixture of cool and warm to get a nice natural tone of light. Also all electrical circuits on th build will be 20 amp.

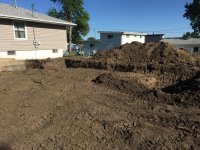
The first step was this weekend to take out half of the drive way and the concrete stairs. I brought my bobcat home from the sign shop and rented a jack hammer for it and broke it all up. Than a friend of mine brought his side dump trailer and we filled it and dumped it. It's extremely satisfying to be starting this build and cannot wait for more to happen.

I will update as the build progresses.


Attachments

  • image.jpeg
    image.jpeg
    2.7 MB · Views: 1,176
  • image.jpeg
    image.jpeg
    1,001.5 KB · Views: 1,068
CONGRATULATIONS!!!

Can't wait to see the progress.

Peter
 
sweet dude !    Good luck and have fun !!  [popcorn] [thumbs up]

Eric
 
Gonna be a great summer.  It's awesome to have the power situation figured out from the get go.
 
Tayler-Mann:
we all envy you for the opportunity to build your own customized shop space!
Perhaps you might want to reconsider your ceiling height and go to 10 ft.
When you get done hanging everything that goes on the ceiling you end up with considerably less than 9 ft. And raising the ceiling later would not be an option.
It will be interesting to learn from your your LED lighting experience. Are you choosing "Big ASS' brand fixtures or something else?

 
Klemm said:
Tayler-Mann:
we all envy you for the opportunity to build your own customized shop space!
Perhaps you might want to reconsider your ceiling height and go to 10 ft.
When you get done hanging everything that goes on the ceiling you end up with considerably less than 9 ft. And raising the ceiling later would not be an option.
It will be interesting to learn from your your LED lighting experience. Are you choosing "Big ' brand fixtures or something else?

I have to keep the ceilings at 9 ft unfortunately. I did not want a pole in the middle of my shop and I also didn't want to lift a 5000 lb I beam wrapped LVL so the floor trusses have to be 20" to span 30'. I never do bare minimums so I am doing a 24" floor truss to ensure there is no sponginess on the second floor. With all of that said we are at 11', the second floor is than another 9' with scissor rafters adding another 8-10". By the time the roof pitch is added it we come out to 26-28 ft tall with the original house hanging at a mere 18'. Aesthetically it would not look to gooder.

For the lights I am not sure at the time what brands. I buy wholesale prices at our local electrical supply store and get fantastic pricing. It's kind of up to pricing to help me decide what I get.
 
So the last few weeks have been a busy one. We had the excavator come and sit out the foundation. Than the footings and foundation walls where set and poured. This week I coated the walls and footing with tar and than wrapped the entire foundation with 1" foam for insulating the heated slab. Today the excavator is back filling and getting it ready for the concrete contractor to grade and prepare for the slab. We should be framing in a few weeks.


Attachments

  • image.jpeg
    image.jpeg
    2.4 MB · Views: 946
  • image.jpeg
    image.jpeg
    1.5 MB · Views: 866
  • image.jpeg
    image.jpeg
    3.6 MB · Views: 798
Tayler_mann said:
The floor will consist of 9 10' X 10' slabs. Located in the center of the slabs there will be a power box of 4 or 5 220 v circuits and 2 20 A 110 circuits all connected to a 400 amp panel.

Why so many 220 outlets in each 10'x10' square?  I'd think two 220 outlets and four 110 outlets in each square would be a better choice.  220 is only used for stationary tools in the US.  Once you set the machine in place and plug into the 220 outlet, you are done.  It never moves again.  And with 220 there are maybe half dozen or so machines in the shop.  Set them up around the shop near a 220 outlet.  Done.  But with 110, they are portable and there are lots of them.  So you could in theory have five or six tools all in use at the same time at the same spot.  Would need four outlets.
 
RussellS said:
Tayler_mann said:
The floor will consist of 9 10' X 10' slabs. Located in the center of the slabs there will be a power box of 4 or 5 220 v circuits and 2 20 A 110 circuits all connected to a 400 amp panel.

Why so many 220 outlets in each 10'x10' square?  I'd think two 220 outlets and four 110 outlets in each square would be a better choice.  220 is only used for stationary tools in the US.  Once you set the machine in place and plug into the 220 outlet, you are done.  It never moves again.  And with 220 there are maybe half dozen or so machines in the shop.  Set them up around the shop near a 220 outlet.  Done.  But with 110, they are portable and there are lots of them.  So you could in theory have five or six tools all in use at the same time at the same spot.  Would need four outlets.

That is written confusing. There will be 4 or 5 outlets in the center of the entire shop. My plan is to have all the stationary machines in the center of the shop and benches to the outside. That way there is minimal ductwork to run for the machines. However, I won't pull the wire from the panel till I need it. Also it is more a plan ahead type deal rather than a problem later. My layout might change once I get everything but at least it's all there for future use.
 
Tayler_mann said:
RussellS said:
Tayler_mann said:
The floor will consist of 9 10' X 10' slabs. Located in the center of the slabs there will be a power box of 4 or 5 220 v circuits and 2 20 A 110 circuits all connected to a 400 amp panel.

Why so many 220 outlets in each 10'x10' square?  I'd think two 220 outlets and four 110 outlets in each square would be a better choice.  220 is only used for stationary tools in the US.  Once you set the machine in place and plug into the 220 outlet, you are done.  It never moves again.  And with 220 there are maybe half dozen or so machines in the shop.  Set them up around the shop near a 220 outlet.  Done.  But with 110, they are portable and there are lots of them.  So you could in theory have five or six tools all in use at the same time at the same spot.  Would need four outlets.

That is written confusing. There will be 4 or 5 outlets in the center of the entire shop. My plan is to have all the stationary machines in the center of the shop and benches to the outside. That way there is minimal ductwork to run for the machines. However, I won't pull the wire from the panel till I need it. Also it is more a plan ahead type deal rather than a problem later. My layout might change once I get everything but at least it's all there for future use.

OK.  You will have 4-5 or so 220 outlets in the center of the whole shop.  Where all the 220 volt machines are located, in the center.  And a couple 110 outlets in the center for fun just in case.  And lots of 110 outlets along the perimeter in the walls where all the benches are located.
 
Tayler_mann said:
This weekend marks the first step of the shop and addition my fiancé and I are doing this summer...
...
Located in the center of the slabs there will be a power box of 4 or 5 220 v circuits and 2 20 A 110 circuits all connected to a 400 amp panel [big grin]. Unfortunately there is not way to get 3 phase in my shop without a converter :'(. The shop will be lit with LED fixtures and they will be a mixture of cool and warm to get a nice natural tone of light. Also all electrical circuits on th build will be 20 amp.
...

So are those going in a orange conduit with some styrofoam or other ends to pull out after for the boxes?
There are conference room floor outlets (110v) that are usually brass and ~6" in diameter...
Some conduit for 3-phase and for any phone or CAT-6 would be easier now than later...
 
So I took out the electrical boxes in the floor since it is in a residential garage they were a pain in the but to meet code. I'll come up with another plan I suppose. I layed the foam for the heated floor and the pex on top. Than the concrete workers came in and did a 7" slab on top. Unforunetly the next day after they poured it was 110 degrees out. They cut seams in the slab but there was 2 spots that had minor cracking. I was ensured that it wouldn't get worse and they would make it right if it did.

Today all the material for the rough framing, siding and roofing was delivered. We start framing this weekend and hope to have the first floor framed for the most part. The excitement is starting to really build.


Attachments

  • image.jpeg
    image.jpeg
    2.8 MB · Views: 767
  • image.jpeg
    image.jpeg
    2.7 MB · Views: 755
  • image.jpeg
    image.jpeg
    1.2 MB · Views: 803
Good for you!!!!. See that shed in the center of the last photo. That's my shop....
 
That's tight to the house did you need to put it there for set backs to your property line?
 
Nice project! That concrete wall is very nice looking, I've framed many homes and they never have as crisp/clean edges as that.  Keep the floor wet if it hasn't been too long, will cure slower and end up being whiter and harder (so I've been told) we just did it to our driveway last month and no cracks yet.
 
So today we got rained out till about 11:00 and could only work till 5:30 because my fiance thought it would be good to make dinner reservations  [mad]. Anyways two of us framed for about 6 1/2 hrs give or take and got 3 walls up and braced. Not to bad of a job but I was hoping to have the floor trusses on today but oh well. It's mad how much bigger spaces seem once walls go up.
 

Attachments

  • image.jpeg
    image.jpeg
    2.3 MB · Views: 796
Back
Top