Dogberryjr
Member
- Joined
- Mar 5, 2015
- Messages
- 147
Nope. Fortunately, this was the underside of the piece.Bob D. said:Ouch! That's not gonna rub out.")
Make it a uniform recessed depth, clean up the corners, and put a "Hand made by Dogberryjr" plaque in the space.Dogberryjr said:Nope. Fortunately, this was the underside of the piece.
I like it! I filled it with extra epoxy and I'm not going to think about it any more once it's flipped over.MikeGE said:Make it a uniform recessed depth, clean up the corners, and put a "Hand made by Dogberryjr" plaque in the space.Dogberryjr said:Nope. Fortunately, this was the underside of the piece.
pixelated said:I was cutting some lumber I was recycling from another project on my (blue) miter saw. In one cut, near the end of a piece, the saw's pitch changed a bit, and it needed a bit more pressure than usual to finish the cut. Didn't think much about at the time, since the behavior change was only slight. I figured it was going through a knot or similar.
Then when I put the newly-cut piece into place, I noticed the remains of two stainless screws that were neatly flush cut with the end of the wood. [crying] [mad]
The only visible damage I could find on the blade were a few teeth with very slight nicks in them, though the blade doesn't cut as cleanly as it had prior. I still use it occasionally for rough work (but checked more thoroughly for metal).
neilc said:Here's one for you -
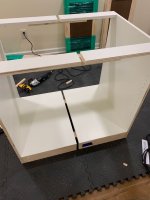
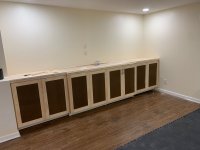
I made a set of base cabinets for an entertainment wall for my daughter. She had measured the width but didn't check if the side walls were parallel. I made the cabinets 3/4" narrower thinking I had room for filler strips. Flat packed and shipped the cabinets for she and her husband to assemble and install.
Well they were 3/8" too wide. What to do??!
I drove up to Madison to cut them down. Had an idea so I loaded up the car with tools and headed north.
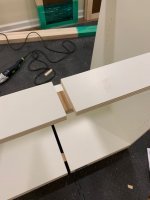
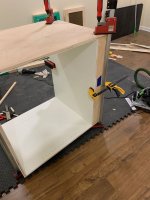
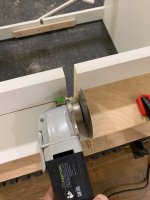
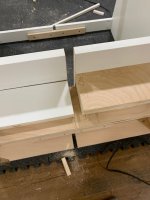
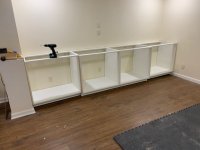
Photos show the process - which turned out to be easy and very accurate. Took 3/4" out of each of two cabinets in the center section and then dominoes and glued them back together. A little time in the clamps and they were ready for installation.
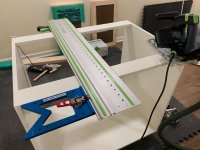
Track saw with backer boards screwed in underneath each section made the cuts very easy and the domino made quick work of aligning the two halves back together. I did use the Vectoro for cutting the front kick-plate flush with the bottom shelf cuts.
Two cabinets cut down took about 2 hours including gluing back together.
Install went well. I did have to remake two sets of doors given they were full overlay and the stiles had been hinge drilled and I wanted them all consistent width.
A measurement miss was reversed with a little Festool help.
Measure twice, cut once. My daughter now knows that mantra!
neil
View attachment 1
View attachment 2
View attachment 3
View attachment 5
View attachment 6
View attachment 8
