You are using an out of date browser. It may not display this or other websites correctly.
You should upgrade or use an alternative browser.
You should upgrade or use an alternative browser.
Shop reconfiguration/Breakdown MFT
- Thread starter Richard/RMW
- Start date
Richard/RMW
Member
- Joined
- Jul 11, 2010
- Messages
- 2,947
The MFT setup was just dumb luck, the original plan was to move everything in/out & set up as needed. I know it sounds simple, but the ability to add on sections easily, after getting rid of the monster MFT/SYS cart, is turning out to be the best change made to the shop in ages.
I've also culled out a bunch of tools/supplies that gravitated into the shop over a few years, and now the worksurfaces are 90% free of clutter. Adding some drawers and cabinets really helped, along with eliminating some bench tools I really didn't use often. What I really need to wrap up the other 10% is a "junk drawer" to store misc. hardware waiting for a project, i.e. the hinges for the cabinets under construction.
Thanks.
RMW
Richard/RMW
Member
- Joined
- Jul 11, 2010
- Messages
- 2,947
Been on a bit of a FOG/shop break for the past month or so... what did I miss? [popcorn]
Spent some time playing around with Shaper Origin and learning how to accurately work with AL. Done carefully tolerances in the range of a few thousandths of an inch over a span of ~ 8" to 12" or so are doable.
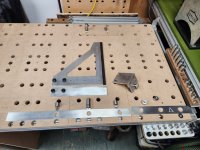
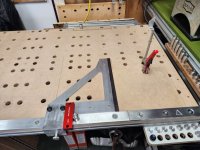
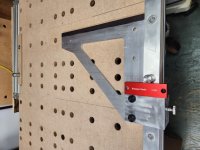
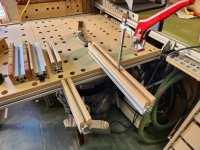
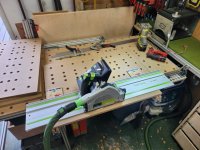
This is another take on the MFT track saw setup with the fence at the front edge of the table, this time using tall dogs rather than the TSO guide rail square. I think I'm liking this better.
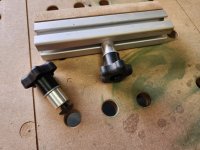
Using some 1.5" by 1/4" 6061 I was able to get precise dog holes on 144mm centers with Origin. My MFT has 2 rows of holes @ 48mm centers, between the typical 96mm pattern, specifically for cutting with a dogs & guide rail. A couple Axminster fixture dogs countersunk for M6 FHSCS/T-nut secure the fence to the 80/20 thru a 20mm hole centered over the slot. There is also a short extension fence that can be used to the left or right of the main fence.
[attachimg=1]
All the dogs have a ~1mm 45-degree rim around them, similar to TSO's new Chamfer Dogs. These are UK Benchdogs variety, but they all work the same way. The chamfer works its magic when the dogs are secured tight into holes that have been chamfered also. The fence is dead on 90 degrees from the rows of dog holes.
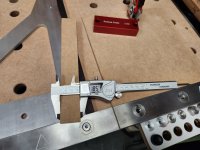
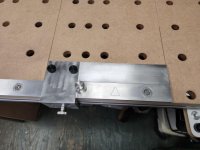
Next was adding an adjustable guide using the front t-slot in the 80/20, & a triangular fence for narrow rips. There is a basic stop of 1/4" by 2" 6061 AL, interchangeable with the triangular fence, & either one attaches to the adjustable guide.
[attachimg=2]
[attachimg=3]
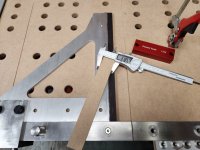
Everything was cobbled together from the boneyard, part of an old 80/20 linear bearing and a triangle/square from a pre-TSO guide rail square experiment (the GRS-16 made it obsolete). Lots of patient cutting, filing, lapping of AL & listening to music.
The adjustable guide registers on the left side of the dog used to square up the guide rail, then the fence & stops were trimmed to size so when the adjustable guide is full against the dog the fence/stop are precisely zeroed out to the saw blade.
[attachimg=4]
[attachimg=5]
Now the payoff. Moving the stop left, whatever gap there is between the dog and the edge of the adjustable guide is exactly the width of the saw cut. Rather than measure (where I'm lucky to get within ~.5mm repeatably) I can use gauge blocks or some other material with a known dimension as a spacer to set the cut width. Now we are talking tenths of a MM, repeatably. This test cut used a 32mm gage block, result was parallel over the length.
[attachimg=6]
[attachimg=7]
[attachimg=8]
[attachimg=9]
Things look quiet for the balance of the year; I'm hoping to get some quality time in the shop. Hope everyone is enjoying the holidays.
RMW
Spent some time playing around with Shaper Origin and learning how to accurately work with AL. Done carefully tolerances in the range of a few thousandths of an inch over a span of ~ 8" to 12" or so are doable.
This is another take on the MFT track saw setup with the fence at the front edge of the table, this time using tall dogs rather than the TSO guide rail square. I think I'm liking this better.
Using some 1.5" by 1/4" 6061 I was able to get precise dog holes on 144mm centers with Origin. My MFT has 2 rows of holes @ 48mm centers, between the typical 96mm pattern, specifically for cutting with a dogs & guide rail. A couple Axminster fixture dogs countersunk for M6 FHSCS/T-nut secure the fence to the 80/20 thru a 20mm hole centered over the slot. There is also a short extension fence that can be used to the left or right of the main fence.
[attachimg=1]
All the dogs have a ~1mm 45-degree rim around them, similar to TSO's new Chamfer Dogs. These are UK Benchdogs variety, but they all work the same way. The chamfer works its magic when the dogs are secured tight into holes that have been chamfered also. The fence is dead on 90 degrees from the rows of dog holes.
Next was adding an adjustable guide using the front t-slot in the 80/20, & a triangular fence for narrow rips. There is a basic stop of 1/4" by 2" 6061 AL, interchangeable with the triangular fence, & either one attaches to the adjustable guide.
[attachimg=2]
[attachimg=3]
Everything was cobbled together from the boneyard, part of an old 80/20 linear bearing and a triangle/square from a pre-TSO guide rail square experiment (the GRS-16 made it obsolete). Lots of patient cutting, filing, lapping of AL & listening to music.
The adjustable guide registers on the left side of the dog used to square up the guide rail, then the fence & stops were trimmed to size so when the adjustable guide is full against the dog the fence/stop are precisely zeroed out to the saw blade.
[attachimg=4]
[attachimg=5]
Now the payoff. Moving the stop left, whatever gap there is between the dog and the edge of the adjustable guide is exactly the width of the saw cut. Rather than measure (where I'm lucky to get within ~.5mm repeatably) I can use gauge blocks or some other material with a known dimension as a spacer to set the cut width. Now we are talking tenths of a MM, repeatably. This test cut used a 32mm gage block, result was parallel over the length.
[attachimg=6]
[attachimg=7]
[attachimg=8]
[attachimg=9]
Things look quiet for the balance of the year; I'm hoping to get some quality time in the shop. Hope everyone is enjoying the holidays.
RMW
Attachments
-
 1 All Parts.jpg244.2 KB · Views: 2,095
 -
 9 32mm bottom.jpg219.3 KB · Views: 1,962
 -
 8 32mm Top.jpg216 KB · Views: 1,942
 -
 7 32mm Rip Setup.jpg239.6 KB · Views: 1,970
 -
 6 32mm Gage Block.jpg243 KB · Views: 1,962
 -
 5 Rip Guide.jpg246.3 KB · Views: 1,987
 -
 4 Small Stop.jpg83.2 KB · Views: 1,975
 -
 3 Fence Left.jpg230.7 KB · Views: 1,993
 -
 2 Ripping.jpg256.3 KB · Views: 2,124
Michael Kellough
Member
Very sophisticated!
Richard/RMW
Member
- Joined
- Jul 11, 2010
- Messages
- 2,947
This weekend I finally got around to updating the MFT extensions I've been using for years as a sacrificial cutting station. The old ones were kind of klunky and had gotten pretty beat up.
[attachimg=1]
[attachimg=2]
They involved (2) 2" by 1/2" pieces of MDF screwed to the sides of 1515 extrusion. The updated version uses a single strip of 3/4" MDF glued to one side then milled to open the t-slot for access by clamps.
[attachimg=3]
[attachimg=4]
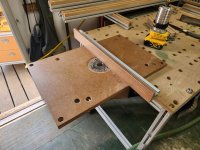
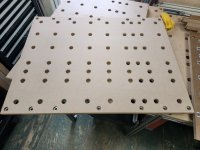
They are designed to either attach to the edge of the 8020 on the MFT, keeping the work surface on the same plane, or on top of the MFT from below with a clamp or t-slot bolt to create a free-form surface for cutting/clamping large panels.
[attachimg=5]
[attachimg=6]
[attachimg=9]
[attachimg=10]
Also got the modular router table set up, finally needing it to complete a project. It's downright amazing how long the little DeWalt cordless router will run on a single battery.
[attachimg=7]
[attachimg=8]
It's essentially been spring here all through February, 40's-50's and mostly sunny. The radiant heat really shines, I can open the shop doors (as long as the wind is westerly) and work all day. Heater keeps the interior in the 50's even if it's colder outside.
RMW
[attachimg=1]
[attachimg=2]
They involved (2) 2" by 1/2" pieces of MDF screwed to the sides of 1515 extrusion. The updated version uses a single strip of 3/4" MDF glued to one side then milled to open the t-slot for access by clamps.
[attachimg=3]
[attachimg=4]
They are designed to either attach to the edge of the 8020 on the MFT, keeping the work surface on the same plane, or on top of the MFT from below with a clamp or t-slot bolt to create a free-form surface for cutting/clamping large panels.
[attachimg=5]
[attachimg=6]
[attachimg=9]
[attachimg=10]
Also got the modular router table set up, finally needing it to complete a project. It's downright amazing how long the little DeWalt cordless router will run on a single battery.
[attachimg=7]
[attachimg=8]
It's essentially been spring here all through February, 40's-50's and mostly sunny. The radiant heat really shines, I can open the shop doors (as long as the wind is westerly) and work all day. Heater keeps the interior in the 50's even if it's colder outside.
RMW
Attachments
-
 20230219_123321.jpg288.1 KB · Views: 1,809
 -
 20230219_123220.jpg343.2 KB · Views: 1,812
 -
 20230219_114209.jpg230.4 KB · Views: 1,760
 -
 20230219_114152.jpg287.4 KB · Views: 1,786
 -
 20230218_142435.jpg281.2 KB · Views: 1,811
 -
 20230218_123110.jpg268.8 KB · Views: 1,849
 -
 20230218_150956.jpg325.9 KB · Views: 1,821
 -
 20230219_115701.jpg244.2 KB · Views: 1,832
 -
 20230218_142901.jpg308.9 KB · Views: 1,842
 -
 20230218_142915.jpg280.3 KB · Views: 1,835
Richard/RMW
Member
- Joined
- Jul 11, 2010
- Messages
- 2,947
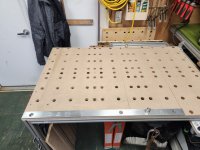
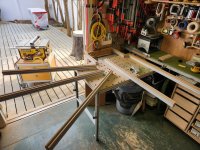
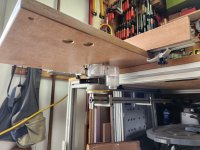
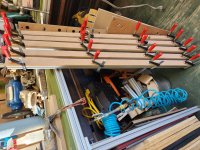
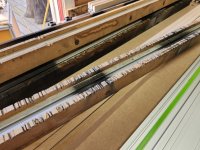
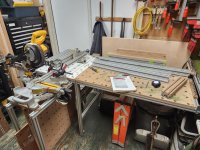
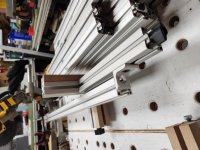
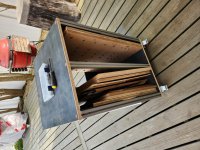
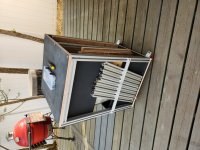
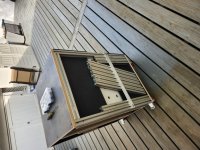
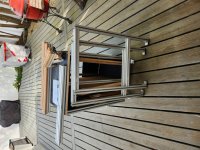
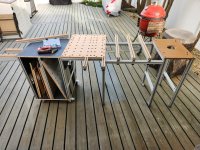
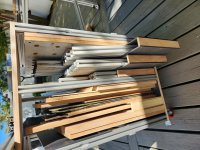
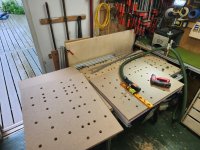
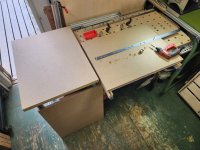
Springtime, and the shop just got a lot bigger!
I've been fiddling with the breakdown MFT for the past couple of months, gave it a trial run tonight. It's really just a bunch of 80/20 in several sizes, some similarly sized tops, and simple fasteners. The only tool needed is a 3/16" hex driver.
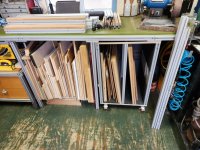
The cart is the newest addition, when I get everything cleaned up all the shorter parts & tops will fit on it. There are also four sets of legs and a bunch of the new MDF-topped extensions.
[attachimg=1]
[attachimg=2]
[attachimg=3]
[attachimg=4]
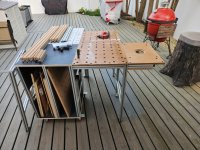
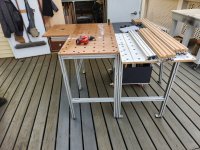
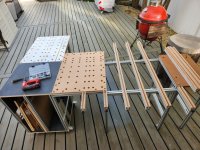
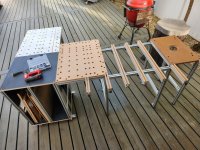
Here's a series of mockups.
[attachimg=5]
[attachimg=6]
[attachimg=7]
[attachimg=8]
[attachimg=9]
Cart fits under the stationary worksurface.
[attachimg=10]
In addition to the MFT tops, so far there's a small top for the little Dewalt router and a setup to hold the cordless chop saw, mostly used for cutting the 80/20. The little 80/20 extensions can also be used similar to welding table fixtures for whatever goofy setup is needed.
[attachimg=11]
[attachimg=12]
Still a bunch of fiddly stuff to do but it's getting close to "done", whatever that is.
RMW
I've been fiddling with the breakdown MFT for the past couple of months, gave it a trial run tonight. It's really just a bunch of 80/20 in several sizes, some similarly sized tops, and simple fasteners. The only tool needed is a 3/16" hex driver.
The cart is the newest addition, when I get everything cleaned up all the shorter parts & tops will fit on it. There are also four sets of legs and a bunch of the new MDF-topped extensions.
[attachimg=1]
[attachimg=2]
[attachimg=3]
[attachimg=4]
Here's a series of mockups.
[attachimg=5]
[attachimg=6]
[attachimg=7]
[attachimg=8]
[attachimg=9]
Cart fits under the stationary worksurface.
[attachimg=10]
In addition to the MFT tops, so far there's a small top for the little Dewalt router and a setup to hold the cordless chop saw, mostly used for cutting the 80/20. The little 80/20 extensions can also be used similar to welding table fixtures for whatever goofy setup is needed.
[attachimg=11]
[attachimg=12]
Still a bunch of fiddly stuff to do but it's getting close to "done", whatever that is.
RMW
Attachments
-
 20230414_182146.jpg316.2 KB · Views: 1,428
 -
 20230414_182202.jpg296.3 KB · Views: 1,426
 -
 20230414_183116.jpg275.8 KB · Views: 1,409
 -
 20230402_203237.jpg299.3 KB · Views: 1,401
 -
 20230402_203301.jpg236.7 KB · Views: 1,388
 -
 20230414_180958.jpg327.2 KB · Views: 1,434
 -
 20230414_180700.jpg327.3 KB · Views: 1,453
 -
 20230414_173356.jpg315.9 KB · Views: 1,624
 -
 20230414_173404.jpg271.2 KB · Views: 1,619
 -
 20230414_173417.jpg293.2 KB · Views: 1,552
 -
 20230414_173810.jpg314.1 KB · Views: 1,506
 -
 20230414_175420.jpg345.5 KB · Views: 1,479
dicktill
Member
Very nice. Now if you can just figure out a way to incorporate the BBQ into it. : )
Richard/RMW
Member
- Joined
- Jul 11, 2010
- Messages
- 2,947
dicktill said:Very nice. Now if you can just figure out a way to incorporate the BBQ into it. : )
Yea there's another project in there somewhere Dick...
The deck and "outdoor kitchen" need some love this spring. Weather (and energy) permitting, there will be some progress soon.
RMW
gunnyr
Member
Nice solution! I keep wanting to mess with 8020 (along with 953 other things.....) Your cart gives me some inspiration!
nclemmons
Member
I made four of the 1515 80-20 rails several years ago patterned from your idea. They are REALLY handy for large sheets. I’ve had up to a 5x10 top on mine for glue-up.
The evolution of your thinking with 80-20 is great. So many ideas!
The evolution of your thinking with 80-20 is great. So many ideas!
Richard/RMW
Member
- Joined
- Jul 11, 2010
- Messages
- 2,947
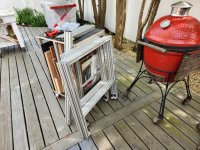
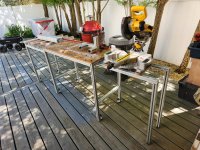
Multi Function Table indeed...
[attachimg=1]
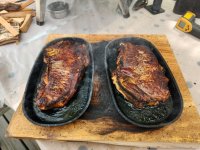
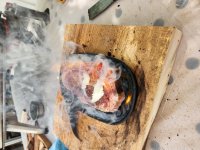
The medium-long story is sometime 2021-ish we bought a cheap small chest freezer to stock up on meat whenever we found a deal. Thursday after 8:00 PM something caused me to check it and about half its contents were mostly defrosted, turns out Home Depot is open until 10:00. The boss and her father spent Friday cooking/freezing and by this AM we were left with 2 pounds of pork roll for breakfast and ~5-6# of steak.
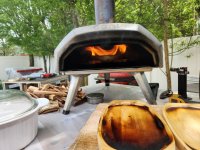
One of the wonderful things about getting old is you get to play with fire whenever you want to. Who knew that bacon grease combusts at around seven hundred degrees?
[attachimg=2]
[attachimg=3]
Fortunately, there was some raw meat nearby to put the flame out with.
[attachimg=4]
[attachimg=5]
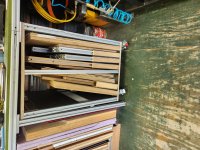
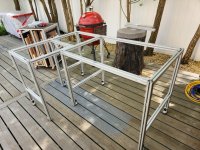
Yesterday AM I spent some time making up more legs/connectors. Nearing enough pieces to be able to set up 2 large workstations, big enough for multiple tools.
[attachimg=6]
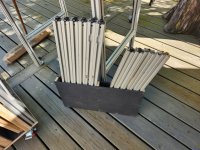
Also made a couple "pockets" to store parts in on the cart.
[attachimg=7]
[attachimg=8]
Breaking down the grill station took ~10 minutes (after cleanup) for everything to be back in its cubby.
[attachimg=9]
[attachimg=10]
[attachimg=11]
Next I need to make 2-3 more sections of MFT top, then I should be able to pivot over to some real projects.
RMW
[attachimg=1]
The medium-long story is sometime 2021-ish we bought a cheap small chest freezer to stock up on meat whenever we found a deal. Thursday after 8:00 PM something caused me to check it and about half its contents were mostly defrosted, turns out Home Depot is open until 10:00. The boss and her father spent Friday cooking/freezing and by this AM we were left with 2 pounds of pork roll for breakfast and ~5-6# of steak.
One of the wonderful things about getting old is you get to play with fire whenever you want to. Who knew that bacon grease combusts at around seven hundred degrees?
[attachimg=2]
[attachimg=3]
Fortunately, there was some raw meat nearby to put the flame out with.
[attachimg=4]
[attachimg=5]
Yesterday AM I spent some time making up more legs/connectors. Nearing enough pieces to be able to set up 2 large workstations, big enough for multiple tools.
[attachimg=6]
Also made a couple "pockets" to store parts in on the cart.
[attachimg=7]
[attachimg=8]
Breaking down the grill station took ~10 minutes (after cleanup) for everything to be back in its cubby.
[attachimg=9]
[attachimg=10]
[attachimg=11]
Next I need to make 2-3 more sections of MFT top, then I should be able to pivot over to some real projects.
RMW
Attachments
-
 20230507_145750.jpg345.6 KB · Views: 1,166
 -
 20230507_145428.jpg355.8 KB · Views: 1,156
 -
 20230507_145157.jpg345.9 KB · Views: 1,176
 -
 20230506_160410.jpg278.9 KB · Views: 1,171
 -
 20230506_160310.jpg319.7 KB · Views: 1,152
 -
 20230506_142357.jpg349.6 KB · Views: 1,182
 -
 20230507_140054.jpg133.3 KB · Views: 1,165
 -
 20230507_135808.jpg261.4 KB · Views: 1,174
 -
 20230507_135750.jpg252.7 KB · Views: 1,189
 -
 20230507_132634.jpg267.9 KB · Views: 1,175
 -
 20230507_132620.jpg309.4 KB · Views: 1,183
rvieceli
Member
Richard you are lucky. the same thing happened to us and we didn't notice until things started to smell. was not a pleasant experience.
Ick.
What are you using for the sides on the bins? is it Richlite?
Thanks
Ron
Ick.
What are you using for the sides on the bins? is it Richlite?
Thanks
Ron
Richard/RMW
Member
- Joined
- Jul 11, 2010
- Messages
- 2,947
rvieceli said:Richard you are lucky. the same thing happened to us and we didn't notice until things started to smell. was not a pleasant experience.
Ick.
What are you using for the sides on the bins? is it Richlite?
Thanks
Ron
Definitely, doubly since the replacement from HD limited the thaw to about half of what was frozen. I have no idea what prompted me to check it.
The black panels are some nominal 1/4" plastic I got cheap back when 80/20 was still using eBay to offload surplus material. I'm making an effort to use up various materials gathered over the past 10+ years.
I miss their old eBay store, down to
Richard/RMW
Member
- Joined
- Jul 11, 2010
- Messages
- 2,947
festal said:. Got a freezer alarm after that
Yep, twenty some bucks from Amazon. In hindsight I'm not sure why we placed so much trust in a $200 appliance.
RMW
Richard/RMW
Member
- Joined
- Jul 11, 2010
- Messages
- 2,947
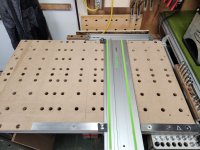
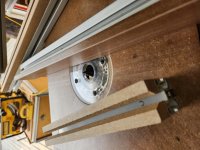
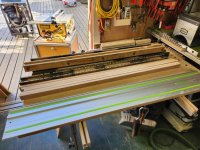
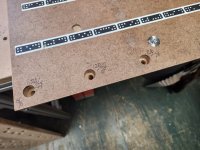
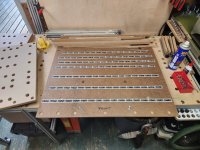
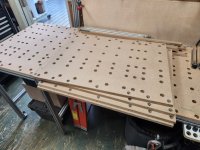
Rainy yesterday so it was MFT tops all day, starting with a 6AM egg McMuffin/MDF run. These are a standardized 576 X 768 module.
[attachimg=1]
Drill/bore/chamfer/ream 248 times, followed by trimming to size & Shapering 56 counterbores, finishing with CA glue/stainless washers. The day ended around 4:00, broken up by a "break" to clean the kitchen (weekend chores).
[attachimg=2]
[attachimg=3]
[attachimg=6]
[attachimg=4]
[attachimg=5]
[attachimg=7]
Love the utility of the Parf system, but that was a lot of holes. I'm happy to cross that project off the list.
RMW
Attachments
-
 20230520_134114.jpg253.8 KB · Views: 1,030
 -
 20230520_153121.jpg221.4 KB · Views: 1,036
 -
 20230520_152520.jpg287.8 KB · Views: 1,034
 -
 20230520_120824.jpg276.4 KB · Views: 1,043
 -
 20230520_110135.jpg248.9 KB · Views: 1,038
 -
 20230520_152528.jpg230.1 KB · Views: 1,054
 -
 20230520_161526.jpg250 KB · Views: 1,065
Richard/RMW
Member
- Joined
- Jul 11, 2010
- Messages
- 2,947
I’ve mostly finished tweaking the MFT system and settled on some standard components. The info on this has gotten pretty confused in this thread, but it boils down to a modular MFT system using MDF tops and 80/20. There are < a dozen individual components (not counting hardware) and it can be set up quickly and in various configurations, breaking down to store easily in a small space.
Is there enough interest to warrant me putting together a clean thread without all the clutter of the random side projects?
RMW
Is there enough interest to warrant me putting together a clean thread without all the clutter of the random side projects?
RMW
nclemmons
Member
Nice work, Richard! I’d definitely like to see you put together a summary thread. I’ve used a lot of your techniques with 80/20 in the past and the flexibility you’ve designed is really great for a small shop or large too!
- Joined
- Jun 25, 2016
- Messages
- 466
neilc said:Nice work, Richard! I’d definitely like to see you put together a summary thread. I’ve used a lot of your techniques with 80/20 in the past and the flexibility you’ve designed is really great for a small shop or large too!
Richard,
add my vote to Neil's for a summary thread [smile]
Hans
Richard/RMW
Member
- Joined
- Jul 11, 2010
- Messages
- 2,947
TSO_Products said:neilc said:Nice work, Richard! I’d definitely like to see you put together a summary thread. I’ve used a lot of your techniques with 80/20 in the past and the flexibility you’ve designed is really great for a small shop or large too!
Richard,
add my vote to Neil's for a summary thread [smile]
Hans
[member=59331]TSO Products[/member] Hans, I'm considering adding a guide rail hinged setup, was looking at your MFT Aligned product. Only problem is, based on photos, it looks like the bracket would stick up above the MFT top. The 80/20 slot centerline is only 1-1/2" below the surface.
Is there any reason I couldn't install the brackets upside down? It looks like all the features are centered and flipping the brackets the holes would still line up with the stock MFT hardware.
RMW
Similar threads
- Replies
- 3
- Views
- 366
- Replies
- 10
- Views
- 671
- Replies
- 58
- Views
- 3K
- Replies
- 4
- Views
- 625