AlexThePalex
Member
- Joined
- Nov 12, 2008
- Messages
- 7,757
I recently asked the people of the FOG for advice on how to work with Ytong blocks, and now the job's done I thought I'd follow up to show how it all worked out.
Thanks again for all the advice people gave me, it helped a lot.
Link to original thread.
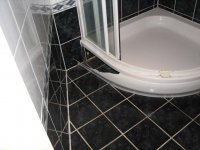
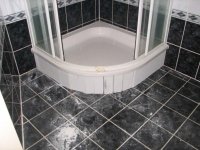
So it started out with this:
[attachimg=1]
The skirt was damaged and the home owner wanted it replaced or repaired in some way, as long as it was done without too much cost. I looked around quite extensively, but unfortunately it turned out it wasn't possible to order a new skirt for the shower. So we had to go for option number two and replace it in some way, and after careful deliberation with several sources, placing tiles over ytong blocks turned out to be the winner.
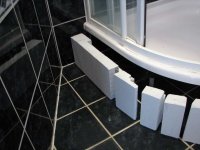
You buy these blocks in sizes for 60 x 20 cm, and a thickness of 5, 7 or 10 cm. I decided to use three 7 cm thick blocks and one of 5cm. I had to cut them all in small parts to follow the round shower tray. In the picture below they're all test fitted.
[attachimg=2]
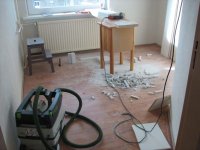
I cut them all to size with a hand saw, but did the shaping with the MultiMaster, which turned out to be very usefull for this kind of work. It cut through the blocks like butter and the job would have taken a lot longer without it. Below my cutting station, only Festool used in this whole job was the CTL Mini for clean up. The dust of this stuff was very nasty. I forgot to bring a mask and could taste the dust all evening in my throat.
[attachimg=3]
The pics below shows an exploded view of all blocks and how I had to cut some odd shapes to fit them around the supports.
[attachimg=4]
[attachimg=5]
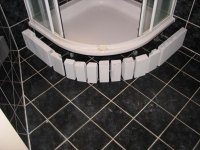
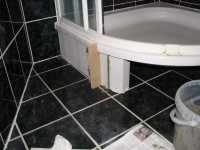
To help with placing all blocks in the right spot and get the tiles flush with the edge of the tub I made a spacer out of MDF, accounting for the width of the tiles and a 3 mm layer of grout.
[attachimg=6]
I treated all blocks with a primer to remove suction, and I then glued all blocks in place using glue to fix them to the tiles and grout to fix them to each other. After some testing with glue I found the blocks adhered best to the existing tiles with the construction glue, and I used grout to fill up the seams between the blocks because it had more volume.
[attachimg=7]
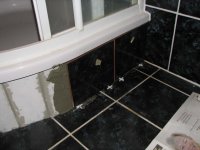
Then it was time to tile. I found some left over tiles from the bathroom, so decided to use them on the straight sides of the tub. I had to cut each tile to size and number them because the tub wasn't evenly spaced from the floor in all places.
[attachimg=8]
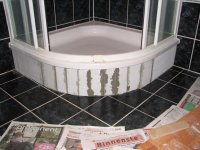
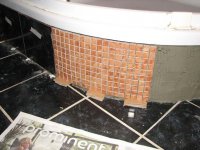
Then the hard part, the mosaic tiles for the curve. I originally planned to use 4x4 cm black tiles, but due to some deceptive pricing from the store they turned out 5 times as expensive as originally planned and this was not an option. So I found some cheap sheets to use instead. The orange/brown colour is different from the rest of the bathroom but it fits well with the colours in the rest of the apartment so it's not totally out of place.
Though I have tiled lots of times before, I never used such small mosiac tiles before, and they were a PITA. I hope I never have to do a full wall with these things. The sheets kept collapsing in on itself, it was very difficult to keep them in place. But I managed to get somewhere in the neighbourhood of acceptable, I think. I hope.
[attachimg=9]
[attachimg=10]
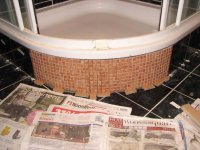
Then after a day drying it was time the fill the seams between the tiles. Made a nice filler and rubbed it in with a rubber rubbing thingy. I also partially filled the bottom and side seams for strength. Later it will all be finished off with a handsome layer of silicone caulk.
[attachimg=11]
After letting it dry for some time it was time for the clean up: removing most excess material with a moisty spunge and then a dry cloth.
[attachimg=12]
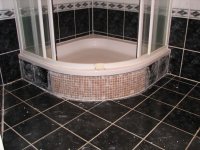
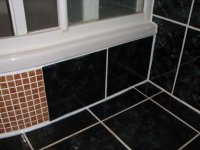
Then the next day when the tile filler was dry and hard, it was time for the finishing touch. I applied silicone bathroom caulk all around the edges. This caulk remains flexible so there won't be any cracks over time. If you'd only use tile filler the edges would crack after a while because of the movement between the walls and floor. The tub itself also had a very ugly caulk line, so I cleaned that up as well and replaced it with a new one.
[attachimg=13]
[attachimg=14]
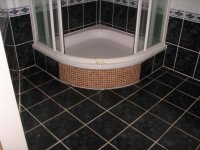
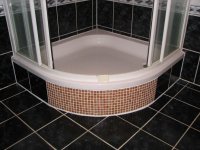
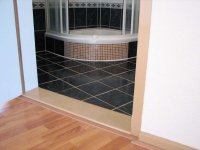
Though the colour of the mosaic tiles is a bit off from the rest of the bathroom, it fits well with the rest of the house's styling:
[attachimg=15]
The home owner was very happy with how it turned out.
Thanks again for all the advice people gave me, it helped a lot.
Link to original thread.
So it started out with this:
[attachimg=1]
The skirt was damaged and the home owner wanted it replaced or repaired in some way, as long as it was done without too much cost. I looked around quite extensively, but unfortunately it turned out it wasn't possible to order a new skirt for the shower. So we had to go for option number two and replace it in some way, and after careful deliberation with several sources, placing tiles over ytong blocks turned out to be the winner.
You buy these blocks in sizes for 60 x 20 cm, and a thickness of 5, 7 or 10 cm. I decided to use three 7 cm thick blocks and one of 5cm. I had to cut them all in small parts to follow the round shower tray. In the picture below they're all test fitted.
[attachimg=2]
I cut them all to size with a hand saw, but did the shaping with the MultiMaster, which turned out to be very usefull for this kind of work. It cut through the blocks like butter and the job would have taken a lot longer without it. Below my cutting station, only Festool used in this whole job was the CTL Mini for clean up. The dust of this stuff was very nasty. I forgot to bring a mask and could taste the dust all evening in my throat.
[attachimg=3]
The pics below shows an exploded view of all blocks and how I had to cut some odd shapes to fit them around the supports.
[attachimg=4]
[attachimg=5]
To help with placing all blocks in the right spot and get the tiles flush with the edge of the tub I made a spacer out of MDF, accounting for the width of the tiles and a 3 mm layer of grout.
[attachimg=6]
I treated all blocks with a primer to remove suction, and I then glued all blocks in place using glue to fix them to the tiles and grout to fix them to each other. After some testing with glue I found the blocks adhered best to the existing tiles with the construction glue, and I used grout to fill up the seams between the blocks because it had more volume.
[attachimg=7]
Then it was time to tile. I found some left over tiles from the bathroom, so decided to use them on the straight sides of the tub. I had to cut each tile to size and number them because the tub wasn't evenly spaced from the floor in all places.
[attachimg=8]
Then the hard part, the mosaic tiles for the curve. I originally planned to use 4x4 cm black tiles, but due to some deceptive pricing from the store they turned out 5 times as expensive as originally planned and this was not an option. So I found some cheap sheets to use instead. The orange/brown colour is different from the rest of the bathroom but it fits well with the colours in the rest of the apartment so it's not totally out of place.
Though I have tiled lots of times before, I never used such small mosiac tiles before, and they were a PITA. I hope I never have to do a full wall with these things. The sheets kept collapsing in on itself, it was very difficult to keep them in place. But I managed to get somewhere in the neighbourhood of acceptable, I think. I hope.
[attachimg=9]
[attachimg=10]
Then after a day drying it was time the fill the seams between the tiles. Made a nice filler and rubbed it in with a rubber rubbing thingy. I also partially filled the bottom and side seams for strength. Later it will all be finished off with a handsome layer of silicone caulk.
[attachimg=11]
After letting it dry for some time it was time for the clean up: removing most excess material with a moisty spunge and then a dry cloth.
[attachimg=12]
Then the next day when the tile filler was dry and hard, it was time for the finishing touch. I applied silicone bathroom caulk all around the edges. This caulk remains flexible so there won't be any cracks over time. If you'd only use tile filler the edges would crack after a while because of the movement between the walls and floor. The tub itself also had a very ugly caulk line, so I cleaned that up as well and replaced it with a new one.
[attachimg=13]
[attachimg=14]
Though the colour of the mosaic tiles is a bit off from the rest of the bathroom, it fits well with the rest of the house's styling:
[attachimg=15]
The home owner was very happy with how it turned out.
Attachments
-
 IMG_8266.jpg77.6 KB · Views: 1,302
 -
 IMG_8588.jpg107 KB · Views: 1,167
 -
 IMG_8596.jpg74.2 KB · Views: 1,123
 -
 IMG_8613.jpg96.8 KB · Views: 1,185
 -
 IMG_8614.jpg77.5 KB · Views: 991
 -
 IMG_8631.jpg78.2 KB · Views: 1,246
 -
 IMG_8653.jpg97.9 KB · Views: 1,233
 -
 IMG_8672.jpg68 KB · Views: 920
 -
 IMG_8683.jpg107 KB · Views: 1,016
 -
 IMG_8690.jpg106.7 KB · Views: 993
 -
 IMG_8712.jpg109.5 KB · Views: 1,094
 -
 IMG_8718.jpg83.8 KB · Views: 1,575
 -
 IMG_8919.jpg95.7 KB · Views: 1,074
 -
 IMG_8839.jpg66.9 KB · Views: 1,061
 -
 IMG_8921.jpg71.1 KB · Views: 1,071