Simple Vecturo Bevel Cut jig for Exterior Trim

Scott B.

Magazine/Blog Author
Member
Joined
Nov 24, 2011
Messages
2,004
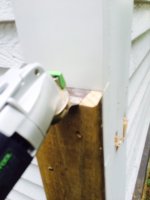
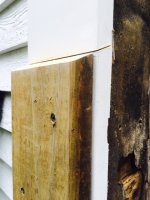
This is a handy option on exterior corner board rot replacement. Often, 80% of the board is good, but the bottom 20% is toast. This set up creates a joint worthy cut to bring a new piece into.

Simple set up...the pt screwed to the face of the corner acts as a fence for the the cutter to ride across. You can mark the cutter for the desired depth, which was 3/4" here. You can also feel when you have cut all the way through.

Just thought I'd share this in case no one else has so far.

[attachthumb=1]

[attachthumb=2]


Attachments

  • FullSizeRender (38).jpg
    FullSizeRender (38).jpg
    60.4 KB · Views: 510
  • FullSizeRender (37).jpg
    FullSizeRender (37).jpg
    120.8 KB · Views: 472
That is a pretty cool tip, Scott. Thanks for posting - I use guide blocks like this for other cuts and it works great to get straight cuts.
 
ScotF said:
That is a pretty cool tip, Scott. Thanks for posting - I use guide blocks like this for other cuts and it works great to get straight cuts.

Thanks Scott, happy to share.

The old timers who taught me this cut for rot replacement referred to it as a "weather cut" where the top (existing piece) will lap down over the new piece being installed at the joint. It is a 22.5* cut.

I don't use a Kapex, and my CMS is not incremental, so if anyone is in this same boat, it is important to cut the guide board and the actual trim piece(s) without changing the setting on the saw to make sure the angle of the cut is identical. And be sure to install the block sitting on a square.

I have a pretty large commercial job coming up where there are a bunch of these cuts on exterior overhead door casings...
 
That scarf cut is what seals the deal. [thumbs up]

I use a similar setup for patching 3/4" hardwood floors. I machined an aluminum jig that places the Multimaster blade 1 degree off vertical which allows for a nice tight joint with the new piece of flooring.
 
Hey that's great! Should be lots of people using that trick.

Seth
 
I used a jig like this on some vertical pine board garage siding this summer.  For some wider boards, I was able to use the tracksaw with the rail fastened horizontally to the wall to make these bevel cuts. 
 
I looked at it with my circ saw, but its a right handed saw so I would have had to start from the outside of the corner and come in. Depth would be fine, but stopping the cut with a large circular blade would have left me well shy on the siding edge of the inside corner.

My conclusion here was that it is really necessary to have a square edged cutter and plunge in, that is if one is attempting to make the cut without impacting siding or other adjacent surfaces.

I am curious to see how one would make a through cut in this situation with a different type of saw. Visibility would be difficult, and I think it would be awkward with a larger saw.

This type of cut on rot repair is becoming more and more common for us, and its great to have a clean cutting and efficient solution to it.
 
Scott Burt said:
My conclusion here was that it is really necessary to have a square edged cutter and plunge in, that is if one is attempting to make the cut without impacting siding or other adjacent surfaces.

For rot repair I've always found the same thing with a Fein and have used the same precut edge as a guide approach, it's a lot easier.

When it's really akward access though I make the first cut with a wide blade, cutting the open edge first and following the line of the guide then switching to a narrower blade for the back of the cut when there's adjacent surfaces to avoid.
 
Back
Top