six-point socket's tidbits of Home Improvement, small projects and other stuff.

  • Thread starter Thread starter six-point socket
  • Start date Start date
Status
Not open for further replies.
Oliver, the reason it never occurred to us that your SO might be taking the pics is most of us would get a few eye rolls for making such a request, followed by silence as the SO vanished from the shop!

Hmmm, now that I think about it, that might be the recipe I need for shop time!  "Honey, can you take a pic of this for the guys on the FOG?  Oh, just one more, this is a good one!"
 
lol, Raj :)  [big grin] [big grin] [big grin] [big grin]

Most of these pictures actually serve a real purpose: documentary of what was done, how and when. The rest is fun and games... :) It's also just a select few that I end up posting that fit my personal guidelines for online posting ;)

Kind regards,
Oliver
 
six-point socket II said:
Most of these pictures actually serve a real purpose: documentary of what was done, how and when.

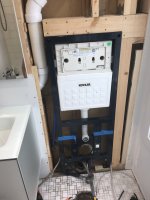
I'm with you Oliver...all of my rehabs have been thoroughly documented, so that in the future when I need to modify a particular area, I know exactly where the sub-structure lies and what it will take to get to where I want to be. I don't just take pictures, rather I will mark on the drywall and the studs the heights and the distances between structural members so that I can then relocate the datum lines that will allow me to continue to modify a structure with minimal disturbance...then I take a picture. It works well. [thumbs up] That's been part of my MO for the last 20+ years...it's a tough habit to break.

For instance, after removing a conventional toilet and installing a wall mounted unit, if I want to mount shelving to the wall later, I'm completely aware of the routing of the PVC venting.
 

Attachments

  • 3141.JPG
    3141.JPG
    2.2 MB · Views: 689
Thanks for the clarification on the digging, Oliver.  So can I assume that is a 220 v line then?

As for the Installation Pliers, that's a cool tool.  I just went to Amazon with the search 'expandable anchor installation pliers' and low and behold I found this -https://www.amazon.com/ASIBT-Rivet-...d=1491703009&sr=8-1-fkmr1&keywords=expandable+anchor+installation+pliers

I think I'll add one to my cart.  Looks to be so much better than using a drill to tighten the screw and seeing the head spin and tearing up the wall rather than setting the bolt.

I also take really good care of my tools, but for some reason two of the Snap-on drivers have failed.  Both saw occasional use and one was in my trunk, the other in my wife's trunk.  So it might have had something to do with humidity or temperature extremes over time that caused the ratcheting mechanism to no longer catch.  My rep says he sees it a lot on the older style like you have with the yellow cap.  I have that style and the newer one and have had no issues with the newer models.

BTW, I'd have to pay my SO to take photos of me!  You've got it good!

Thanks!

Neil
 
neilc said:
Thanks for the clarification on the digging, Oliver.  So can I assume that is a 220 v line then?

As for the Installation Pliers, that's a cool tool.  I just went to Amazon with the search 'expandable anchor installation pliers' and low and behold I found this -https://www.amazon.com/ASIBT-Rivet-...d=1491703009&sr=8-1-fkmr1&keywords=expandable+anchor+installation+pliers

I think I'll add one to my cart.  Looks to be so much better than using a drill to tighten the screw and seeing the head spin and tearing up the wall rather than setting the bolt.

I also take really good care of my tools, but for some reason two of the Snap-on drivers have failed.  Both saw occasional use and one was in my trunk, the other in my wife's trunk.  So it might have had something to do with humidity or temperature extremes over time that caused the ratcheting mechanism to no longer catch.  My rep says he sees it a lot on the older style like you have with the yellow cap.  I have that style and the newer one and have had no issues with the newer models.

BTW, I'd have to pay my SO to take photos of me!  You've got it good!

Thanks!

Neil

Hi Neil,

yes, it's a 220V line.

The pliers look good!

I will keep an eye on my old-style ratcheting wrenches then, maybe I'm just lucky for now.

Kind regards,
Oliver
 
[member=61231]HarveyWildes[/member]

Hi Harvey,

a little later than promised, I apologize for that - but here are the picture of that plane you spotted in my previous pictures.

It was made by: Busch, Jacob; Jacob Busch, Werkzeugfabrik, Remscheid, Hochstrasse 26-30 established in 1823, "Garantiewerkzeuge" "Marke "Spannsäge"" - In 2009 they were bought by Wilh. Schmitt & Comp., Königstr. 59, 42853 Remscheid who produce everything that you know/buy as "Kirschen".

Anyway, here are the pictures:

28961486ky.jpg


28961487jx.jpg


28961488cj.jpg


28961489qb.jpg


28961490kt.jpg


28961491jn.jpg


28961492bm.jpg


28961493kr.jpg


28961494fx.jpg


28961497pi.jpg


28961498cy.jpg


28961499jc.jpg


28961500sa.jpg


Hope you like them ;)

Kind regards,
Oliver

 
Awesome - thanks!

Any idea how old this particular plane is?  Any plans to refurbish it?  If so, what do you think it would take to get it operating like new?
 
Hi Harvey,

well, I have no exact idea about it's age. My (uneducated) guess is: definitely not pre 1900 and not much younger than WWII. It's hard to find backed up information on this, most of what I found regarding old tools from Solingen/Remscheid is focussed on chisels.

Getting it in working order is somewhere on my list and that list is looong and it's certainly not a priority. Now that I got the blade out I will take it as an opportunity to get the rust off and sharpen it. Then someday take it from there...

Kind regards,
Oliver
 
Hi,

Long time no hear, I thought I'd post an update.

So shortly after my last post in this thread I had unwanted, nightly visitors. Long story short: Nothing happened, but they managed to get on my backyard patio without tripping any of the cameras. Then one of them tripped a camera with two of his fingers in motion while obviously showing/pointing out the camera to his partner in crime. I saw the e-mail notification 10 minutes late, gladly I was still awake - but when I went out they were gone. Additional measures were put in place - but I also decided I would add another camera (different angle) and replace the low rising elements of my fence by high rising elements.

Preparations - No work without Jerky and Ginger Ale.

29753926px.jpg


Getting out old slotted screw from the wall where the new post would be installed.

29753927il.jpg


29753929gc.jpg


Connecting the high rising elements.

29753935gz.jpg


Drilling holes for attaching the post to the wall.

29753937vz.jpg


Sorry, no more pictures on this.

Then I needed to fix a small gate which posts are too weak. At some point I will have to replace the 70x70 with 90x90 posts but for now I just gave it some additional hold.

Adjusting and attaching angular mount to the board.

29753944fx.jpg


Attaching board(s) to post.

29753953ly.jpg


Attaching angular mount to concrete wall.

29753956cf.jpg


Next up, I needed to re-adjust 2 panels of my patios roof. So I had to unscrew and re-position them.

I prepared a ratchet and my impact wrench as I didn't know if maybe the impact wrench's power would be to much. As the beams have obviously dried over the years and I needed to put the screws back in the exact same holes they came out. I got lucky, it worked like a charm using the impact wrench.

29753959pq.jpg


29753961tb.jpg


Then, Casper Kjerumgaard called for "Cut out a wooden heart day" - I followed his call. In case you don't know Casper, this is his Website:http://www.casperkjerumgaard.com And this is his Instagram feed:https://www.instagram.com/casperkjerumgaard/ He is a very cool guy, awesome craftsman and I think following him will be well worth your while if you do social media.

So I cut out a wooden heart.

29753962kb.jpg


Next thing up was a rather quick re-design of a small portion of the back yard, building a little wall from shell limestone.

29753963qq.jpg


29753966tm.jpg


Of course this wasn't enough and there's a second part.

But for that I needed to remove a European Yew.

29753972ym.jpg


That went very well, I felled it completely by hand using only my Tajima G-Saw 240.

29753975od.jpg

https://vimeo.com/224834345

But of course there was still it's root.

So I had to spent quite a bit of time to get that dug out.

29753918bi.jpg


Then I went to buy a new tool to get the soil freed from smaller roots.

29753977ha.jpg


This is what it looked like after.

29753978zk.jpg


Now I was able to build the second part of the new small shell limestone wall.

29753919ll.jpg


And this is what it looks like finished. Still needs some new plants. And I'm still looking for something to make that "ramp" look a little nicer.

29753925rt.jpg


Now for some just for fun tool shots:

29759829nt.jpg


29759830bm.jpg


29759832ha.jpg


29759833nq.jpg


29759834wt.jpg


Kind regards,
Oliver
 
Hi,

About every two years I install a new, flexible side cover to the patio's roofing. Today was the day.

Back in the day I wanted to use the same quality-material that was used for the roof, while cutting it to spec. isn't a problem - there are no fixtures/hardware readily available to mount these horizontally. So I decided to go with a milky plastic foil, but that of course only lasts two winters before it needs replacing.

29799263tz.jpg


29799264wf.jpg


29799268ho.jpg


29799274th.jpg


Kind regards,
Oliver
 
Thanks Neil!

I love the Snap-On CT 761. It has a 3/8" drive and is packed with plenty of power (officially 120 ft-lb/ 162.7 Nm of torque output) reality is: it can loosen bolts that are torqued to 150 ft-lb/ 203 Nm. Which is pretty amazing for such a small package.

I mainly use it as impact driver with impact bitholder and impact bits or as pictured with an impact six-point socket when working around the house. Used it for demolition of my old, foldable attic ladder and other stuff like that (works great breaking lose old, rusted bolts and nuts...) - or as pictured to drive large diameter screws on my patio and the patio's roofing. It's capable of doing far more than what you would normally throw at a 3/8" compact impact wrench and that's what makes it, at least to me, so appealing. I did try it on some lug nuts and was impressed - though I wouldn't do that to it if I was changing tires daily. I figure using it constantly at outer maximum torque will at some point lead to premature wear and tear and finally result in a broken tool.

There might be more powerful and cheaper options out there by now and Snap-On obviously uses their own battery design. But I wanted and want Snap-On. I'm really, really happy with it.

I put a complete 3/8" impact socket set metric, shallow & deep with the CT 761, extensions, a 1/2" ratchet, adapters, 1/2" impact sockets for lug nuts, impact bits, impact bitholders, charger, spare battery... all into that red Systainer T-LOC 2 :)

If you have specific questions, I'll be glad to answer them. :)

If you like, you can watch it - next to the PDC - driving a SPAX (R) HI.FORCE (R) 6x120 Washer head, T-STAR plus (R) drive, steel, Wirox (R), Partial thread.
https://vimeo.com/220070186

And, again if you like, you can watch it - next to PDC and Bosch GSR 12V - driving 4,5x80 Wuerth Assy 3.0 screws (AW 20 head)
https://vimeo.com/220609322

Kind regards,
Oliver

 
Nice videos and additional detail, Oliver! 

Love your choice of tools.  Got to watch the wallet when I read your posts!

 
six-point socket II said:
Thanks Neil!

I love the Snap-On CT 761. It has a 3/8" drive and is packed with plenty of power (officially 120 ft-lb/ 162.7 Nm of torque output) reality is: it can loosen bolts that are torqued to 150 ft-lb/ 203 Nm. Which is pretty amazing for such a small package.

I mainly use it as impact driver with impact bitholder and impact bits or as pictured with an impact six-point socket when working around the house. Used it for demolition of my old, foldable attic ladder and other stuff like that (works great breaking lose old, rusted bolts and nuts...) - or as pictured to drive large diameter screws on my patio and the patio's roofing. It's capable of doing far more than what you would normally throw at a 3/8" compact impact wrench and that's what makes it, at least to me, so appealing. I did try it on some lug nuts and was impressed - though I wouldn't do that to it if I was changing tires daily. I figure using it constantly at outer maximum torque will at some point lead to premature wear and tear and finally result in a broken tool.

There might be more powerful and cheaper options out there by now and Snap-On obviously uses their own battery design. But I wanted and want Snap-On. I'm really, really happy with it.

I put a complete 3/8" impact socket set metric, shallow & deep with the CT 761, extensions, a 1/2" ratchet, adapters, 1/2" impact sockets for lug nuts, impact bits, impact bitholders, charger, spare battery... all into that red Systainer T-LOC 2 :)

If you have specific questions, I'll be glad to answer them. :)

If you like, you can watch it - next to the PDC - driving a SPAX (R) HI.FORCE (R) 6x120 Washer head, T-STAR plus (R) drive, steel, Wirox (R), Partial thread.
https://vimeo.com/220070186

And, again if you like, you can watch it - next to PDC and Bosch GSR 12V - driving 4,5x80 Wuerth Assy 3.0 screws (AW 20 head)
https://vimeo.com/220609322

Kind regards,
Oliver
  I have that same Impact from them , in Red. Started out with it to compliment my Snap-On Impact Driver with its 1/4" Quick Change Chuck[ CT725QC]  Finally decided after a few months to upgrade to the 18 volt platform with the CT8810A, and take the 14 volt impact home. While the 18 volt impact has far more power, I do miss the smaller 14 volt version from time to time since as you noted, it has more power than its size would leave you to believe possible.
I may STILL bring that 14 volt unit back to work someday.... [embarassed]
 
I bet you love the 18V Snap-On impact [member=10952]leakyroof[/member] - It's a beast for sure. I eyed it a couple of times but decided that it would see no real use anyway and skipped on the purchase - but it is tempting. Especially with the "flat gearbox/head" 18V angle grinder they offer and once one has the batteries...... *lol*

I do own a very old 1/4" Snap-On driver, CTSE561CLSK which has a 7.2V NiCd battery. But it's very useful because you can remove/pull out the 1/4" hex shaft and put a 1/4" square shaft in for direct attaching of 1/4" sockets... all of these shafts can also be placed in a instinct-ratcheting handle that came with the set. And of course a big load of bits... One of my very first Snap-On purchases. Love that kit for very light tasks.

Kind regards,
Oliver
 
You always have neat projects.  Next time you look for the plastic covering try and get greenhouse plastic 4 to 5 years of life and usually a very reasonable cost.

Peter
 
Status
Not open for further replies.
Back
Top