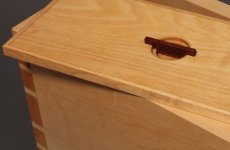
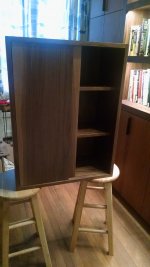
I just finished putting together this little cabinet that's going to be recessed into a 12" deep wall. It's about 2' wide and 30" tall.
View attachment 1
View attachment 3
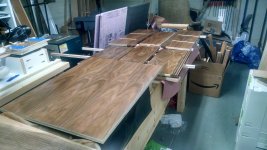
The case materials are mostly leftovers from building my kitchen. If you look behind a couple of the photos, you can see some of the wall of cabinets that make up one side of the room. Once i finish the pantry, maybe I'll finally take photos of the kitchen itself. For now, it's holding a lot of things that should be in the pantry.
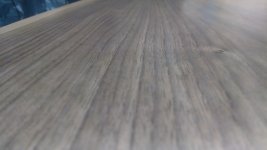
Construction is pocket screws + hide glue for the hardwood edges, dadoes for the 2 shelves. Shelves are edged with some 1/4" walnut I had trimmed off my countertop last year.
View attachment 2
The shelves were fun, as it was my first time using the of1010 with the edge trimming attachments. For solid edging, I think this was the easiest approach I've tried. I could get it to a point where it was easy to bring it flush with a card scraper + some 150g paper.
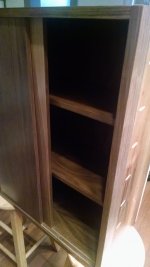
The sliding doors are 1/2" MDF with a walnut veneer that I applied using a veneer hammer and hot hide glue. The track is just some grooves routed into the top and bottom of the case and I rabbeted the back of the doors so they can be lifted in and then ride in the groove. I left about 2mm of room below the bottom rabbet so that it is riding on the shoulder instead of the bottom of the groove. I think that's going to do better in terms of avoiding gunk in the groove.
View attachment 6
The finish is 4 coats of EM6000 satin waterborne lacquer.. I did do some pore filling on the case parts using crystalac tinted with a little dye, mainly to try and even out the tone of the wood - some of that plywood has been exposed to sun for the last half year, but some had not. The doors didn't need any pore filling, as I had sized the veneer with a coat of thinned hide glue prior to hammer veneering them. I was shocked how well that worked out. I did put a thinned coat of sealcoat over them before spraying them.
View attachment 5
I did screw up a bit with the case assembly - I think my dadoes may have been about 1mm too deep , and I glued the shelves into them using some old brown glue. Because I was paranoid about them not fully seating, I clamped them. As a result, there is a very slight bow to the case sides. This leads to a small (1/16+) gap at the corners when the doors are fully closed.
I still need to decide what to do about pulls - very open to ideas/suggestions.
Thanks for looking!
Adam
View attachment 1
View attachment 3
The case materials are mostly leftovers from building my kitchen. If you look behind a couple of the photos, you can see some of the wall of cabinets that make up one side of the room. Once i finish the pantry, maybe I'll finally take photos of the kitchen itself. For now, it's holding a lot of things that should be in the pantry.
Construction is pocket screws + hide glue for the hardwood edges, dadoes for the 2 shelves. Shelves are edged with some 1/4" walnut I had trimmed off my countertop last year.
View attachment 2
The shelves were fun, as it was my first time using the of1010 with the edge trimming attachments. For solid edging, I think this was the easiest approach I've tried. I could get it to a point where it was easy to bring it flush with a card scraper + some 150g paper.
The sliding doors are 1/2" MDF with a walnut veneer that I applied using a veneer hammer and hot hide glue. The track is just some grooves routed into the top and bottom of the case and I rabbeted the back of the doors so they can be lifted in and then ride in the groove. I left about 2mm of room below the bottom rabbet so that it is riding on the shoulder instead of the bottom of the groove. I think that's going to do better in terms of avoiding gunk in the groove.
View attachment 6
The finish is 4 coats of EM6000 satin waterborne lacquer.. I did do some pore filling on the case parts using crystalac tinted with a little dye, mainly to try and even out the tone of the wood - some of that plywood has been exposed to sun for the last half year, but some had not. The doors didn't need any pore filling, as I had sized the veneer with a coat of thinned hide glue prior to hammer veneering them. I was shocked how well that worked out. I did put a thinned coat of sealcoat over them before spraying them.
View attachment 5
I did screw up a bit with the case assembly - I think my dadoes may have been about 1mm too deep , and I glued the shelves into them using some old brown glue. Because I was paranoid about them not fully seating, I clamped them. As a result, there is a very slight bow to the case sides. This leads to a small (1/16+) gap at the corners when the doors are fully closed.
I still need to decide what to do about pulls - very open to ideas/suggestions.
Thanks for looking!
Adam

")