Split Top Roubo Bench Build

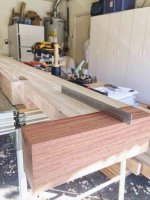
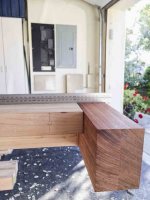
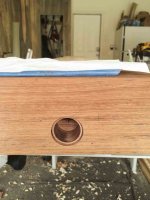
I completed the basic mortise on the end cap.  Everything is square and flat.  At least as flat as I'll ever get it. I skipped the turret again and went too deep on a pass.  At least it won't be seen.  I have to tighten that darn turret.

I also have a 0.5mm to 1.5mm gap between the cap and the slab.  I think I can correct it.  I'll visit that tomorrow.

[attachimg=1]

[attachimg=2]
 

Attachments

  • e_capA-1.jpg
    e_capA-1.jpg
    65.1 KB · Views: 1,732
  • e_capA-2.jpg
    e_capA-2.jpg
    65.1 KB · Views: 1,529
VW MICK said:
Looking good mate

This now my go to thread every day

Thanks Mick,

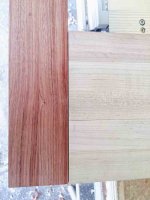
I have spent 3 hours trying to get the end cap closer to the slab.  I just can't find the offending bulge to plane/chisel off.  I used a flashlight and every other trick I know.  I have "improved" the gap.  The edges are now parallel and the width is down to .012" or .305mm.  I am going to run with it because there is imminent danger (to wood) anytime I pick up a chisel.

I'm now going to take it to the drill press.

[attachimg=1]
 

Attachments

  • gap-1.jpg
    gap-1.jpg
    55.6 KB · Views: 1,410
Most people would say "I can't believe I did that",  Me....  "I did it again"
Once more welcome to my world where I convince myself that what I'm doing is right, when it is in fact wrong.

Example No. 4375
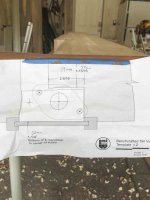
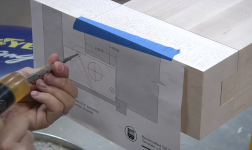
Align end cap drill template to the wrong registration point.
I had my laptop open and I was watching and pausing the video instructions while aligning the template.
I have watched that 20 minute video at least three times and I checked the template alignment at least three times.

I did the same when it was on the drill press.

Too late to visit the hardwood store.

[attachimg=1]

[attachimg=2]

[attachimg=3]


Attachments

  • errorB-1.jpg
    errorB-1.jpg
    58.8 KB · Views: 1,433
  • errorB-2.jpg
    errorB-2.jpg
    63.7 KB · Views: 1,405
  • Screen Shot 2015-05-05 at 3.07.17 PM.png
    Screen Shot 2015-05-05 at 3.07.17 PM.png
    3.3 MB · Views: 1,706
>>>Most people would say "I can't believe I did that",  Me....  "I did it again"
Once more welcome to my world where I convince myself that what I'm doing is right, when it is in fact wrong.> from others.  Beside my work, you are doing great.

When i first went into mason biz on my own, if i made a mistook, i would apologize for it.  After a few booboo's, i learned to stand in front of the errors while pointing out how proud I was of the job, and how glad I was to be doing it for them.  It was surprising how my stock went up from such a gesture.  I am sure that when you have finished your bench, you will be really proud and will show it off to great advantage.
Tinker
 
That's right Luke.  A good carpenter makes it work.  And if all else fails, there's putty and paint!  It's all good.
 
Thanks guys.  I truly appreciate it.
This one hurt more.  Here is….. probably too much information for my virtual buddies.  But what the heck.

These mistakes happen because my mind just breaks.  For many years I owned and ran a successful tech company.  Our engineers designed, integrated, and supported networks for very large companies.  NASA is one example. The best description is we were “data plumbers.”

Then my mental illness got increasingly worse.  Other events in 2008 necessitated that I sell the company.  That worked out well but the mental issues remain.  I was “hospitalized” twice and while there I was given 12 ECT treatments.  (electroshock)  Supposedly there are no side effects.  Supposedly.

However, since then I can’t hold numbers in my head and old memories are foggy.  I have to relearn things over and over and I mix up spacial stuff like....say.... aligning a simple mark on a template or... mixing up the positions of the dog hole strip.  I can learn neat stuff like building an amp but I couldn’t tell you much about it now.  Heck,  I used to design data networks for thousands of workstations in far flung places.  Not anymore.  Run a company?  Keeping that many balls in play is not possible for me.

Now it’s….. bzzzzz.  Don’t misunderstand, I am blessed and I’m comfortable with where I am, but it surprises me each time these things happens and the frustration of my limitations resurfaces.  It is so strange.  Posting this build process is therapeutic for me.  It helps me put both the good and not so good in perspective and in context it’s only wood.
 
Luke,

It takes a big man to admit what you have said on this forum. Love watching this build and hearing about your adventures.

Keep it up mate!

Cheers. Bryan.
 
I found a news clipping about your company on a Google search.  Good to see you stuck it to the man (Cisco).  Keep on posting brother, good and bad.  We've all been there.  On one of my latest threads about making a door dutchman, I got the door all patched and painted.  It looked brand new.  I hung the door and marked where the new doorknob needed to be drilled with pencil.  Grabbed my drill and knelt down to finish the deed and after realized I had drilled the hole 3 in. lower than my mark.  Had to do a complete do-over!
 
Jim Kirkpatrick said:
I found a news clipping about your company on a Google search.  Good to see you stuck it to the man (Cisco).  Keep on posting brother, good and bad.  We've all been there.  On one of my latest threads about making a door dutchman, I got the door all patched and painted.  It looked brand new.  I hung the door and marked where the new doorknob needed to be drilled with pencil.  Grabbed my drill and knelt down to finish the deed and after realized I had drilled the hole 3 in. lower than my mark.  Had to do a complete do-over!

It's surreal when that happens, as I'm sure you know. 
I'm on my way to Austin's Hardwoods to get another chance of babinga.

At least when you make a mistake with wood it doesn't explode....

[attachimg=1]
 

Attachments

  • boom-1.jpg
    boom-1.jpg
    40.8 KB · Views: 1,300
Hey Luke you are doing a fantastic job .you are really inspiring me and prob others

I've got a FS jig and pm11 blades on my list

Keep up the good work 
 
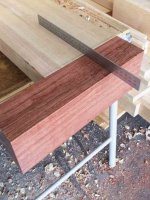
Moving right along I have the new end cap blank clamped.
Tip for new guys.  Always use a glue roller.  That one is a Speedball.

Also.  Be sure to always move the depth stop on your saw almost all the way up.  If you've been making deep cuts and you forget you might end up plunging through your MFT top.  Learned that one a year ago.

[attachimg=1]
 

Attachments

  • bing-1.jpg
    bing-1.jpg
    84.1 KB · Views: 1,221
Hey Luke, I just thought of one of my little mistooks from way back when I was a mason contractor.  I had recently gotten a new backhoe somewhat larger than the one I had used for three or four years.  I had a garage to build for a new customer who, from my conversations pre estimate, i knew was rather fussy and had voiced several complaints concerning other contractors.  In spite of his mild complaining, i did like both his wife and him.

I laid out the job, but did not set up batter boards.  The garage was to be on a fairly steep slope with barely space for me to set up my backhoe. Batter boards would have gotten knocked over before i even made my first bucket load dig.  I just put a few stakes in the ground at the corners and about half way down the slope.  Ordered concrete hoping for early morning delivery the next day.  The dispatcher told me he had a truck in the yard that he could send out right away, or he could send one in about an hour if it would be a quick unload.  I assured him the whole pour was on a slope and the trenches were half way dug already.  I would call the BI to see if he could check within the hour.  The BI had seen me working in the past and knew I would not pour unless it was a clean trench with solid base.  He told me he had another job to check within a quarter mile of my job and he would take a look on his way.

I went right to work finishing up the trnches and had everything shipshape by time BI got there.  He gave me a tag as the concrete truck roared into the driveway.  The pour worked out fine and quick.  My rep was still in tact with both BI and the concrete dispatcher. By 4:30, I was home and sitting at the kitchen table chatting with THE BOSS LADy over a cool one while she sipped a cup-a-tea.

About the time i finished my beer, the phone was ringing. I answered to a very irate owner who was yelling into the phone with a force to rattle the wax out of my ears.  He told me i was about 6 feet short on the back (lower side) footing.  I managed to calm him down a little when i told him I would be right there to check the problem.  I took one look and realized the mistook.

The man was a carpenter by trade, so i had the explanation that he would certainly understand.  "Phil, have you ever measured a board with your six foot folding rule, marked the end and added a mark six inches further on the board where you wanted to make your cut?  AND, then you cut at the first mark?"

"Well, yeah, i have done that."

"Well, if you look down the hill, you can see the two stakes I drove into the ground to mark the corners of my footings.  The trench I made is between the two stakes I put in at the end of my 25 foot tape.  I had measured the extra five feet to the corners, but did my digging at the first markers."

The carpenter just started laughing.  I re dug the extended trench, ordered more concrete and poured a day later and every body was happy, except for my wife who writes the checks for materials.  [wink]  I guess over all the man was happy. I did more work for him and he recommended me to others.  ::)
Tinker
 
Things turned for the better this morning.  The end cap fits better than the previous one and is ready to be drilled.  When the bolts are installed the small gap will disappear and it will be flush with the slab.

Yesterday I flushed up the tenon so it is square to the top of the slab again.  The MFS helped a lot.  I also used the MFS to excavate the mortise from the babinga instead of the router guides.  It takes me quite some time (90 min) to figure the setback, square it up, and secure it to the workpiece, but in the end the router is more stable and you don’t have to adjust the guide after each pass.

My spacial recognition skills seem to always crop up when I hand hold the router.  I see the rotation direction arrow on the router but I over think which side to enter the workpiece.  Naturally it doesn’t matter on the first plunge run, but for whatever reason I get confused on subsequent passes.  Yesterday when I went to square up the tenon and I chose the wrong side to enter the workpiece.  The router skated across the piece and I swung it up in the air.  I was very lucky I didn’t get dinged.

If there’s some sort of mental reminder saying, I’d love to hear it.

[member=550]Tinker[/member]
Good story, I actually understood most of it, as I have had several good sized construction projects done.

[attachimg=1]

[attachimg=2]
 

Attachments

  • cap_blk-2.jpg
    cap_blk-2.jpg
    82.6 KB · Views: 1,160
  • cap_blk-1.jpg
    cap_blk-1.jpg
    70.1 KB · Views: 1,207
Someone correct me if I am wrong, but if you are using the router handheld and right side up, move the router left to right.

If the router is upside down in a router table, move the work piece right to left.
 
RLJ-Atl said:
Someone correct me if I am wrong, but if you are using the router handheld and right side up, move the router left to right.

If the router is upside down in a router table, move the work piece right to left.

I think this will help.  Since I can only feed one way on a table, I don't have to think about it.
Hence I will try to burn it in my brain, that when hand held, move the router Left to Right.

So.  Is this correct?  When routing the piece below I would enter the top face from the open end and exit with the bit against the lower material from right to left.

[attachimg=1]
 

Attachments

  • router_path2.jpg
    router_path2.jpg
    334.5 KB · Views: 1,204
iamnothim said:
RLJ-Atl said:
Someone correct me if I am wrong, but if you are using the router handheld and right side up, move the router left to right.

If the router is upside down in a router table, move the work piece right to left.

I think this will help.  Since I can only feed one way on a table, I don't have to think about it.
Hence I will try to burn it in my brain, that when hand held, move the router Left to Right.

So.  Is this correct?  When routing the piece below I would enter the top face from the open end and exit with the bit against the lower material from right to left.

[attachimg=1]

You are correct. You still have to stop and think >>> At least I do.  I had my own shock treatment when i was two years old. My mom told me i was out for a few hours from that one I fell off a playground slide and landed on my head.  Of course, that explains every mistook I have ever made since then.  ----- along with a few other maladies we won't go into here  ::)

I don't get into the shop as often as I like, even less from now until early winter just before snow falls.  I always have to stop and figure it out and actually make a couple of dry runs before attacking a piece of wood with the router making noises.  I just tell anybody who might be watching that is the way with lefties.  Even with my bandsaw, i make a dry run or two as that is the most sneaky toy in my shop.  it makes very little noise and you never see the blade moving until it suddenly pops out thru the piece you are cutting.  A big surprise if that is the same spot where you are pushing with your thumb.  [oops]

BTW: You still have to stop and think on the router table if you are cutting a mortice wider than the bit you are using.  Don't ask how i know that little tid-bit
Tinker

 
I’ve done as much as I can on the end cap until the Benchcrafted hardware arrives on Tues.  The holes for the lead screw and flange have been bored and actually match the template.

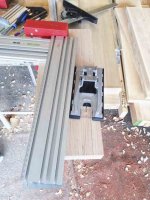
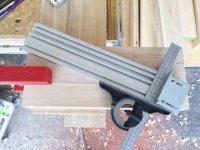
In the meantime I am making a mockup of the leg wedge/tenon joint.  I’ve glued up the two layers that represent the bench top. (see photo)  I will apply the closing piece with screws so I can take it off after the wedges have been set and see how the bond looks.

I am not going to implement the leg dovetails.  At first I was only concerned with the rear legs.  I email David Barron and told him about my mistake. He said not to worry and that the tenon was strong enough.  This tenon is at least three time larger than what is called for in the plans.

Today when I began to focus on the front legs. I noticed that the tail vise cavity would make the implementation very difficult.  I’d also have to make one piece with perfect joints on both ends.  Anyway they are out.  I have enough challenges.

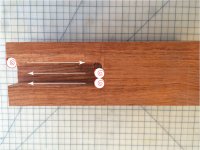
My reversal of the dog hole position at the leg area presented a challenge.  How to push up the dogs that are behind the leg?  I have decided on a finger slot.

I have been fretting making the large dovetails and the leg tenon because they really requires a bandsaw.  I may purchase one next month as I can see how handy it will be long term. 

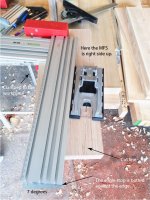
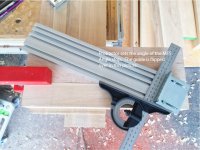
Until then I want to see if I can do without.  In the mockup I have set up the MFS as a guide for the Carvex.  It’s really pretty cool how flexible that jig is.  I used my Starrett protractor and set the angle stop for 7 deg.  Then I clamped it to the workpiece using the ratchet clamps.  Just like a guide rail.

Tomorrow I’ll make some cuts and see if I can get it to work in the mockup.

All-the-best

Luke

[attachimg=1]

[attachimg=2]

[attachimg=3]
 

Attachments

  • Leg_Ten-1.jpg
    Leg_Ten-1.jpg
    80 KB · Views: 1,137
  • Leg_Ten-2.jpg
    Leg_Ten-2.jpg
    72.2 KB · Views: 1,104
  • Leg_Ten-3.jpg
    Leg_Ten-3.jpg
    78 KB · Views: 1,142
Annotated

[attachimg=1]

[attachimg=2]
 

Attachments

  • Leg_Ten-1B.jpg
    Leg_Ten-1B.jpg
    623.5 KB · Views: 1,258
  • Leg_Ten-2B.jpg
    Leg_Ten-2B.jpg
    525.3 KB · Views: 1,250
No band saw, huh?

Watch Rob Bois do a little resaw work with his 14 inch Rikon, in this video.

It is part five of a ten part sequence, and it is worthwhile to watch the whole thing. 

 
Back
Top