Squaring the MFT/3

Bugsysiegals

Member
Joined
Mar 19, 2016
Messages
908
FWIW - I set my MFT/3 up using the method Gregory Paolini showed on YouTube; however, unfortunately his method didn't align the fence or rail aligned with the bench dog holes.  Perhaps this doesn't matter for some people but I'd think we'd want everything in alignment with these holes for various use cases later on. 

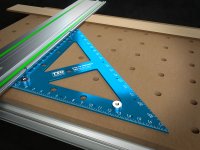
The way I set mine up instead was to loosen the screw on the side of the miter gauge, put bench dogs behind the fence on each end, push the fence tight up against the dogs, and snug down the miter gauge and end stop lock.  If you need the fence further back or further forward, you can place 2 bench dogs in front of and perpendicular to the fence, use a square/triangle, ensure it's square, and lock it down ... I used this to verify it was square.

Afterwards, I placed 2 dogs parallel with the fence, set my square/triangle against the dogs and guide rail, and continued adjusting the front raiser piece until the guide rail was perfectly square.  I then loosened the set screw the front raiser piece butts into, moved it tight against the front raiser piece, and locked it down.  I then loosened the bolts on the guide rail to release any tension, tightened them back down, and made sure the guide rail remained square and verified the guide rail came down perfectly on the front raiser block pin.

Now the fence and guide rail are square to each other and aligned with the bench dog holes so they can be used to cut 45 degree angles, etc.

Hope this is helpful for somebody else looking to square things up.
 
[member=60777]Bugsysiegals[/member] – your post  “  FWIW - I set my MFT/3 up using the method Gregory Paolini showed on YouTube; however, unfortunately his method didn't align the fence or rail aligned with the bench dog holes.  Perhaps this doesn't matter for some people but I'd think we'd want everything in alignment with these holes for various use cases later”   

This brings to mind an exclusive feature of our Precision Triangles for squaring MFT/3 guide rails, especially when raising it to the height of, say 3/4” material” being cut.

Attached is a picture  showing this simple set-up for squaring the rail to the dog holes. We just added this feature to the newest upgraded version of the PTR-18 Plus Triangle – best value for an 18” Triangle on the market today. Our website doesn’t show it yet for the PTR-18  but that is what we are shipping on both 18” Triangles now, not just on the MTR-18 . The Stainless Pins are 25mm/1" tall above the Triangle.
https://tsoproducts.com/tso-products-precision-system-triangles/mtr-18-precision-system-triangle/

Hans
 

Attachments

  • PTR-18-Plus-03.jpg
    PTR-18-Plus-03.jpg
    620.9 KB · Views: 622
Hans. Arrr!
You keep making the things better.  [blink]
True 45* and true 90* are just not enough for you huh?
Keep up the good work.
 
Michael - do you have a PTR-18 Triangle?

-if so, you can easily upgrade it by using our specially priced $ 6.00 Aluminum Drill Jig to add the precision mounting holes for the Stainless Pins which we can supply as spare parts .

The idea is to avoid obsolescence of customer tools whenever possible while improving the product line.

No reason to buy any other 18" Triangle, regardless of color [smile]

Hans
 
Thanks Hans!!  This square has actually been on my wishlist ever since I seen Dave Stanton use it in some of his videos. Because my bench dogs made my guide rail overlap existing bench dog holes, I wondered whether TSO triangle would do the same or if I could simply use it free form, assuming it has a tall enough lip on it.  It’s nice to see you’ve added these pins ...  a potential improvement, if it doesn’t add to much cost, would be to add a few more rows deep for these pins which would allow several fresh zero clearance cuts rather than having to move the triangle over an entire row per fresh cut, make sense?  That or I guess a spacer block which is consistent would work too.

 
[member=60777]Bugsysiegals[/member] - we have a better solution for that application. Its called TDS-10 and will be introduced weekend of May 4/5 - look for it two weeks from now.

Hans
 
TSO Products said:
Michael - do you have a PTR-18 Triangle?

-if so, you can easily upgrade it by using our specially priced $ 6.00 Aluminum Drill Jig to add the precision mounting holes for the Stainless Pins which we can supply as spare parts .

The idea is to avoid obsolescence of customer tools whenever possible while improving the product line.

No reason to buy any other 18" Triangle, regardless of color [smile]

Hans

Hans & Eric: you guys are great, keep up the good work!

Everyone else: I won't tell you what these guys did for me, but wow, what great customer service.
 
While we're waiting for the good folks at [member=59331]TSO Products[/member] to bring out the TDS-10, you might want to try this method. 
 
[member=59331]TSO Products[/member] ... I've been wanting the Super Parf Dogs and guide rail clips ... can you tell me, will the guide rail clips fit into the back channel of the MFT/3 fence?  I'm interested how well they'd hold the fence in position and if it can whether it would be square to the bench dog holes.  If this doesn't work, it seems like a great new product!!

My interest is to add a Starrett adhesive measure to the front of the existing MFT/3 fence and be able to quickly slide it to the left 300-400mm, and lock it back down so it remains square.  I figure I can get wider cross cuts by simply aligning the fence up the the guide rail with one of my stainless steel rules as a spacer, set the tape, and then make a spacer block out of wood/aluminum extrusion which allows me to adjust the rail 300-400mm to the left for 1220mm wide cross cuts ... with this method I only need to add 300-400mm to whatever the tape measure says for wide cuts which is simple math.
 
[member=60777]Bugsysiegals[/member] – UJK’s Dog Rail Clips are designed to fit the T-slot on FESTOOL guide rails and loop over the 20mm tall Parf Dog or similar dog designs. They do not fit any extrusion on the MFT/3 table.

Note: the Track saw motor housing will not clear tall Dogs thus limiting the cutting width – especially on an MFT/3.
TSO’s Stubby Dogs solve that problem by providing enough height to capture the Dog Rail Clips while not interfering with the motor housing when cutting common sheet goods thicknesses.

Hans

 
Thanks Hans.  Did you mean the track saw will not clear the Parf Long Super Dog (120mm projection) but will clear the Parf Super Dog (60mm projection)?

If I buy the PLSD am I able to get the shaft only piece in order to convert it to a PSD when needed?
 
Can confirm after trying every other method using the MTR-18 and the tall pins is the most accurate way to square up a guide rail. Every product TSO makes is worth its weight in gold.
 
Bugsysiegals said:
Thanks Hans.  Did you mean the track saw will not clear the Parf Long Super Dog (120mm projection) but will clear the Parf Super Dog (60mm projection)?

If I buy the PLSD am I able to get the shaft only piece in order to convert it to a PSD when needed?
 

[member=60777]Bugsysiegals[/member] – YES, I do mean that the TS-55 motor housing will not clear a 60 mm projection above the table surface.
We sized our Stubby Dog to just do that and it rises only 40mm above the worksurface top.

To be able to have both a Parf Super Dog and a Parf Long Super Dog: buy the Parf Long Super Dog Adapter shaft as a spare part to go with the Parf Super Dog – not the other way round.  TSO stocks both the PSD and the Long Extension.

Hans

 
TSO Products said:
Bugsysiegals said:
Thanks Hans.  Did you mean the track saw will not clear the Parf Long Super Dog (120mm projection) but will clear the Parf Super Dog (60mm projection)?

If I buy the PLSD am I able to get the shaft only piece in order to convert it to a PSD when needed?
 

[member=60777]Bugsysiegals[/member] – YES, I do mean that the TS-55 motor housing will not clear a 60 mm projection above the table surface.
We sized our Stubby Dog to just do that and it rises only 40mm above the worksurface top.

To be able to have both a Parf Super Dog and a Parf Long Super Dog: buy the Parf Long Super Dog Adapter shaft as a spare part to go with the Parf Super Dog – not the other way round.  TSO stocks both the PSD and the Long Extension.

Hans

What plunge depth/material thickness allows the housing to clear 40mm?
 
Very strange, It seems Dave is using the 60mm Super Dogs and shows it clearing with 19mm board and says it will work on smaller boards somehow ... starts talking about 6m in and cuts around 7m.

[member=59331]TSO Products[/member], do you mean it will not clear if you use it without the guide rail?  Isn't Dave using the Super Dog with 19mm plywood and clearing it?  I believe he says you'll have the same clearance with thinner plywood which I don't get but good to know the facts before buying the wrong product.
 
[member=297]Michael Kellough[/member] and [member=60777]Bugsysiegals[/member]
you guys are sending me back to shop to measure - I'll report my findings here.

Do you recall which of Dave Stanton's videos has the demonstration you mention?

Hans
 
Bugsysiegals said:
Very strange, It seems Dave is using the 60mm Super Dogs and shows it clearing with 19mm board and says it will work on smaller boards somehow ... starts talking about 6m in and cuts around 7m.

[member=59331]TSO Products[/member], do you mean it will not clear if you use it without the guide rail?  Isn't Dave using the Super Dog with 19mm plywood and clearing it?  I believe he says you'll have the same clearance with thinner plywood which I don't get but good to know the facts before buying the wrong product.

If the housing clears 60mm on a 19mm workpiece then there will be even more clearance above a thinner workpiece.

Thicker workpiece=more plunge so the housing will be closer to the table surface. So, what is the minimum workpiece thickness to clear the 40mm tall Stubby dog? We’re talking about this in connection (puns accepted) with using the rail clips and dogs so use of a rail is included.
 
Michael Kellough said:
Bugsysiegals said:
Very strange, It seems Dave is using the 60mm Super Dogs and shows it clearing with 19mm board and says it will work on smaller boards somehow ... starts talking about 6m in and cuts around 7m.

[member=59331]TSO Products[/member], do you mean it will not clear if you use it without the guide rail?  Isn't Dave using the Super Dog with 19mm plywood and clearing it?  I believe he says you'll have the same clearance with thinner plywood which I don't get but good to know the facts before buying the wrong product.

If the housing clears 60mm on a 19mm workpiece then there will be even more clearance above a thinner workpiece.

Thicker workpiece=more plunge so the housing will be closer to the table surface. So, what is the minimum workpiece thickness to clear the 40mm tall Stubby dog? We’re talking about this in connection (puns accepted) with using the rail clips and dogs so use of a rail is included.

How is there more clearance with a thinner workpiece?  If the dog is 60mm above the table and the stock is 19mm and the fence is ~5mm, the dog would protrude 36mm above the fence whereas with a 16mm stock it would protrude 39mm making it closer to the saw???
 
TSO Products said:
[member=60777]Bugsysiegals[/member] – your post  “  FWIW - I set my MFT/3 up using the method Gregory Paolini showed on YouTube; however, unfortunately his method didn't align the fence or rail aligned with the bench dog holes.  Perhaps this doesn't matter for some people but I'd think we'd want everything in alignment with these holes for various use cases later”   

This brings to mind an exclusive feature of our Precision Triangles for squaring MFT/3 guide rails, especially when raising it to the height of, say 3/4” material” being cut.

Attached is a picture  showing this simple set-up for squaring the rail to the dog holes. We just added this feature to the newest upgraded version of the PTR-18 Plus Triangle – best value for an 18” Triangle on the market today. Our website doesn’t show it yet for the PTR-18  but that is what we are shipping on both 18” Triangles now, not just on the MTR-18 . The Stainless Pins are 25mm/1" tall above the Triangle.
https://tsoproducts.com/tso-products-precision-system-triangles/mtr-18-precision-system-triangle/

Hans

[member=10397]Hans[/member]

Looks like a nice product!

I don't mean this bad, really not, but 265 USD ? Did someone of the marketing/sales department dropped om their head? Whats under that beautifully blue finish, gold?  [eek]

I hope not, but I find this type of pricing really of the chart  [scared]

Maybe just me  :-[

Probably will get some flak for saying this, but well so be it ...
 
Back
Top