jonny round boy
Member
- Joined
- Jul 21, 2007
- Messages
- 3,223
Just done this job - client wanted timber shelving for both alcoves in their living room. They wanted the shelving to be strong, without a back (so you could see the wall colour behind) and a dark timber to match some other furniture in the room. I suggested using pine (cheap & readily available), and finishing with a combination of stain and wax.
The shelves are made from ex-9"x1" PAR boards, with a face-frame from ex-2"x1" PAR (scribed to the walls). The face frame covers sides, top, bottom, and the third shelf up. The reason for this is that they wanted the option to add doors to the bottom sections at some future point.
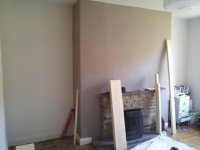
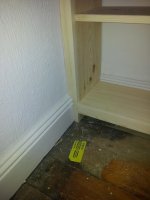
The room was newly decorated, but it's an old house (approx. 120 years old) and the walls were pretty lumpy. Here's the room beforehand:
[attachimg=1]
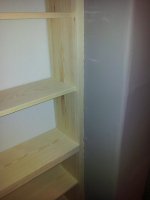
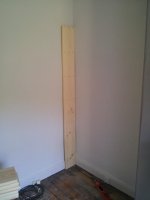
I started with the uprights, and scribed them around the skirting at the back (the lowest shelf was going to be below the skirting height, so that area would be seen), and cut domino slots for all the shelf positions:
[attachimg=2]
The uprights and shelves were not scribed completely to the back wall (except in one place where it was particularly uneven); this would have massively increased the time taken, and would never really be seen anyway as the client will be filling the shelves with books.
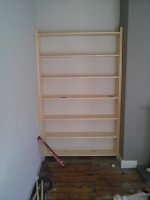
With both sides done, I could plumb them & get a measurement for the length of all the shelves:
[attachimg=3]
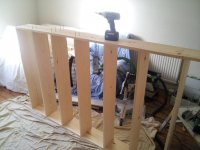
I then cut all the shelves to length on the Kapex, and dominoed the ends of each board to match the uprights. I also cut the rails for the face frame to the same measurement.
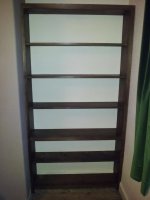
Once all the components were sanded, they were then assembled, and screwed together. I did put a small amount of glue on the dominoes, but the screws provide most of the strength:
[attachimg=4]
The next step was to fix the unit into the alcove. It was fixed with a combination of; screws under the lowest shelf into the skirting, screwed & plugged through the sides into the walls, and 'L' brackets on the top to the back wall.
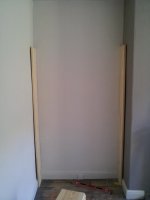
Next, the stiles for the face frame were scribed to the walls & around the skirting:
[attachimg=5]
Then the frame was dominoed together, and then sanded. The face frame was fixed just using dominoes and a little glue. No mechanical fixings used:
[attachimg=6]
[attachimg=7]
A quick sand to remove the pencil marks from the frame domino positions, and it was then onto the other side to repeat the whole process (there wasn't enough room to do both sides simultaneously).
The shelves were stained with a water-based 'French Oak' stain, applied with a foam brush. This is where I realised I'd made a MAJOR boo-boo. I'd decided it would be best to apply the finish after installation, rather than try to install it after finishing. I couldn't have been more wrong!
The stain was very, very watery, and was difficult to apply without getting it everywhere. At first I tried masking up the adjacent paintwork, but discovered two flaws with that plan; firstly, the stain was so watery it just bled under the tape; secondly, the tape, despite being low-tack Frog Tape, pulled some of the paint off the walls. [crying] Fortunately I forgot to take any pictures at this stage, so it obviously never happened! [big grin]
It was at this point that I was really glad I hadn't scribed all the back edges tight to the wall, as in most areas I could slip a sheet of coated paper between the timber & walls to act as a barrier whilst I got the stain on.
Once left for a couple of days to dry out, I went back to apply a couple of coats of dark brown wax. Again, in most areas I was able to use a sheet of paper to protect the paint as I applied the wax with a foam brush, and polished it off with a cloth.
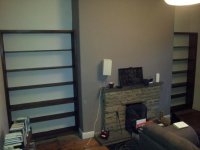
Here are the finished shelves, once the paintwork had been touched up where needed:
[attachimg=8]
[attachimg=9]
[attachimg=10]
[attachimg=11]
All in, it took two days to build, install and stain the shelves, plus a couple of hours on a third day to do the waxing (luckily I had a few odd jobs to do there in between applying coats, so it could dry out a little).
Jonathan
The shelves are made from ex-9"x1" PAR boards, with a face-frame from ex-2"x1" PAR (scribed to the walls). The face frame covers sides, top, bottom, and the third shelf up. The reason for this is that they wanted the option to add doors to the bottom sections at some future point.
The room was newly decorated, but it's an old house (approx. 120 years old) and the walls were pretty lumpy. Here's the room beforehand:
[attachimg=1]
I started with the uprights, and scribed them around the skirting at the back (the lowest shelf was going to be below the skirting height, so that area would be seen), and cut domino slots for all the shelf positions:
[attachimg=2]
The uprights and shelves were not scribed completely to the back wall (except in one place where it was particularly uneven); this would have massively increased the time taken, and would never really be seen anyway as the client will be filling the shelves with books.
With both sides done, I could plumb them & get a measurement for the length of all the shelves:
[attachimg=3]
I then cut all the shelves to length on the Kapex, and dominoed the ends of each board to match the uprights. I also cut the rails for the face frame to the same measurement.
Once all the components were sanded, they were then assembled, and screwed together. I did put a small amount of glue on the dominoes, but the screws provide most of the strength:
[attachimg=4]
The next step was to fix the unit into the alcove. It was fixed with a combination of; screws under the lowest shelf into the skirting, screwed & plugged through the sides into the walls, and 'L' brackets on the top to the back wall.
Next, the stiles for the face frame were scribed to the walls & around the skirting:
[attachimg=5]
Then the frame was dominoed together, and then sanded. The face frame was fixed just using dominoes and a little glue. No mechanical fixings used:
[attachimg=6]
[attachimg=7]
A quick sand to remove the pencil marks from the frame domino positions, and it was then onto the other side to repeat the whole process (there wasn't enough room to do both sides simultaneously).
The shelves were stained with a water-based 'French Oak' stain, applied with a foam brush. This is where I realised I'd made a MAJOR boo-boo. I'd decided it would be best to apply the finish after installation, rather than try to install it after finishing. I couldn't have been more wrong!
The stain was very, very watery, and was difficult to apply without getting it everywhere. At first I tried masking up the adjacent paintwork, but discovered two flaws with that plan; firstly, the stain was so watery it just bled under the tape; secondly, the tape, despite being low-tack Frog Tape, pulled some of the paint off the walls. [crying] Fortunately I forgot to take any pictures at this stage, so it obviously never happened! [big grin]
It was at this point that I was really glad I hadn't scribed all the back edges tight to the wall, as in most areas I could slip a sheet of coated paper between the timber & walls to act as a barrier whilst I got the stain on.
Once left for a couple of days to dry out, I went back to apply a couple of coats of dark brown wax. Again, in most areas I was able to use a sheet of paper to protect the paint as I applied the wax with a foam brush, and polished it off with a cloth.
Here are the finished shelves, once the paintwork had been touched up where needed:
[attachimg=8]
[attachimg=9]
[attachimg=10]
[attachimg=11]
All in, it took two days to build, install and stain the shelves, plus a couple of hours on a third day to do the waxing (luckily I had a few odd jobs to do there in between applying coats, so it could dry out a little).
Jonathan
Attachments
-
 20131114_101822.jpeg50.6 KB · Views: 1,947
 -
 20131119_161146.jpeg61 KB · Views: 1,928
 -
 20131119_161104.jpeg49.8 KB · Views: 1,939
 -
 20131119_161129.jpeg110.3 KB · Views: 1,947
 -
 20131119_161042.jpeg102.9 KB · Views: 2,043
 -
 20131114_161613.jpeg89 KB · Views: 1,925
 -
 20131114_161540.jpeg133.9 KB · Views: 1,885
 -
 20131114_142215.jpeg90.8 KB · Views: 2,062
 -
 20131114_133130.jpeg80.3 KB · Views: 1,947
 -
 20131114_111450.jpeg75 KB · Views: 2,009
 -
 20131114_111502.jpeg74.4 KB · Views: 2,057