Starrett combination out of square

ear3

Member
Joined
Jul 24, 2014
Messages
4,341
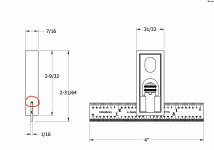
I just discovered that my Starrett combination square (the C11H head) is out of square -- I've triple checked it with all three 12, 18 and 24 rulers I use with it, and have repeated the error with all of them.  It's not off by a huge amount, but certainly more than one would accept from Starrett.  I've never bumped or dropped it, and with no visual sign of any damage on the head, I can't for the life of me think of when any error would have been introduced.  I assume I checked it for square when I first got it, but frankly, I can't remember at this point if I actually did.  I tend to use my Woodpeckers more for squaring up material, or setting a fence for mid panel joinery for the Domino, and the Starrett instead for marking off the edge, which is why perhaps I didn't notice it until now if there was a problem from the beginning.

Wondering if anyone had ever had luck going back to Starrett to get them to fix/replace something like this, well after the original purchase (I got the head in 2018)? 

 
It's easy to make adjustments to any of the combination squares like the Starrett C11H.  The steel rule rides on a shoulder in the housing, and the shoulder can be carefully filed down on the appropriate side to bring the tool back into square.  Here is a video that shows one method to make the adjustment.

 
The method of checking a square by striking a line, then flipping the square over and striking a second line has always troubled me. No one says; and you don't see anyone do it in videos; to check the edge you are placing the head of the square against. You're using two completely different sections of what is assumed to be a straight edge. It may be, but it could just as easily not be.

And in this video performing the initial check to an engineer's square with its fixed blade does also not guarantee the square you are testing is 'good'. Has that engineers square been checked against some standard with traceability? If not it is no better than what you are testing, maybe as bad or worse.
 
Edward, remove the blade from the head and check the edges of the blade for grit/burrs/gunk that may prevent the blade from registering properly. Here's a drawing of the side view of the slot assembly. A raised rib is in the middle and the blade edge rides on that rib. The space on each side of the rib is extremely small so also check for dirt in those tiny areas.

I'd give that small rib/slot area several shots of WD40 to remove any particles.

[attachimg=1]

Also check the lock bolt assembly that tightens and centers the blade for cleanliness issues. Again, WD40 is your friend.

[attachimg=2]
 

Attachments

  • 13A+ Detail.png
    13A+ Detail.png
    739.4 KB · Views: 867
  • PT99021.jpg
    PT99021.jpg
    37.3 KB · Views: 850
Bob D. said:
The method of checking a square by striking a line, then flipping the square over and striking a second line has always troubled me. No one says; and you don't see anyone do it in videos; to check the edge you are placing the head of the square against. You're using two completely different sections of what is assumed to be a straight edge. It may be, but it could just as easily not be.

And in this video performing the initial check to an engineer's square with its fixed blade does also not guarantee the square you are testing is 'good'. Has that engineers square been checked against some standard with traceability? If not it is no better than what you are testing, maybe as bad or worse.

You should be able to test the flatness/straightness of the reference edge with the ruler from the square you intend to test. Place its edge against the reference edge, look for gaps with a light on the far side, flip the ruler over and check the other side too. If the ruler is bowed, this will be exaggerated even more.
 
I’m sure Starrett can true it up again. I’ve found them to be extremely helpful. I have several squares; Starrett, Woodpeckers, et al. My check is to run the questionable combination square blade out and butt a trusted square against the 90 degree angle. I test to feel if there is any room to rock then hold the two up to a light to look for gaps.
 
"You should be able to test the flatness/straightness of the reference edge with the ruler from the square you intend to test. Place its edge against the reference edge, look for gaps with a light on the far side, flip the ruler over and check the other side too. If the ruler is bowed, this will be exaggerated even more."

I understand how to do it, my point is no one is saying do that before you test your square, so there is the possibility your results do not represent the true condition of the combination square. The error could be all in the edge your using and not the tool at all.

I use the edge of my table saw. I place a piece of painters tape on the CI top and draw my line with a .5mm mechanical pencil on the tape using the machined edge of the table as my reference which I have checked with a known good straight edge.
 
Bob D. said:
my point is no one is saying do that before you test your square

That seems a bad generalization at best. For instance these were my top Google hits:

What's actually less well-known is that most people use squares, especially combination squares, incorrectly. As both those videos show, people are checking the outside edge of the blade against the inside edge of the body. Squares are calibrated using both inside edges. So, you're now relying on the blade's two edges being parallel - and any discrepancy there will affect your readings. And woodworking "try" squares are typically only calibrated for the inside edges, which is why you can't test one by putting it inside another.

Now, you can "fix" your combination square to have blade outside to body inside squareness, but then you might find the inside to inside edge squareness is slightly off. For layout work, this kind of accuracy may be overkill.

The other problem with the "scribe a line" technique is that it itself is prone to error. You need to hold the pen at the same angle to the paper throughout the scribe. And there are issues with pencil and pen transfer. Better, but more destructive to your test materials, is to use a marking knife held properly.

In production, Starrett tests squares against known granite reference surfaces, with a strong light behind to visually see any gaps. Unfortunately, I can't find the old FWW article online any more.
 
Basically you have two choices, send it back to Starrett who offer a calibration service for older squares or have a shot at fixing it yourself if you feel confident enough to do that. Firstly you need to be sure you are using good technique when checking it because it really does need constant hand position to ensure a good result. Me, I would get a new plastic drawing square and compare it to that on a very flat surface. The plastic drawing squares are super accurate and I use them a lot. You may scoff at that but consider how accurate plans have to be when drawn by hand.
 
Sometimes...er make that...most of the time these utube videos do more damage than good. Anyone with a 1/2 oz of brain and a pound of logical deduction can and will prove that this UTube video is the BS that it is. This stuff is just plain goofy.

Taking a $120 precision instrument and then grinding the important surfaces with a piece of sandpaper and then declaring that it's perpendicular to...what and within what tolerance is just pure nonsense?

This is a great solution for a cheap $10-$15 square but this will never be acceptable for a precision square produced by Starrett or Brown & Sharpe. This stuff is just stupid and is part of the reason why the internet can both help and hurt...this is the hurt version.

 
Cheese said:
Sometimes...er make that...most of the time these utube videos do more damage than good. Anyone with a 1/2 oz of brain and a pound of logical deduction can and will prove that this UTube video is the BS that it is. This stuff is just plain goofy.

Taking a $120 precision instrument and then grinding the important surfaces with a piece of sandpaper and then declaring that it's perpendicular to...what and within what tolerance is just pure nonsense?

This is a great solution for a cheap $10-$15 square but this will never be acceptable for a precision square produced by Starrett or Brown & Sharpe. This stuff is just stupid and is part of the reason why the internet can both help and hurt...this is the hurt version.

I agree entirely especially when the check method is open to many errors. The plastic squares are cheap and on a good surface should give a reasonable indication of any problems. In the absence of a surface plate a jointer table or even the side of a well supported straight edge could be used for comparison using the two squares.
 
Back
Top