You are using an out of date browser. It may not display this or other websites correctly.
You should upgrade or use an alternative browser.
You should upgrade or use an alternative browser.
Systainer-compressor out of makita AC001
- Thread starter ka3ax
- Start date
Billy stray
Member
- Joined
- Jun 16, 2015
- Messages
- 316
Yup i agree, half the job is inside
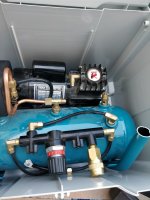
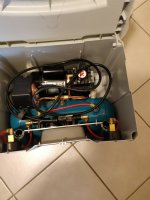
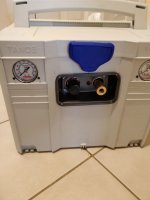
The compressor fits right but the motor had to be moved closer to the tank approx 1/5 of inch most of the Cage had to be cut off, air lines from the tank and from regulator had to be replaced due to the their length. I wanted to replace the on/off switch with padded one. But after research found out you cannot modify switch if the pressure switch and on /off built in together. Also the drain valve is not access I left anymore so you have to drain through the pressure releive at the top. All of that is to make sure the compressor is more compact, you can put something on top of it now and also "stick it" to the Schneider and Cadex with their $700USD price tag VS $350 CAD it costed me to build it.
- Joined
- Jul 8, 2007
- Messages
- 13,126
Cool project. How much time do you have invested in it?
Peter
Peter
Dick Mahany
Member
- Joined
- Jan 8, 2016
- Messages
- 555
Great job. It must be a little hair raising to cut up such a nice compressor to fit. Glad it worked out so well. You can expect a few copies of this idea.. [cool]
Thank you guys. In terms of the time its a bit tricky I dont remember cause at first I cut off the handle and had to find the material to mount the motor to the rest of the frame. It took about 3 hours. The fact that we live in the condo and the only place where I could work is the balcony. Did not help much. And the second time to finish was about 3-4 hours. But that was about 2 weeks later. Cause I had to gather the rest of the parts.
In terms of the drilling the hole to drain the air, I did not want to cause the hole will have to be fair Big to accomodate at least two fingers in order to drain it.
Secondly it would be just collecting the dust and other debries from the sites. I am thinking of extending the drain valve with drain kit and fishing and rerkuting it to the side where it will be reach able.
Secondly it would be just collecting the dust and other debries from the sites. I am thinking of extending the drain valve with drain kit and fishing and rerkuting it to the side where it will be reach able.
Billy stray
Member
- Joined
- Jun 16, 2015
- Messages
- 316


Billy stray
Member
- Joined
- Jun 16, 2015
- Messages
- 316
Looking good I thought I'd have mine done over the winter , i cracked the lid of the systainer and lost my mojo...
Billy stray
Member
- Joined
- Jun 16, 2015
- Messages
- 316
I assume everyone has seen the cadex..Billy stray said:Looking good I thought I'd have mine done over the winter , i cracked the lid of the systainer and
lost my mojo...
Attachments

Billy stray
Member
- Joined
- Jun 16, 2015
- Messages
- 316
I had no knowledge of the roll air  sweet
sweet
sweetBilly stray
Member
- Joined
- Jun 16, 2015
- Messages
- 316
Ok so I'm collecting parts to move on to phase 2 of my 1010 in a sys 4 project
I'm wondering if someone can help me out with the "plugit" set up , ive seen others use this but where do i get the male end that comes out of the systainer ?
I'm wondering if someone can help me out with the "plugit" set up , ive seen others use this but where do i get the male end that comes out of the systainer ?
Similar threads
- Replies
- 4
- Views
- 2K
- Replies
- 23
- Views
- 1K
- Replies
- 3
- Views
- 502