Mismarked
Member
- Joined
- Oct 8, 2014
- Messages
- 138
Here are some photos of the teak grill table and plant stand I posted about a while back during the build. Solid teak. West systems epoxy with dominos for the most part, but used G-flex epoxy on the end panels after a FOG member suggested that. Nice, but being used to the usual West epoxy, thickened or not, I made a mess with the G-Flex and would probably tape it off next time.
Anyway, this is the first real furniture project I actually completed, so don't judge too harshly. (Let's see if I managed to follow the photograph uploading tutorial properly)
[attachimg=1]
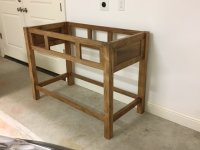
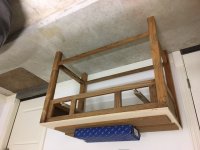
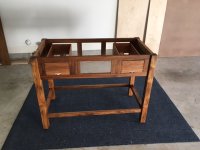
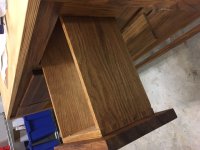
Basic frame
[attachimg=2]
Wooden runners for drawers; plywood to be covered on all sides with epoxy to support granite
[attachimg=3]
drawers without fronts attached
[attachimg=4]
drawer fronts installed
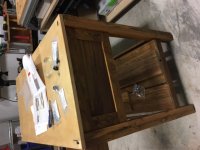
[attachimg=5]
white oak drawer cases with teak oil. Rockler dovetail jig worked okay, other than constantly dropping the boards when unclamping and trying to use my foot to keep them from hitting the ground.
[attachimg=6]
Side panel detail. Completely filled the bottom groove with the G-flex epoxy to hopefully keep the rainwater from collecting in the groove. The sides and top grooves are not epoxied to allow for expansion.
[attachimg=7]
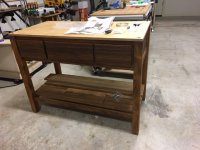
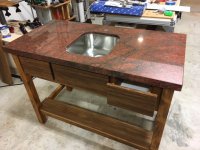
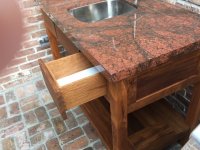
Granite top installed. Left over from slab used in a bathroom. The white drawer bottom is Starboard that loosely fits on cleats so that rain water won't collect and so that I can clean it easily if it gets grease from the grill tools.
[attachimg=8]
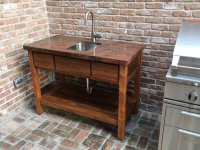
In place with plumbing installed.
[attachimg=9]
Another view of Starboard drawer bottom. Fortunately, with granite overhang, it has gotten zero water in the drawers despite heavy rains over the past month.
[attachimg=10]
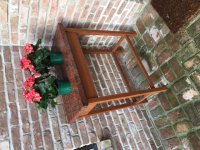
Another side table using the same left over granite slab.
Anyway, this is the first real furniture project I actually completed, so don't judge too harshly. (Let's see if I managed to follow the photograph uploading tutorial properly)
[attachimg=1]
Basic frame
[attachimg=2]
Wooden runners for drawers; plywood to be covered on all sides with epoxy to support granite
[attachimg=3]
drawers without fronts attached
[attachimg=4]
drawer fronts installed
[attachimg=5]
white oak drawer cases with teak oil. Rockler dovetail jig worked okay, other than constantly dropping the boards when unclamping and trying to use my foot to keep them from hitting the ground.
[attachimg=6]
Side panel detail. Completely filled the bottom groove with the G-flex epoxy to hopefully keep the rainwater from collecting in the groove. The sides and top grooves are not epoxied to allow for expansion.
[attachimg=7]
Granite top installed. Left over from slab used in a bathroom. The white drawer bottom is Starboard that loosely fits on cleats so that rain water won't collect and so that I can clean it easily if it gets grease from the grill tools.
[attachimg=8]
In place with plumbing installed.
[attachimg=9]
Another view of Starboard drawer bottom. Fortunately, with granite overhang, it has gotten zero water in the drawers despite heavy rains over the past month.
[attachimg=10]
Another side table using the same left over granite slab.
Attachments
-
 IMG_0513.JPG81.7 KB · Views: 729
 -
 IMG_0520.JPG97.2 KB · Views: 712
 -
 IMG_0531.JPG102.4 KB · Views: 716
 -
 IMG_0537.JPG112 KB · Views: 783
 -
 IMG_0538.JPG107 KB · Views: 693
 -
 IMG_0539.JPG103.7 KB · Views: 782
 -
 IMG_0544.JPG128.2 KB · Views: 796
 -
 IMG_0558.JPG148 KB · Views: 717
 -
 IMG_0559.JPG135.2 KB · Views: 789
 -
 IMG_0691.JPG175.2 KB · Views: 779