tiralie
Member
- Joined
- Jan 26, 2010
- Messages
- 3,614
I was asked by a client that I have been doing quite a bit of work to "fix" some stairs that were installed in an new addition to her home. Along with fixing the stairs that take you from the landing to the basement, the client also wanted me to make 2 steps for a floating stair.
The contractor had installed these stairs while they worked and they have been in use by the client for the last 6-9 months.
[attachimg=1]
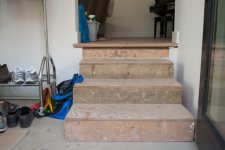
These contractor steps were patched together and created a real challenge and an accident as they are poorly spaced.
Here is the space after the old contractor steps were removed.
[attachimg=2]
The clients architect had drawn up a fanciful Jules Vern looking structure which my client didn't like so she called a local metal fabricator and had him start to build a single stringer floating step. When the contractor finished his stringer and tried to install it, I discovered he had measured or calculated incorrectly and had not left enough room leaving the bottom riser an 1" too short.
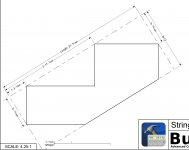
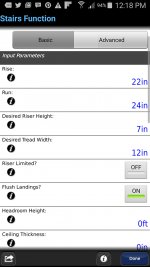
I redesigned the stringer using the Advanced Stair Function in the BuildCalc app. on my Android.
[attachimg=8]
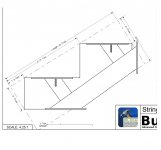
I entered the total rise which is the vertical distance from the landing floor to the main floor, the step width, 12" and thickness , 1 3/8". BuildCalc calculated the result and out put the drawing below.
[attachimg=3]
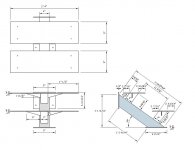
I then took this drawing and imported it into Sketchup and used it to create the correct angles in two dimensions for specifying a new single stringer floating step.
[attachimg=4]
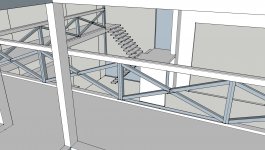
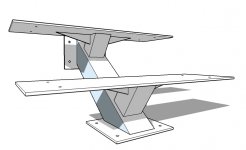
This is a single stringer staircase has a 4″ x 4″ steel tube structure. The 3/8″ tread plates are supported by 3″ steel tube riser posts that are welded to the center support. I added some supporting brackets.
As you can see from the drawing, I moved my stringer to a sharper angle than the stringer specified in the BuildCalc drawing. I wanted to make sure that the steps hid as much of the supporting structure under the step as possible to give a great illusion of a floating step.
Once I had all the structure drawn I created a 3D drawing to check how the stringer and would appear after the wood treads were added.
[attachimg=5]
Once I was satisfied, I generated a plan drawing in Sketchup Layout and sent it by email to my fabricator.
[attachimg=6]
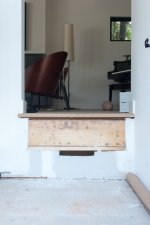
He powder coated it in black, I picked it up and installed the white oak steps. That evening my clients husband while going up the steps, tripped, fell and broke a bottle of red wine on the wood and sliced his hand open.
[attachimg=7]
Tim
The contractor had installed these stairs while they worked and they have been in use by the client for the last 6-9 months.
[attachimg=1]
These contractor steps were patched together and created a real challenge and an accident as they are poorly spaced.
Here is the space after the old contractor steps were removed.
[attachimg=2]
The clients architect had drawn up a fanciful Jules Vern looking structure which my client didn't like so she called a local metal fabricator and had him start to build a single stringer floating step. When the contractor finished his stringer and tried to install it, I discovered he had measured or calculated incorrectly and had not left enough room leaving the bottom riser an 1" too short.
I redesigned the stringer using the Advanced Stair Function in the BuildCalc app. on my Android.
[attachimg=8]
I entered the total rise which is the vertical distance from the landing floor to the main floor, the step width, 12" and thickness , 1 3/8". BuildCalc calculated the result and out put the drawing below.
[attachimg=3]
I then took this drawing and imported it into Sketchup and used it to create the correct angles in two dimensions for specifying a new single stringer floating step.
[attachimg=4]
This is a single stringer staircase has a 4″ x 4″ steel tube structure. The 3/8″ tread plates are supported by 3″ steel tube riser posts that are welded to the center support. I added some supporting brackets.
As you can see from the drawing, I moved my stringer to a sharper angle than the stringer specified in the BuildCalc drawing. I wanted to make sure that the steps hid as much of the supporting structure under the step as possible to give a great illusion of a floating step.
Once I had all the structure drawn I created a 3D drawing to check how the stringer and would appear after the wood treads were added.
[attachimg=5]
Once I was satisfied, I generated a plan drawing in Sketchup Layout and sent it by email to my fabricator.
[attachimg=6]
He powder coated it in black, I picked it up and installed the white oak steps. That evening my clients husband while going up the steps, tripped, fell and broke a bottle of red wine on the wood and sliced his hand open.
[attachimg=7]
Tim
Attachments
-
 OldSteps.jpg710.7 KB · Views: 1,756
 -
 BackStep.jpg737.6 KB · Views: 1,704
 -
 BuildCalcStringerLayout.jpg558 KB · Views: 7,442
 -
 2StepStairWBuildCalcDrw.jpg133 KB · Views: 1,838
 -
 2StepStairDrawing.jpg91.2 KB · Views: 1,617
 -
 TwoStepPlanDrawing_1.jpg56.5 KB · Views: 1,606
 -
 3Qrtr2Step.jpg942.1 KB · Views: 1,581
 -
 BuildCalcScreenShot.jpg160.1 KB · Views: 1,461