The Domino Cross Stop Minimizes Pencil Lines and Improves Precision

ChuckM

Member
Joined
Sep 7, 2015
Messages
5,732
The cross stop is not just for edge joining tasks. It can be used for any repetitive mortising work.

Recently, I came across a Festool video on making face frames. Pencil lines were used and tight-to-wide mortise setting was demonstrated. Anytime tight-to-wide setting is used, it means pieces need to be aligned properly during clamping. Almost all pencil lines and alignments will be made unnecessary if the cross stop/trim stop and tight-to-tight setting are used in a face frame operation.

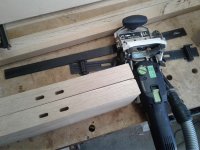
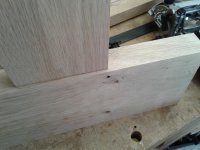
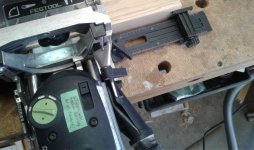
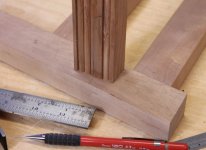
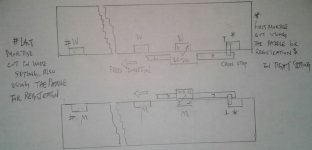
Here's a similar example to a face frame's drawer rail: Making a T-joint on 6 boards without marking lines on all of them. Placement lines were made on only one piece which were then used to set the cross stop. The tight/standard setting was used on all pieces.


Attachments

  • 20210414_161047 (Large).jpg
    20210414_161047 (Large).jpg
    304.1 KB · Views: 859
  • 20210414_161326 (Large).jpg
    20210414_161326 (Large).jpg
    278.3 KB · Views: 722
  • 20210414_161138 (Large).jpg
    20210414_161138 (Large).jpg
    262 KB · Views: 739
Although I am not a very experienced user of the Domino the only reason I can think of to use tight to wide settings is to allow for timber expansion. I have never had alignment issues relying on accurate marking of both pieces.
 
Your eye sight must be far better than mine. Pencil lines -- which I've tried with 0.3mm (e.g. Pentel 120), 0.5mm and 0.7 mm leads) -- sometimes work for me, but sometimes I'm off a hair. I therefore try to avoid using placement lines by registering with the paddles or pins on the cross stop wherever possible.

But at times, pencil lines are the only way to go. I pay extra attention on those occasions.
 

Attachments

  • placement lines.JPG
    placement lines.JPG
    62.4 KB · Views: 517
The beauty of woodworking and the Domino is there are multiple methods of achieving excellent results. Tight-tight, tight-wide, or wide-wide methods can all produce good results.

I’ve been using the Domino 500 and 700 for many years. I’ve settled on tight-tight for the first set of mortises and tight-wide for all the rest. Works for me.
 
Birdhunter said:
Snip.
I’ve settled on tight-tight for the first set of mortises and tight-wide for all the rest. Works for me.

Same here for most Domino work with only a few exceptions.
 
Chuck,

I agree with you. I ignored the Cross Stops for close to a year. I recently pulled them out of the box for a job where the built-in stops were too close to the end. They worked perfectly. No matter how good your eyes are, indexing to a physical stop is always going to be more precise than aligning by eye.
 
Birdhunter said:
I’ve settled on tight-tight for the first set of mortises and tight-wide for all the rest. Works for me.

My method too. And when you do the tight-tight with the paddle as off set the results are great every time. It’s a no brainer.
 
Are you using the tight-tight, tight-wide method for critical joints, like rail/apron to table leg?
 
If strength is critical, I always use the tight setting for all mating pieces, including when using double and/or twin tenons, although some may argue that the face grain in a tight to wide mortise offers enough glue surface. Better tight than...sorry. [big grin]
 
Yeah, I definitely use the tight-tight, unless it's only for alignment. I mean, you wouldn't cut a real mortise & tenon joint with sideways slop.
 
Lincoln said:
Are you using the tight-tight, tight-wide method for critical joints, like rail/apron to table leg?

I don't for short joints like legs or stretchers, but longer runs like large panels yes, tight-wide.
I sometimes make very large architectural panel units or column wraps. These generally have to be assembled in the field by someone else, so I have to make them as easy to reassemble as possible.
 
I was hoping someone can help or comment.  I have just bought and received a cross stop.  There is not tons of information and it seems very simple.  I am joining boards for a wardrobe doors, and been using tight to tight - up to today - by pencil marks and they fit perfectly.  However to avoid pencil marks this seems  great idea. 
However the left and right cross stops are a good 1 mm out!  After 16 dominos ~2m... there is almost 2/3 of a domino difference (8x40).  Never again... its going in the bin UNLESS i simply dont understand how to use it properly!  The left and right stops are set at exactly the same nots for 15cm distances between dominos.  Help or bin?  Thanks in advance, Mark
 
woof woof said:
Snip. 
However the left and right cross stops are a good 1 mm out!  After 16 dominos ~2m... there is almost 2/3 of a domino difference (8x40).  Never again... its going in the bin UNLESS i simply dont understand how to use it properly!  The left and right stops are set at exactly the same nots for 15cm distances between dominos.  Help or bin?  Thanks in advance, Mark
First, you're right that there's little official info. on how to use it from Festool. None? The promo video looks simple and easy, but it's not really the case.

Before you try my procedures shared here, check that the paddles on your machine are properly set. If not, refer to the manual on how to tune it in alignment.

The big reason why your mortises didn't line up is two-folded: 1)  Most likely, you used tight setting for all the cuts, and 2) When used in tight setting, if any one of the previous mortises was milled slightly off, the rest of them would be off in a compound manner.

Here's how I use the cross stop with success every time. Refer to the drawing as you read the steps:

1) Cut the first mortise on both mating pieces in the tight setting using the paddle to register (that's why I suggested that you check them for alignment first)
2) Set the width to the wide (middle) setting
3) Cut the last mortise on the other end of the two boards using the paddle again for registration
4) On the first board, use the right arm (R) of the cross stop to register against the first tight mortise, and mill the next mortise (wide)
5) Repeat step 4 but registering against the freshly milled wide mortise until all the mortises are milled
6) Proceed to the second mating board, and use the left arm (L) of the cross stop to register against the first tight mortise to mill the second mortise (wide).
7) Repeat step 6 registering against the just milled wide mortise to mill the rest of wide mortises.

In the end, only two tight mortises are cut (for alignment) and the rest wide. This allows you to put the two boards together with ease even if any or all of the mortises are milled slightly off.

Try this on scrap boards first!
 

Attachments

  • Cross Stop.JPG
    Cross Stop.JPG
    59.1 KB · Views: 478
ChuckM said:
Snip.
Recently, I came across a Festool video on making face frames. Pencil lines were used and tight-to-wide mortise setting was demonstrated. Anytime tight-to-wide setting is used, it means pieces need to be aligned properly during clamping. Almost all pencil lines and alignments will be made unnecessary if the cross stop/trim stop and tight-to-tight setting are used in a face frame operation.

This video (from 0:50) shows that face frames can be done without pencil lines...when using the cross stop (and all in the tight setting):
=50s

The cross stop is an under-appreciated accessory.
 
woof woof said:
Snip. Help or bin?  Thanks in advance, Mark

I think I missed this part of your post.

You can easily fix the misalignment: locate the mortises that are misaligned, make pencil lines on one of the boards and mortise them again to widen them slightly (with the tight setting if appropriate). There's no need to make adjustments on both boards.
 
Chuck - many thanks for your highly detailed reply.  AT the weekend I will give this another go.
So far though, I did measure distances either side between left and right cross-stops and the machine and there was 0.05mm difference.  I noted you can adjust this from the instruction sheet, and did so so that both sides are now exactly the same distance (by vernier anyway!).  So I will line up and give this another go using the tight fit - this time on scrap - and see what the difference made once 10 mortices side-by-side but avoiding any "splinters" if generated.  I will update on any progress but did want to make sure this was not just an unsolicited rant from me! 

I do agree that this is meant to work best tight... then loose for the remainder.  I guess my problem is that I am finally ditching my biscuit jointer (a very good one though my lamello may be) to have more precision.  But I do appreciate the tolerances in joinery too.  It would  have been so very good to be able to adjust the loose-fit settings to something like 2 mm.  Maybe in future generations, its just the gaps between floating tenons and the mortices make me nervous, and a reminder of slipping biscuits!

 
woof woof said:
Chuck - many thanks for your highly detailed reply.  AT the weekend I will give this another go.
Snip.

When you retry  (if all in tight setting only), make sure that the mortises milled are clean, that's, the outside corners have no debris left as that could affect each pin registration (and the compound error could kick in). In addition, apply even pressure when registering the cross stop pins against each mortise. (Also check that the pins on the cross stop are set to the same distance from the cutter.)
 
ChuckM said:
woof woof said:
Chuck - many thanks for your highly detailed reply.  AT the weekend I will give this another go.
Snip.

When you retry  (if all in tight setting only), make sure that the mortises milled are clean, that's, the outside corners have no debris left as that could affect each pin registration (and the compound error could kick in). In addition, apply even pressure when registering the cross stop pins against each mortise. (Also check that the pins on the cross stop are set to the same distance from the cutter.)

That ^ is important.  When you place the pin in the mortise, just put it against the mortise. Don't  pull  it tight. If you pull it tight the distance will get stretched a tiny bit on each one. That error will stack up as you move along a row of mortises.

Seth
 
woof woof said:
So far though, I did measure distances either side between left and right cross-stops and the machine and there was 0.05mm difference.  I noted you can adjust this from the instruction sheet, and did so so that both sides are now exactly the same distance (by vernier anyway!).

Where is this instruction to adjust the outrigger/cross stop?  My R one is off by less than a 1/2 mm, but my L is off by almost exactly 1/2 mm.

I'll make it work, but it's obviously less than ideal to have this non-pencil (quicker) method be negated by inaccuracy.
 
I use extremely tight tolerances where necessary but not when applications do not need tight tolerances. Very few of my woodworking applications require or benefit from using tight to tight mortises. Using tight to loose mortises requires just a couple of hammer taps to achieve perfect alignment. Less stress fewer bad words!
 
Back
Top