The Kapex Butterfly

Mario Turcot

Member
Joined
Nov 26, 2017
Messages
1,288
Introducing the Kapex butterfly  [big grin]

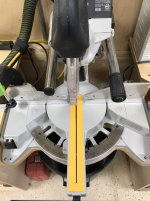
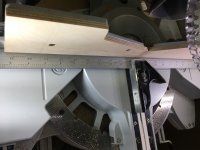
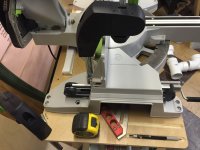
I was not pleased with my previous Kapex stand, I decided to go wild. The goal was to reduce accumulation of dust under the Kapex.
[attachimg=1]

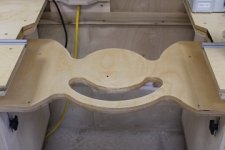
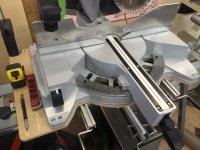
Most dust not captured by the CT should end up in the trash bin  [big grin]
[attachimg=2]

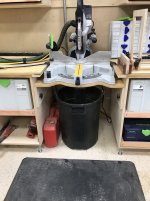
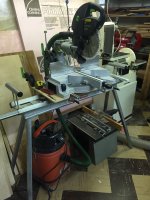
I still have to make a few stop block for repeating cut but it's all functional  [cool]
[attachimg=3]
 

Attachments

  • kapex-butterfly.jpg
    kapex-butterfly.jpg
    39.5 KB · Views: 2,171
  • topview.jpg
    topview.jpg
    171 KB · Views: 2,216
  • backview.jpg
    backview.jpg
    185.6 KB · Views: 2,162
  • kapex-butterfly.jpg
    kapex-butterfly.jpg
    39.5 KB · Views: 711
  • topview.jpg
    topview.jpg
    171 KB · Views: 623
  • backview.jpg
    backview.jpg
    185.6 KB · Views: 600
Looks great!

What about the dust behind the saw, isn't that dropping behind your bucket?

How about a funnel-ish behind that drops into the bucket?
 
Thank you [member=62969]lshah72414[/member] for the kind words  [smile]

[member=65767]threesixright[/member] you know at the beginning I was planning to put a three faces funnel but. After putting the trash bin under the saw, I realized that there was not enough room (6"-8"), or the slope would be too minimal. I may end up building a saw dust wood box to have it lower and put a funnel like you said.
 
Nice job. I like the knobs that allow you to level the saw if ever needed.
 
Mario Turcot said:
[member=65767]threesixright[/member] you know at the beginning I was planning to put a three faces funnel but. After putting the trash bin under the saw, I realized that there was not enough room (6"-8"), or the slope would be too minimal. I may end up building a saw dust wood box to have it lower and put a funnel like you said.
Yeah something like, maybe cut a ½ circle in there that would fit (½) the bucket  8)
 
ChuckM said:
Nice job. I like the knobs that allow you to level the saw if ever needed.

In my previous attempts it's always been a problem to get the surface of both sides plane with the Kapex bed. That time I gave myself  some leverage  [wink]

The butter fly slides on those adjustable boards (holders), All I need to do is put a stopper in the back  [smile]
 
ghjaxman said:
Nice.  Now we just need the SVG file so I can cut it out with a Shaper Origin.  [big grin]

Ahaha I wish I had a 3D scanner. Would be a piece of cake  [wink]

That was fun & easy to make. Sat the Kapex on a board and trace contours. Made a few 2" 1/2 holes with a forstner bit, jigsaw the smily and band saw the contours. If you wonder about sagging, the board is made of 2x 18mm baltic birch ply laminated together.
 
Good Idea on the dual Baltic Birch.  I will have to draw something up on Inkscape for the pattern.  Great Idea.
 
Very nice job Mario, and functional.
I have to sort something out for my Kapex, it spends most of it’s time in the workshop, and often with the extensions. Dust collection is fine, as I use a short 36mm hose on the port, and a large hood angled at the rear and base. It’s a bit Heath Robinson at the moment though, as the saw gets moved a lot.

So I’m looking to make a functional but portable solution, you’re idea has prompted some other thought.  [thumbs up]
 
Jiggy Joiner said:
So I’m looking to make a functional but portable solution, you’re idea has prompted some other thought.  [thumbs up]

Well Jiggy, here's my solution. I also used the butterfly approach using 12 mm BB. I wanted to include a little extra bit of real estate to hold useful items.

This is mounted to an old Milwaukee miter saw stand so it's completely portable if needed.

[attachimg=1]

The ply is light weight and holds a couple of pencils, tape measure, square, holes for an extra hold down along with 2 hex keys.

[attachimg=2]

A package of zero kerf inserts live on the rear extension.

[attachimg=3]

Don't forget to add an 8 mm BB zero clearance fence

[attachimg=4]

However, if you want to be able to still pivot the hold downs into position rather than removing & replacing them, you'll have to nip off one of the points.

[attachimg=5]

[attachimg=6]
 

Attachments

  • 4294_S.jpg
    4294_S.jpg
    424.7 KB · Views: 1,601
  • 4288.jpg
    4288.jpg
    627.9 KB · Views: 1,593
  • 2167.JPG
    2167.JPG
    783.2 KB · Views: 1,665
  • 1972.JPG
    1972.JPG
    865.5 KB · Views: 1,682
  • 1886.JPG
    1886.JPG
    913.9 KB · Views: 1,651
  • 4293.jpg
    4293.jpg
    516.9 KB · Views: 1,585
Well done [member=44099]Cheese[/member] Why didn't you post that earlier you slacker  [tongue]
 
Mario Turcot said:
Well done [member=44099]Cheese[/member] Why didn't you post that earlier you slacker  [tongue]

[scratch chin]  Ya got me on that one Mario...
 
That's really nice Cheese, and would solve my always looking for my pencil problem amongst other things.
The problem I have with making a butterfly, is my saw is on the UG base/stand, as it gets used a lot with the extensions. so I'm limited to some extent.

 
Back
Top