Thin Rip Guide

Birdhunter

Member
Joined
Jun 16, 2012
Messages
4,144
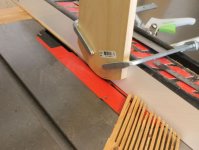
I know this tool has been discussed before and there are many ways to accomplish the same function, but I find the guide to be extremely useful in reproducing thin trim pieces for the boxes I like to make.

I’m making a box for a friend’s cremains and need to cut trim pieces from scrap ebony of various sizes.

The guide made the task effortless.
 
[member=15289]Birdhunter[/member] , ar you talking about the Woodpeckers Thin Rip Guide?

Peter
 
Good concept. Make that ripping jig more versatile by making the fences adjustable.
 
eschumac said:
And there is this guy


Full points for enthusiasm but I think the other guys processes and jigs are better, around the 13:50 mark the video illustrates why it's not for the faint hearted or inexperienced.
 
The third video is way too long for my taste, so I didn't finish it (to find out how his method really works). On that count, if I needed to follow and adapt any of the three methods, one of the first two would be the choice. But I have had no problem ripping thin strips before -- even long narrow ones, as long as 3 feet long or so -- so I'll stick to the techniques I'm familiar with.
 
ChuckS said:
The third video is way too long for my taste, so I didn't finish it (to find out how his method really works). […]

I agree. 

My journalism professor remarked on one of my papers, “Terse.  Pithy.  To the point.  Excellent job.” (Using redundant phrases here was his idea of humor.)

The video maker could have benefited from that same college course.  Even modest editing would have brought that entire video to 5 or 6 minutes and would have kept my attention. 

I think a terse, pithy and to the point editing job would result in a 4 minute video.  This failure to tightly edit videos is endemic online.  People should call them out on that point.

Separately:

When I had a lot of strips to rip, I bought a thin rip blade.  It saves a lot of material.

I made a special jig.  The method he uses seems to invited kick back/up.
 
Packard said:
ChuckS said:
The third video is way too long for my taste, so I didn't finish it (to find out how his method really works). […]

I agree. 

My journalism professor remarked on one of my papers, “Terse.  Pithy.  To the point.  Excellent job.” (Using redundant phrases here was his idea of humor.)

The video maker could have benefited from that same college course.  Even modest editing would have brought that entire video to 5 or 6 minutes and would have kept my attention. 

I think a terse, pithy and to the point editing job would result in a 4 minute video.  This failure to tightly edit videos is endemic online.  People should call them out on that point.

Separately:

When I had a lot of strips to rip, I bought a thin rip blade.  It saves a lot of material.

I made a special jig.  The method he uses seems to invited kick back/up.
Potential kick back wasn't the only issue, he was using painters tape as a zero clearance insert, and at one point when pushing the material through it caught and dug into the empty space under the tape. Just not practical or safe I reckon.
 
I love the variety of ideas to adapt to your own approach.

Am I the only one that skips around videos and watches them at 1.75 speed?
 
To feed and cut long strips on the table saw, I go with a jig period furniture maker Chuck Bender came up with:

[attachimg=1] 

The curved jig is set at a height same as the thickness of the thin strip.

Note: I set the riving knife flush with the blade's teeth on the right, rather than on the left as suggested in the user manual. That set-up keeps the leading part of the strip against the fence once it passes the blade.
 

Attachments

  • c bender strips.JPG
    c bender strips.JPG
    62 KB · Views: 780
  • c bender strips 2.JPG
    c bender strips 2.JPG
    53.5 KB · Views: 138
The last part was fed through with a scrap stick. The jig kept everything down, eliminating any vibration from the sawing.
 
I use the method described in the Woodsmith article. The jig takes 5 minutes to make from scrap lumber.  It seems safe, and is efficient.

w179_040a01.jpg

https://www.woodsmith.com/article/ripping-thin-strips-2/
 
The problem I have with the Packard guide is if I have to come back later and cut another thin strip of the same thickness. Once you move the fence, you are into setup mode.

The WP guide eliminates this problem.
 
Birdhunter said:
The WP guide eliminates this problem.

The WP guide requires you to move your fence for every next piece, right? That’s what I don’t like about that method.
 
Birdhunter said:
The problem I have with the Packard guide is if I have to come back later and cut another thin strip of the same thickness. Once you move the fence, you are into setup mode.

The WP guide eliminates this problem.

When I ripped the strips, I noted on the strip guide the fence setting.  So getting additional strips only required that I set the fence exactly on 3/16”.

Whenever I cut narrow strips, I always use an actual fence marking, and not something “a little more than…” or “a littles less than.”

There might be a situation where that won’t work, but I have not come across it yet.

Getting a perfectly fitting dado can make me a little crazy, but setting the fence does not.
 
Back
Top