Three Season Room

Bob D.

Honorary Member
Member
Joined
Feb 22, 2016
Messages
3,014
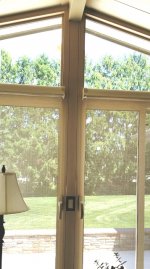
Hi, need some quick help if anyone can. I'm in the middle of a project at my house getting ready to install a ceiling fan in our sunroom. The column where I can to run the cable up to the fan is covered with an aluminum cap which is friction fit into the channel. It's a tight fit.

I remember watching them install after they hooked up the light (that's the switch you see in the photos) and they had to tap (to put it nicely) it in with a white rubber mallet. It took some force to seat it not a simple snap it in.

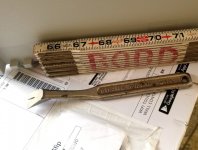
I have no problem running the electric or installing the fan, my question is what is the best way to remove this trim piece without damaging it. I started to pry it off but it is very tight and I risk kinking the aluminum even though it is about 2mm thick. I doubt I can get a replacement easily. I have to remove it up to the top. Then once I get the cover off I need to make an opening for the cable to come through and run across the bottom of the beam in metal wiremold raceway to the fan box I will mount to the beam.

Do you think lifting the one side and rolling it out is the way to go or continue the way I am and bring it out flat but that seems to have more risk of bending.

I'd rather ask a dumb question than screw it up. :-)
 

Attachments

  • 20200601_Sunroom 01.jpg
    20200601_Sunroom 01.jpg
    118.7 KB · Views: 388
  • 20200601_Sunroom 02.jpg
    20200601_Sunroom 02.jpg
    207 KB · Views: 411
Hello Bob

Nice back yard.  [big grin]

My first thought is to heat and bend something into a tight  "J" and use it like those tools the vinyl siding guys that can 'unzip' pieces of vinyl siding.
 
With all due respect, I'm going to disagree with [member=6193]Rob Z[/member].  If you can get to the point shown between the blue box and the aluminum extrusion, I'd suggest using a combination of a good set of channel lock pump pliers and an upholsterer's tack puller.  Use the pliers to gently compress the steel track while slipping the tack puller perpendicular between the aluminum extrusion and the steel track from the outside and gently prying upwards to start the extrusion off the track.  Once one end of the extrusion has been lifted off, gently pull that free end out while using the tack puller to assist getting the remainder of the extrusion free of the track.  Make sense?  [smile]
 
Thanks Rob,

No room to get a hook, even a flat one, in alongside. I ended up getting the end of my claw hammer under the end next to the switch box and using a piece of wood to protect the finish was able to lift it up to get started. Once I had a couple inches up I had something to grab with gloves on (sharp edges) and pulled if off the rest of the way.

Then I just peeled it out. I tried rolling it off to the side but that I could see was going to put a twist in it. So I opted to just lift it out flat which because of the force required and nothing to pry off of behind it I ended up with a curl. But I can flatten it out without a crease or kink so it will be fine.
 
In that closeup photo it looks like there is more room than there really is because that was taken after I started to lift it out then had second thoughts. At that point I had enough room to use (believe it or not Willy) my trusty tack puller and my claw hammer later on with a block of wood as a cushion to get it out.

Got that tack puller at a yard sale for $0.25. Best quarter I've spent since my last pin-ball game about 50 years ago. :-)
 

Attachments

  • 20200601_164331.jpg
    20200601_164331.jpg
    129.5 KB · Views: 350
Good that you made it!

I was just reading, and suggest a wide pry bar. I have several in various sizes and brands.
My favourites are Vaughan’s super bar and Estwing’s. Besides my hammers these are tools that’s always with me. I lift, pry, lever, scrape, hammer and chisel with them. Most valuable are that they provide a large contact area that don’t leave marks (well, it depends on the force.. [big grin]) But with additional backing with a piece of wood these lever with a considerable force without destroying.
 
Good point. I should have taken a trip out to the shop and grabbed one of my pry bars. I have an assortment also from Estwing and others. I was working out of the basement shop, which has a smaller collection of tools and most of my Festools are housed there.
 
Bob D. said:
Got that tack puller at a yard sale for $0.25. Best quarter I've spent since my last pin-ball game about 50 years ago. :-)

Bob,

Glad to hear that the problem is solved.  Speaking of pinball, one of my best buddies  in Jr HS had a pinball machine in the playroom by the pool. And we didn't have to use coins to play!  Good times ! LOL [big grin]
 
I just wanted to close this out and say it all went back together like nothing ever happened. The piece I had to remove was curled a bit and I flattened it for the most part but it still had a bow to it. However, when I got it back in which required the using a white rubber mallet and a block of softwood so as not to mar the finish it looks perfect. The channel cover sits flush just as it did before I started. For this style sunroom this is about the only place you can put an outlet or a switch without doing a surface mount. An old work box will slip in there just right and the width of the cover is within a mm of a standard switch or outlet cover. I'll try to remember to grab a photo to show how it fits but you can see the one switch in the first post. I just added a second one right above it.
 
Back
Top