Tips for working with aluminum

It looks like I have it worked out, in a couple of ways.
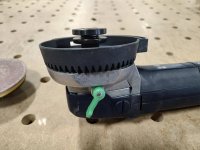
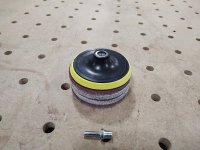
I got a 5" pad with direct 14mm threading. The height is almost exactly the same, within a mm or 2.
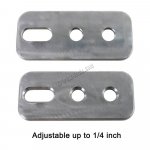
But, because of the diameter difference, it does rub. I'll just make a spacer to keep it from going so deep, easy. I didn't recall seeing it in the description of the pad, but it came with 50 pieces of 100 grit abrasive and the little 1/4" shank arbor/adaptor came with it too.

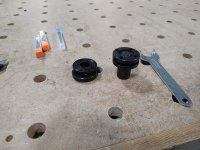
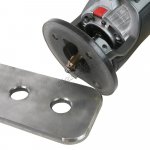
I also found a flange mounting arbor that is direct threaded, converting to 5/8-11. The two flanges and nuts, plus the pin-spanner, were separate. With this I will be able to use flap wheels, grinding wheels, or even cup wheels (wire)

$43 for all of it.
 

Attachments

  • RAS1155inchpad.jpg
    RAS1155inchpad.jpg
    262.1 KB · Views: 1,682
  • RAS adapter.jpg
    RAS adapter.jpg
    350.3 KB · Views: 1,719
  • RAS115arbornut.jpg
    RAS115arbornut.jpg
    200.8 KB · Views: 1,665
  • RAS115pad.jpg
    RAS115pad.jpg
    410.3 KB · Views: 1,672
So the Million $ question is ...does that work with the standard RAS dust collection shroud? And what discs are you planning to use with that back-up pad? Surface conditioning discs (Scotch-Brite) or surface removal discs such as Cubitron II?

What I've found out is that making things work with different components is one level, but making things work with different components while still retaining the dust collection capabilities is another level completely.

I embrace the first level because functionally it's a prudent position and prior to 10 years ago that wasn't even a consideration. But the second level is really the meat on the bones. It's the Dali Lama equivalent to "you will receive total consciousness".  [big grin]
 
No, it's not going to work with the brush. Any increase in diameter will take that out of the picture immediately. I have never really embraced the dust collection aspect of the RAS in the first place. The brush takes the "feel" out of it. I generally use the RAS pretty aggressively, with coarse abrasive, as a smoothing/blending tool. To use it "flat" is nearly impossible with the brush in place, so I removed it, long ago. Then when I found out that it is virtually irreplaceable? Why bother.
Also, when used in a tipped fashion, the dust collection is pretty ineffective anyway, and once you get the offset of a flap-wheel in the mix, the brush is going to be so far away as to be useless.
I'm just looking to increase the effectiveness of the machine by adding to the variety of discs it can use.
The original Festool backing pad has the proprietary hooks, which is a limitation on it's own, this gets me into the more common hook and loop.
The thread adapting arbor and flanges was just a bonus that came up in the investigation.
 
Just noticed that 3M has released a new Cubitron™ II formulation with a re-shaped PSG geometry. It's only available in belt form and only in 36 grit. 3M refers to the new belt product as 984FX Pro.
https://www.rshughes.com/search.htm...0xaHZqF_BsAzSPy0hnIgIE0u3_pK6iBxOLY0o=.WjJzt2

Conventional crushed ceramic...Cubitron™

[attachimg=1]

PSG (precision-shaped grain) ceramic...Cubitron™ II

[attachimg=2]

New modified PSG ceramic...Cubitron™ II 984FX

[attachimg=3]
 

Attachments

  • 3 Modified PSG.png
    3 Modified PSG.png
    550.7 KB · Views: 1,647
  • 2 PSG Ceramic.png
    2 PSG Ceramic.png
    432.7 KB · Views: 1,650
  • 1 Crushed Ceramic.png
    1 Crushed Ceramic.png
    441.8 KB · Views: 1,649
I've been fiddling with a Pat Warner style router sled/fence setup to make milling down precise aluminum blanks easier. Some years ago I bought Pat's PDF's, at the time he also offered one-on-one tutoring in his shop. I regret not making the trip out to meet him personally, it would have been a hoot. Now I'm stumbling through the learning process somewhat blindly.

Pat's setup used a fence that fully encapsulated the bit and a sled that rode along the fence with the material extending slightly past the sled's edge. The main idea is there is always 100% contact between the fence and sled, and the material is secured to the sled in a death grip.

[attachimg=1]

This version had its maiden run today, the edge finish left a lot to be desired, but with a couple of minutes of clean up the result was bang-on parallel.


Next up is a micro-adjuster and precision stop so I can dial in the fence offset for different bits. Any recommendations on this would be appreciated. My inclination is to have an adjustable stop that gets set so there is a 10mm offset to the bit and locked in. Then the fence is adjusted out as far as necessary for whatever rough thickness I'm starting with, moving back ~1mm for each cut until it reaches the fixed stop.

Unfortunately [thumbs up] Ophelia is preventing us from doing any yard work... guess I'll just have to spend the weekend in the shop.  [big grin]

Thanks,

RMW
 

Attachments

  • 25.jpg
    25.jpg
    113.7 KB · Views: 1,528

Attachments

  • Dirt Church 1.jpeg
    Dirt Church 1.jpeg
    24 KB · Views: 401
  • Dirt Church 4.jpg
    Dirt Church 4.jpg
    69.5 KB · Views: 399
  • Dirt Church 5.jpg
    Dirt Church 5.jpg
    63.4 KB · Views: 400
rvieceli said:
[member=44099]Cheese[/member] you’re killing me and my wallet.  [big grin]

Here’s a link to the originators and they have free shipping as well [big grin].
https://dirtchurchindustries.com/products/beveling-bit?_pos=1&_sid=58b8a69c7&_ss=r

They also have some interesting other pieces as well.

Ron

Ditto Ron, and yea Michael Trick Tools is one of those Christmas catalog sites for me too.

I've been using a cheap Ryobi 20v router that's permanently set up with a chamfer bit for both wood and aluminum but haven't gotten up the guts to try it on steel yet. Swag Offroad sells a table designed to hold one of the Chinese pneumatic chamfer tools and I've been trying to talk myself into it but my little compressor would probably croak if it tried it. Cheese's latest find is a better option.


Makes me wonder if there's a difference in carbide between bits made for metal and wood. Probably also geometry.

I do like the approach of having the cutting tool table mounted over handheld.

RMW
 
Richard/RMW said:
Makes me wonder if there's a difference in carbide between bits made for metal and wood. Probably also geometry.

Makes sense that there would be a difference, just as circular/table saw blades are similar to wood but with slightly different geometry (negative rake angle and top grind, not ATB).
 
smorgasbord said:
Makes sense that there would be a difference, just as circular/table saw blades are similar to wood but with slightly different geometry (negative rake angle and top grind, not ATB).

For metal fab vs wood fab, there's both a difference in carbide grade and carbide geometry. What's interesting here is the the same carbide grade and carbide geometry is used for both wood and metal fabrication...makes me think the metal fab is the difficult issue which means the wood fabrication then becomes a bonus round.
 
Some of the geometries for metal cutting are amazing. I'm always astounded when I fly cut steel which is a huge amount of force on the cutters doing an interrupted cut, that the inserts don't just shatter on impact!
 
luvmytoolz said:
Some of the geometries for metal cutting are amazing. I'm always astounded when I fly cut steel which is a huge amount of force on the cutters doing an interrupted cut, that the inserts don't just shatter on impact!

Ya, I'm pretty old school, I was always amazed with the results of the older fly cutters which were nothing more than a lathe tool attached to a cutting head mounted in a milling machine.

I suspect the carbide inserts for steel are focused on strength while the carbide inserts for wood are focused on sharpness.

I know that appears to be the case with lathe tool inserts, if you want dead-sharp inserts to turn steel, then choose inserts made for aluminum...but when turning steel you'll need a lot of them because the sharp aluminum inserts chip easily.  [smile]
 
rvieceli said:
[member=44099]Cheese[/member] you’re killing me and my wallet.  [big grin]

Here’s a link to the originators and they have free shipping as well [big grin].
https://dirtchurchindustries.com/products/beveling-bit?_pos=1&_sid=58b8a69c7&_ss=r

They also have some interesting other pieces as well.

Ron

I was wonder where the bump in my online traffic was coming from [smile].
   
I appreciate the orders that several of you have placed for the Beveling Bit.

This is a brand new product that I just released last week, however it has been 14 months in the making.

I won't go into the nitty gritty details of every design aspect on this cutter, however I will tell you that over a years worth of prototypes and several revisions later I have what i think is an industry first, a beveling bit that is designed to go into a wood router, and it just flat out works. 

Here are are a few specifications and tips I have learned along the way. 

I have ~18 hours of hard use deburring 3" OD, 1/8" DOM tubing and 3/16" steel plate and I have yet to rotate the 3 sided cutting teeth.  In the kit I also provide an additional replacement set of teeth.  I fully expect the average person to get ~100+ hours of cutting out of the items included with each kit. 

A 5.0 amp hour Milwaukee router will cut for ~45 minutes at 100% duty cycle under full load.   

If you have 4 battery packs and keep rotating them they go dead you will have unlimited cutting abilities, or just use a corded model if you are doing that volume of production work.

I was asked what it took to break this cutter, so I put in my ear plugs and hacked away as aggressively as I could on a sheet of 3/8" AR400, AKA the same steel plate you shoot high caliber rifles at, other than making a lot of racket it was chipping away at the plate.  I gave up after a while as it was just obnoxious and ear piercing, however the bit, nor the insets gave way.

I have used this for aluminum, steel, stainless steel, cast iron, plastic, wood and rubber.

We have everything on our website in stock, please reach out to me if you have any questions along the way.

Thank you, Troy
Dirt Church Industries
 
Dirt Church Industries said:
I have used this for aluminum, steel, stainless steel, cast iron, plastic, wood and rubber.

We have everything on our website in stock, please reach out to me if you have any questions along the way.

Thank you, Troy
Dirt Church Industries

Thanks for reaching out Troy...and  [welcome] to the FOG...this web site is different in that the members are a combination of wood workers, metal workers and then wood-metal-plastic-carbon fiber workers. Nothing's sacred here... [big grin]

I'm a retired engineer so the "nitty gritty" details don't bore me rather they energize me. I'd be happy to hear the sordid inside details as would others on this site.  [smile]  Note the previous speculations on carbide insert strength versus carbide insert sharpness.

Thanks again for reaching out.
 
Troy

Thanks so much for reaching out to us here.

IF it's possible I always try to find and buy from the folks that develop the tools. As a maker, always aware of the cost of third party distribution.

Anxiously awaiting the arrival of my order.

Ron
 
Travers Tools just sent me this crib sheet for various 3M abrasives. Keeping track of 3M Roloc discs can be confusing because the 3M Product ID is driven by the disc backing material. Thus a Roloc disc for stainless will be 777F if the backing is Scotch-Brite but will be 785C if the backing is Fibre.

The same situation exists with their abrasive belts.

And the Scotch-Brite hand pads have always been confusing because they keep adding variations but never really delete older versions. I'm glad to see they finally consolidated them down to 5 commonly used versions from 12.

FWIW...here's the Scotch-Brite pad equivalents for grit sizes.
7448...800-1000
7447...360-500
8447...320-400
7446...120-150
7440...80-150
https://f.hubspotusercontent00.net/...4_A&utm_content=288751598&utm_source=hs_email
 
[member=81198]Dirt Church Industries[/member] or others that do deburring do you use this free hand or in a router table for deburring? 
 
Back
Top